


A lot of data and matching labels are very important for training neural networks. Therefore, label tools are an essential part in the preparation of data. If the labeling works easily and quickly, the more time is saved when preparing the data and later when training the neural networks. Since the beginning of 2023 there is the Segment Anything Model (SAM) published as OpenSource by META. This change offers the potential to realize labeling tools that can quickly provide completely unknown or new objects with labels. Solutions like the AnyLabeling presented here in my article which is combined with a YOLO neural network offer the potential to set labels faster. Therefore I am looking forward to try this tool.

AnyLabeling – screen
Installation preparation
To be able to test and try out AnyLabeling, I installed it on a freshly installed Ubuntu 22.04 computer with an NVIDIA A6000. The computer has a powerful AMD CPU and 64 GB main memory. In the following I will install a few tools that are needed to install and run AnyLabeling.
CUDA – installation
First, I installed CUDA from NVIDIA to make the best use of the GPU of the graphics card. I followed the NVIDIA instructions as described by NVIDIA in the following link.
Then I installed a few more tools that are needed to set up the virtual environment, for example.
Command: sudo apt install -y python3-pip
Command: pip3 install --upgrade pip
Set up virtual environment
So that everything can be installed cleanly and a separation from other installations can be made here I have set up a virtual environment with the name AnyLabeling. I have explained the exact procedure below.
Command: pip3 install virtualenv
Command: python3 -m virtualenv -p python3 AnyLabeling --system-site-packages
Command: source AnyLabeling/bin/activate
In case AnyLabeling is used frequently, it is better to start the virtual environment automatically as soon as a terminal window is opened. To do this, please execute the following command.
Command: echo "source ~AnyLabeling/bin/activate" >> ~/.bashrc
Command: source ~/.bashrc
AnyLabeling installation
Since I have several installations of different applications installed on the computer, I always use CONDA to create virtual environments in which I then try out a new tool. This is also how I proceeded here for my test of AnyLabeling. I followed the instructions or the description of the installation of AnyLabeling as described at the following URL.
URL: https://github.com/vietanhdev/anylabeling
Now it is important that you are in the active AnyLabling virtual environment and install AnyLabling there now.
The following command installs AnyLabeling with GPU support.
Command: pip install anylabeling-gpu
The following command installs AnyLabeling with CPU support.
Command: pip install anylabeling
The installation of the GPU version was installed after a few minutes. There was quite a bit of data downloaded and the installation time then probably depends more on the speed of the Internet connection and less on the computer.

AnyLabeling – installation terminal
After successful installation, AnyLabeling is started in the active virtual environment via the following command.
Command: anylabeling
After you have executed the command in the terminal window, AnyLabeling starts. The interface of AnyLabeling looks like this and is quite clearly arranged.

AnyLabeling – start screen
AnyLabeling – Overview
Now I would like to give a short introduction to the program AnyLabeling. There is not much to explain here, because everything is really quite easy to use. The menu at the top is quite extensive from its offered functions.
- Open images
- Image forward
- Back image
- save label
- delete current label
- Draw polygon
- Draw Recheck (Bonding Box)
- draw a circle
- draw a line
- Draw points
Draw a line with several points - Adjust lines / polygons
- delete current polygon selection
- Undo selection
- Zoom
- Zoom pastes to the window size
- Auto Labeling (e.g. Segment Anything support)

AnyLabeling – Menu oveview
On the right side of the image you can see the labels and the objects that have been provided with labels as well as the paths to the individual images. With this, the program is already explained and you can start to provide your images with the labels as you want.
Video – AnyLabeling
The following video shows how AnyLabeling works and what it can do. It is very nice to see the different modes and how fast the labeling of complex objects in images works.

AnyLabeling v0.2.22 Segment Anything Demo
Summary
I liked the AnyLabeling solution for labeling images. It is nothing totally new or that reduces the time for labeling in contrast to other solutions. The labeling of images is and remains a manual effort that requires manual optimizations of the bounding box even with this solution. The more precisely the bounding boxes or polygons are to be set, the more time must be invested. I clearly see the potential of integrating Segment Anything from META but since you always want to label certain information in an image like a plant species or other objects like a pair of scissors, the integration of SegmentAnything doesn’t offer that big of an advantage. This becomes more interesting when you have many identical objects like rice grains of a certain kind and you want to set labels depending on the size of the grains. Then SegmentAnything could bring in its advantages optimally.


The tutorial offers a clear and practical guide for setting up and running the Tensorflow Object Detection Training Suite. Could…
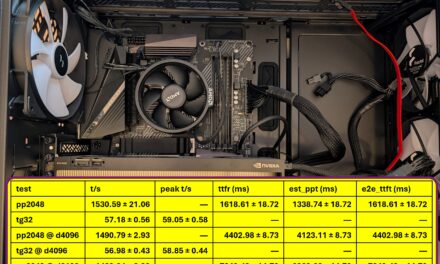
This works using an very old laptop with old GPU >>> print(torch.cuda.is_available()) True >>> print(torch.version.cuda) 12.6 >>> print(torch.cuda.device_count()) 1 >>>…
Hello Valentin, I will not share anything related to my work on detecting mines or UXO's. Best regards, Maker
Hello, We are a group of students at ESILV working on a project that aim to prove the availability of…