


With this article I would like to help you to run locally under Ubuntu 22.04 Llama 2 in the 70B version on a NVIDIA A6000. Of course this is not easy because the classic Llama 2 70B model needs a GPU memory of about 280GB in the Float32 bit version. But if you quantize the model to INT4 bit then it fits into the memory of the NVIDIA A6000 with its 48GB GPU Ram. The model then occupies about 40GB of ram and runs at a decent speed.
I followed the video tutorial by James Briggs on YouTube which explains very well how to get the model running. However, this tutorial lacks the setup of the environment under Ubuntu where everything is set up. This is where I had my minor challenges until everything was up and running. Therefore my tutorial starts with setting up the runtime environment. After that everything works without problems.
Here is the link to the YouTube video of James Briggs: Llama 2 in LangChain — FIRST Open Source Conversational Agent!
Hardware Note: In order to set up the Llama 2 70B model on your computer as described in this guide, you will need approximately 200GB of free memory and a video card with 48GB of video RAM / GPU RAM.
Set up runtime environment:
First I created a conda environment with the name Llama_2_70B and Python 3.10.9. In this environment I had the problem that I got error messages concerning CUDA again and again. So I installed CUDA in the active conda environment Llama_2_70B.
Command: conda create -n Llama_2_70B python=3.10.9
Command: conda activate Llama_2_70B
CUDA installation:
When installing CUDA, I followed the instructions linked below and simply copy & pasted the commands one by one.
Link: CUDA Installation-Guide
Subsequently, after the CUDA was installed I still had to install click. A reboot I had now still executed after the CUDA installation my computer had prompted me to do so.
Command: conda install -c conda-forge click
Then after my computer was booted again and I was logged into the active conda environment Llama_2_70B in the terminal window I installed Jupyter in. Jupyter is needed to run the Jypyter notebook that James Briggs has put online.
Command: pip install jupyter
Here is the link to the Jupyter notebook you need.
Jupyter Notebook: llama-2-70b-chat-agent.ipynb
Now everything is set up and Jupyter can be started with the following command. Before you execute the command, change to the folder where you have placed the notebook before. Then you will see it immediately and can execute it.
Command: jupyter notebook
Remember that when you run the Jupyter Notebook you will need a Hugging Face token to download the Llama 2 model. This is only possible if you have accepted the license agreement from META and used the same email address for the registration at META that you also use at Hugging Face. Then you can download the Llama 2 70B model.
For me the download of the model in the notebook looked like shown in the following picture.

Downloading llama 2 hugging face
If you now search for the location of the downloaded Llama 2 model then you will find the model in the folder .cache in your home directory under the following path.
Path: ~/.cache/huggingface/hub/models--meta-llama--Llama-2-70b-chat-hf/blobs

Hugging Face HUB cache folder
Note: If you restart the virtual Conda environment or the computer and run the notebook again, the Llama 2 model will not be downloaded again. Because it is already in the .cache folder on your computer and is loaded from there back into the memory of the GPU.
From now on, it’s best to follow James Briggs’ video, which you can access via the following link: Llama 2 in LangChain — FIRST Open Source Conversational Agent!
Video – Llama 2 70B lokal
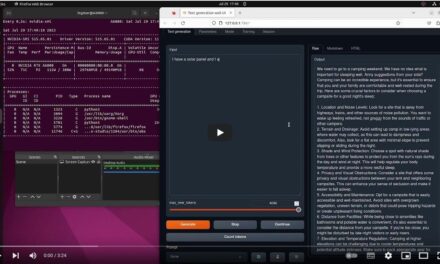
Here is the small video of me showing my computer and the slightly customized notebook. In the video you can see the performance of the model on my computer. I show the start time and the end time as well as the runtime the model needed to generate the answer.

Llama 2 70B Model local runtime
Summary
I am thrilled with how well everything worked and how easy everything was after I configured the runtime environment correctly. It took me most of the time to set up the runtime environment. Because I had a somewhat lengthy error message which was only eliminated when I had installed the appropriate CUDA version in the Conda environment. After everything was set up I had fun with LangChain, Hugging Face and the Llama 2 70B model. It is really impressive how well everything works and especially how easy it is. It’s also nice that I don’t have to download the Llama 2 model again after a reboot. So it only takes a few minutes until everything is loaded into the GPU’s memory.


The tutorial offers a clear and practical guide for setting up and running the Tensorflow Object Detection Training Suite. Could…
This works using an very old laptop with old GPU >>> print(torch.cuda.is_available()) True >>> print(torch.version.cuda) 12.6 >>> print(torch.cuda.device_count()) 1 >>>…
Hello Valentin, I will not share anything related to my work on detecting mines or UXO's. Best regards, Maker
Hello, We are a group of students at ESILV working on a project that aim to prove the availability of…