


After you have already worked through the introduction to the topic of which hardware do I need and which systems are available ready-built, it is now time to move on to the topic of software installation. Before the three essential No-Code AI Pipeline modules can be installed, the Ubuntu operating system must be prepared for it. All necessary software packages and their installation is explained step by step in this article. All you need to do is to execute the commands in their order as described. At the end of this article all necessary components are installed and the AI Pipeline can be installed.
This tutorial now describes step by step how to install the necessary software that is a prerequisite for the installation of the No-Code AI Pipeline of the BMW Group on your Ubuntu computer. I assume for this tutorial that a current NVIDIA GPU is present in your system. However, this is not a mandatory requirement and I will point out if necessary how the installation of the CPU version would proceed. The goal of this installation guide is also to allow multiple users to access and use the AI Pipeline modules remotely over the internal network. The users can thus access the individual modules via their web interfaces in the Chrome browser and thus use the No-Code AI Pipeline via the intranet or private network.
Also in a small subchapter it is described which tools the future administrator of the AI Pipeline can use to remotely maintain the installed Linux computer from e.g. Windows.
Note: Time required
The time needed for the software installation in this article depends somewhat on how much experience the individual already has with Ubuntu and how fast the Internet connection is.
From my experience it takes about 30 minutes with a 25 Mbit internet connection.
During the installation you don’t have to watch the progress bar the whole time and you can use the time for a cup of coffee 😉
Modification history:
The post was updated on 11/08/2022. The use of CUDA 11.7 was tested extensively and the article was supplemented.
Ubuntu – Preparation for installation
The basis to start with is a freshly installed Ubuntu 18.04 or 20.04 operating system on the machine / server on which the AI Pipeline is to be set up.
Note: Ubuntu version
Please use only Ubuntu 20.04 or version 18.04 for the installation of the No-Code AI Pipeline otherwise the NVIDIA Docker version will cause a problem later in the installation process!
This installation guide was written with Ubuntu version 20.04.
Update Ubuntu System
Before a few small tools and larger software packages can be installed, the Ubuntu system must be brought up to date. With the following command the internal software management of Ubuntu is updated first. This allows Ubuntu to determine whether there are, for example, more current software versions in the connected and thus known repositories than already installed.
Command: sudo apt-get update
If the internal software management has been updated, the updates can be installed with the following command. Thus the system is afterwards on the newest conditions and clearly more surely than if old versions of the programs for longer time without an update are installed.
Command: sudo apt-get upgrade
The two previous commands should be executed regularly to keep the Ubuntu installation up to date and to make it less easy for possible attackers to find vulnerabilities that could be exploited.
Good2Have – Install linux tools
Now follows the installation of a few tools that make the work under Linux easier and that are needed to be able to install the AI pipeline at all.
This includes the installation of the Git client. This is needed to access the repositories of the Tech-Office Munich, i.e. the Labelingtool Lite and Training Suite from Linux and to download them for the installation.
Command: sudo apt install git -y
CURL is required to be able to download one or the other file or configuration from the Internet later. Therefore this tool is also installed.
Command: sudo apt install curl -y
It is often the case that you are not sitting locally in front of the computer on which the AI Pipeline was installed all the time. Therefore it is good to be able to log in remotely to the terminal of the Linux computer. To make this possible the Open-SSH-Server has to be installed.
If the Linux computer is to be accessed remotely via the intranet using an SSH connection, then the Open SSH Server must be installed.
Command: sudo apt install openssh-server -y
For those who are not yet familiar with the terminal window and the many commands that can be executed there, I always recommend to install the Midnight Commander. The installation of the Midnight Commander is therefore interesting for all those who want to use a kind of graphical interface in the terminal window to copy, delete or edit files.
I always recommend to install the Midnight Commander (MC) at the beginning of every project.
Very helpful is also the following web page which explains e.g. the most important function keys of the MC.
URL: https://wiki.ubuntuusers.de/Midnight_Commander/
The following command installs Midnight Commander.
Command: sudo apt install mc -y
The Midnight Commander is executed in the terminal window with the following command.
Command: mc
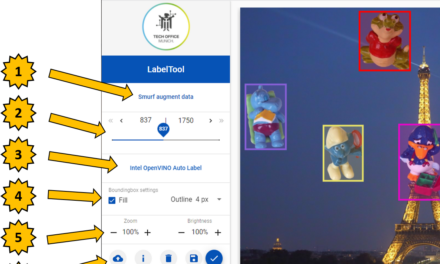
The Midnight Commander looks like shown in the following picture. Very nice to see is the division into a left and a right side. Between these two sides and thus behind it lying paths can be copied comfortably e.g. files back and forth.

No Code AI Pipeline Midnight Commander
With the F-keys on your keyboard you can call up the most important commands of the Midnight Commander. The small overview should help you to master the entrance into the operation of the MC more easily.
- F4: Opens the selected file, e.g. in Text Editor Nano.
- F5: Copies a file or folder selected in the left window to the path opened in the right window.
- F6: Moves a file or folder selected e.g. in the left window to the path opened in the right window.
- F7: Creates a new folder.
- F8: Deletes the file or folder that is currently selected.
- F10: quits the Midnight Commander
Now you are familiar with the MC and the Net-Tools have to be installed. These are required to briefly query the IP address or MAC address of the computer in the network via the console.
Command: sudo apt install net-tools -y
Later in this installation guide the compiler suite GCC will be needed and therefore it will be installed right at the beginning.
Command: sudo apt install gcc -y
Google Chrome is needed to be able to open and use the training environment later without problems. This means that the AI Pipeline modules can only be used with the Chrome browser. It doesn’t matter if you are sitting directly at the Linux computer or if you call the AI Pipeline in the Chrome Browser from a Windows computer over the network.
Note: Copying commands
When copying commands that span multiple lines, as shown below, formatting errors may occur when copying the respective command. If the command extends over two lines, it can happen that a line break is copied along with the command. This line break leads to an error when inserting the command into the terminal window and later executing the command. Please make sure that such errors caused by the formatting are recognized and corrected by you when copying and pasting in the terminal window.
Now copy the following command to download the installation file of Chrome.
Command: wget https://dl.google.com/linux/direct/google-chrome-stable_current_amd64.deb
Use the following command to install Google Chrome on your Linux machine.
Command: sudo apt install ./google-chrome-stable_current_amd64.deb
From now on you should be able to run Google Chrome on your computer. If all this has worked so far, now comes the installation of the CUDA 11 drivers for your NVIDIA graphics card.
CUDA 11.2 installation
For the Training Suite to work without problems, CUDA version 11.2 or newer must be installed. Older versions should theoretically work but for the current NVIDIA graphics cards like the RTX 3090 or the RTX A6000 CUDA 11 is required.
The following link leads to the archive of available CUDA versions.
URL: https://developer.nvidia.com/cuda-toolkit-archive
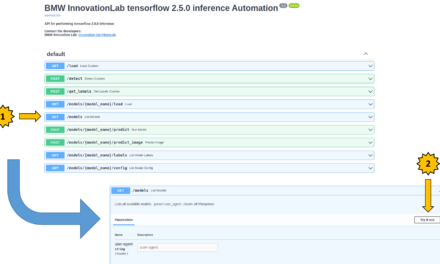
The following URL provides a direct jump to the CUDA version for Ubuntu required for the installation of the Training Suite.
The selection made on the NVIDIA page should then look like the image below.
Hint:
For me, the installation worked best when I selected the deb (local) option. Then I had the fewest problems with downloads etc. with a large number of installations.

No Code AI Pipeline NVIDIA CUDA 11.7.0 selection
For the installation, the commands shown in the picture above must be executed one after the other in the terminal window. When copying the commands, please make sure that they are copied completely and that a few characters are not cut off at the end.
After the successful installation of the CUDA 11.x drivers please restart the computer once. This works e.g. with the following command from the terminal window.
Command: reboot
After the computer has rebooted, continue with the following command. Execute this now and you should see the NVIDA console output with some information about your graphics card. If you see this, it is a confirmation that CUDA support has been installed correctly and the graphics card, or if there are more than one, has been detected.
Command: nvidia-smi
The output should look like the image below and the CUDA version you see may differ from the one shown in the image.
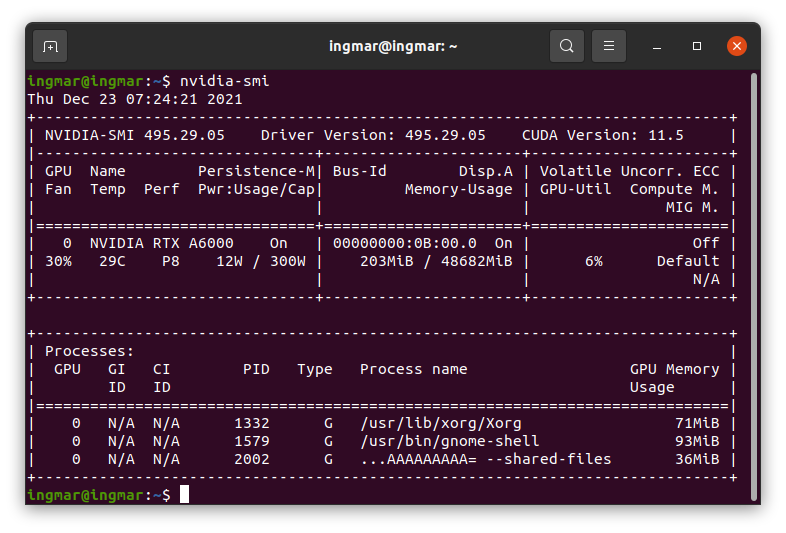
No Code AI Pipeline NVIDIA SMI output
In the following section, we will now continue with the installation of Docker.
Install Docker
Since Labeltool Lite and the Training Suite run in Docker containers, Docker still needs to be installed. Docker is installed with the following command.
Command: sudo apt install docker.io
Now Docker should be installed. You can test exactly which version is installed and if everything worked with the following command now. When you run this command, the version number of the installed Docker environment should be displayed.
Command: docker –version
The Docker version display in the terminal window should look like the image below.
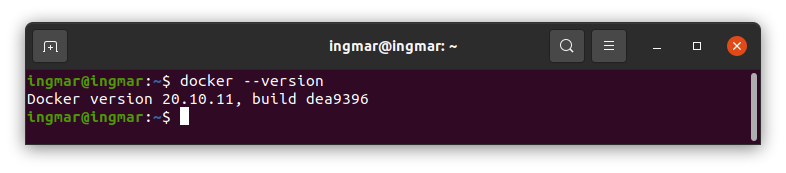
No Code AI Pipeline docker version
After the successful installation of Docker, Docker Compose must now be installed.
Install Docker Compose
In addition to Docker, Docker Compose must also be installed. The following command installs Docker Compose on your machine.
Command: sudo apt install docker-compose
The following command can be used to display the freshly installed version of Docker Compose.
Command: docker-compose –version
The Docker Compose version display in the terminal window should look like the image below.

No Code AI Pipeline docker compose version
Network file sharing with SAMBA (optional)
So that you can easily access the files of your Ubuntu computer from e.g. Windows and later on the training data for backups, quality assurance etc. it is advisable to install SAMBA for file sharing in the network. You install the SAMBA server with the following command.
Command: sudo apt-get install samba -y
After SAMBA is installed you have to modify the file smb.conf in the folder /etc/samba. To do this, open it in the text editor Nano with the following command.
Command: sudo nano /etc/samba/smb.conf
At the very end of the file, add the following lines. With this small adjustment, you share the /home/ folder of your Ubuntu machine on the network.
[Training-Data]
comment = Samba on Ubuntu
path = /home/
read only = no
browsable = yes
In order for the access to work without problems, a small configuration must be made on the Samba server. The Samba server does not use the password of the user created in the system. Therefore, you must assign a password for the Samba server to the user you have created under Ubuntu. Only then you can access the share in the network from e.g. Windows without any problems.
Execute the following command to add a password for the Samba service to the Samba configuration of the user you already have in the system.
Command: sudo smbpasswd -a username
Now you can restart the Samba service with the following command and access the file share under Ubuntu from a Windows computer, for example.
Command: sudo service smbd restart
Windows – Helpers
Often it will be the case that the Linux computer on which the AI Pipeline was installed is in its own room or data center and not always someone sits in front of the computer. Also with the home office and remote working it makes sense to understand how the computer can be maintained remotely.
I would like to introduce a few small helpers below that have already saved me a lot of time and effort in the administration of my remote servers that I run privately.
PuTTY – remote Terminal Tool
From Windows, Putty can be used to access the Linux computer remotely over the network very comfortably. Putty provides a terminal window via an SSH connection, through which the system can be administered completely as if you were sitting in front of it.
Putty can be downloaded from the following website.
Once PuttY is installed, the interface looks like the following picture.
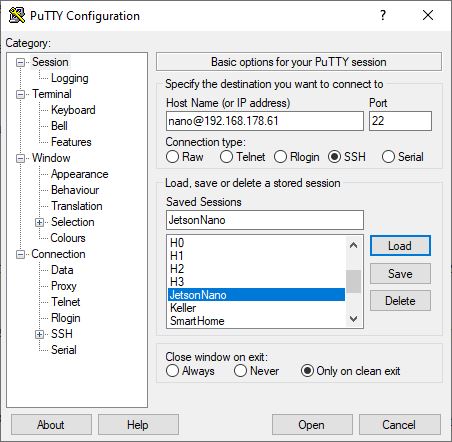
PuTTY
WinSCP – remote File Transfer
With the small helper WinSCP, the file system of the Ubuntu computer can be accessed very easily from Windows, for example. So it is then possible to exchange files between the two systems via an SSH connection. This procedure allows them to quickly transfer a few images or just change a configuration file or backup.
WinSCP can be downloaded from the following website.
URL: https://winscp.net/eng/downloads.php
Once WinSCP is installed, the interface looks like the following picture.
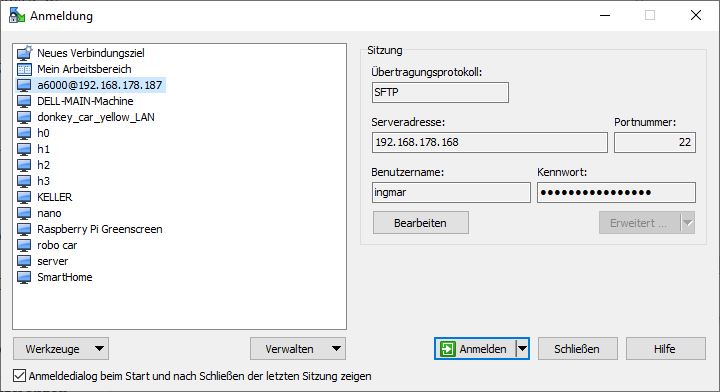
WinSCP
Summary and space requirements
With the completion of this section of the installation instructions, the essential prerequisites for setting up the No-Code AI pipeline have been met. The system is up to date and if an NVIDIA GPU is installed, it can be used for training neural networks from now on.
The space requirement on the system drive for the additionally installed software measured up to here amounts to approx. 11.2 GB.
| Initial occupied memory | Currently used memory | Consumed memory |
| 8,4 GB | 19,6 GB | 11,2 GB |
Article Overview - How to set up the AI pipeline:
AI Pipeline - Introduction of the tutorialAI Pipeline - An Overview
AI Pipeline - The Three Components
AI Pipeline - Hardware Basics
AI Pipeline - Hardware Example Configurations
AI Pipeline - Software Installation of the No-Code AI Pipeline
AI Pipeline - Labeltool Lite - Installation
AI Pipeline - Labeltool Lite - Preparation
AI Pipeline - Labeltool Lite - Handling
AI Pipeline - Tensorflow Object Detection Training-GUI - Installation
AI Pipeline - Tensorflow Object Detection Training GUI - Run
AI Pipeline - Tensorflow Object Detection Training GUI - Usage
AI Pipeline - Tensorflow Object Detection Training GUI - SWAGGER API testing the neural network
AI Pipeline - AI Pipeline Image App Setup and Operation Part 1-2
AI Pipeline - AI Pipeline Image App Setup and Operation Part 2-2
AI Pipeline - Training Data Download
AI Pipeline - Anonymization-Api


The tutorial offers a clear and practical guide for setting up and running the Tensorflow Object Detection Training Suite. Could…
This works using an very old laptop with old GPU >>> print(torch.cuda.is_available()) True >>> print(torch.version.cuda) 12.6 >>> print(torch.cuda.device_count()) 1 >>>…
Hello Valentin, I will not share anything related to my work on detecting mines or UXO's. Best regards, Maker
Hello, We are a group of students at ESILV working on a project that aim to prove the availability of…