


I most often use Ubuntu as my operating system when it comes to trying out new developments in the field of generative AI such as stable diffusion applications or in the area of large language models (LLM). I benefit from the fact that I have an NVIDIA A6000 graphics card installed in my computer which, with its 48GB of video RAM, offers enough space to load such models.
That’s why I keep reinstalling Ubuntu and the necessary drivers from NVIDIA for the graphics card. This way I always have everything up to date and can test everything properly and report here on my blog how everything works and interacts. Hence this extra post, which only deals with how to install the latest CUDA drivers under Ubuntu.
Note: This article was written on 01.01.2024 and uses the following versions:
| Software: | Version: |
| Ubuntu OS | 22.04.3 LTS |
| NVIDIA driver Metapackage | nvidia-driver-535 |
| CUDA | 12.3.1 |
Ubuntu Operating system
After installing the operating system and installing all updates, I always install small helpers that I like to use when I access the system remotely via an SSH client. Below are the commands including the programming that I always install.
Command: sudo apt-get install mc -y
Command: sudo apt-get install openssh-server -y
Command: sudo apt install curl -y
NVIDIA Driver
The NVIDIA drivers were already installed by the Ubuntu installation routine at the beginning. In the installation menu at the beginning of the Ubuntu installation, I had selected that third-party drivers should also be installed.

NVIDIA Grafikkarten Treiber
CUDA installation
It is always worth checking which software requires CUDA and which version should be used before starting the CUDA installation. This is because the latest CUDA version does not always work with the software you are planning to install.
Here is the link to the CUDA archive at NVIDIA so that you can also install later versions. In the overview you can then select which version you want to use.
URL: Deb Network Archive
The following picture shows the selection I made when I wrote this post.

CUDA driver selection
This link leads to the exact selection of the CUDA driver I have installed: CUDA
After successful installation, it is best to restart your system once. Then run the following command to see if the drivers have been installed and the graphics card now has CUDA support.
Command: nvidia-smi
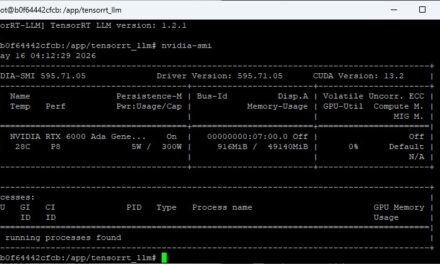
If everything is working correctly, you should now see a screen like the one below. There you can see your graphics card and the installed CUDA version.

NVIDIA SMI Screen
Note: The interesting thing is that despite trying to install the CUDA driver version 12.3.1, the NVIDIA SMI command shows version 12.2. I cannot explain how this could happen.
Summary
If you have a freshly installed Ubuntu operating system, the NVIDIA CUDA installation is no big deal. Simply go through the individual steps as described by me and everything is installed. Now you can set up ComfyUI, Automatic1111 or other programs that require CUDA support.


The tutorial offers a clear and practical guide for setting up and running the Tensorflow Object Detection Training Suite. Could…
This works using an very old laptop with old GPU >>> print(torch.cuda.is_available()) True >>> print(torch.version.cuda) 12.6 >>> print(torch.cuda.device_count()) 1 >>>…
Hello Valentin, I will not share anything related to my work on detecting mines or UXO's. Best regards, Maker
Hello, We are a group of students at ESILV working on a project that aim to prove the availability of…