


In the previous chapter, you learned about the SWAGGER API, which can be used to test the neural network. Since the operation via the SWAGGER interface is not ideal and the REST API calls are suitable for writing your own application, a colleague of mine has written the AI Pipeline Image App. The AI Pipeline Image App simplifies the use of the REST API interface of the Training Suite and offers some additional features to simplify the work with the returned neural network results. The small web application has been written with the goal that it provides the basis for further custom developments and thus lowers the hurdle to develop your own web application that uses the Training Suite’s own API interface.
The AI Pipeline Image App is a NodeJS web application that encapsulates the complexity of using the REST API interface of the Training Suite and makes it much easier for the user. It is no longer necessary to work directly with the SWAGGER API interface, but all important functions are offered directly as menu items in the AI Pipeline Image App (AIPIA). In this way, images can be sent to the REST API interface of the Training Suite for analysis by the already trained neural network very easily and, above all, quickly without any special IT experience. The result, i.e. the prediction whether a piece of information is present in the image or not, is displayed directly in AIIA. The results of the prediction can also be downloaded directly as a CSV file. This was a request of several departments that wanted to process the data afterwards.
Note: Time required
The time required to install the AI Pipeline Image App as described below is approximately 25 minutes. Most of this time is spent installing software, plus a few minutes to adjust the IP address in several configuration files.
Configuration and installation of the AI Pipeline Image App
In order to install the AI Pipeline Image App, a few modules have to be installed first. Just execute the following commands one after the other in the terminal window. The packages that are now installed may be a little more generous than necessary, but this tutorial is about how everything works in the end and not about how optimized everything is for the individual.
Please install the following packages one after the other.
Command: sudo apt install npm -y
Command: sudo apt install python3-pip -y
Command: pip install Flask
Command: pip install Flask-SQLAlchemy
Command: pip install flask-restful
Command: pip install flask-cors
Command: pip install python-Levenshtein
It has been shown that in order to install the AI Pipeline Image App without problems, NodeJS version 14.0x must be installed on Ubuntu 20.04 at the time this guide was written. The installation of NodeJS version 14.x is done with the following commands.
Command: curl -sL https://deb.nodesource.com/setup_14.x | sudo bash –
Command: sudo apt -y install nodejs
Command: sudo apt –fix-broken install
Command: sudo apt -y install nodejs
Command: node -v
After all packages have been installed, the first thing to do is to download the AI Pipeline Image App from GitHub.
Note: Status AI Pipeline Image App
Currently, the AI Pipeline Image App is still under development and thus could not yet meet the quality requirements of BMW’s TechOffice Munich and be published in the TechOffice Munich GitHub repository. Therefore, the app is available in its current state in my private repository until further notice. Improvements and suggestions for this web application are of course very welcome.
The following command downloads the AI Pipeline Image App from GitHub.
Command: git clone https://github.com/custom-build-robots/AI-Pipeline-Image-App.git
After downloading the application from GitHub, it needs to be installed. This is done with the following three commands.
Command: cd AI-Pipeline-Image-App
Command: cd app
Command: npm install
Configuration of the AI Pipeline Image App
In order for the AI Pipeline Image App to work, a few small adjustments have to be made. Primarily it is about the IP address of the computer in the APP itself to be used for communication with the AI Pipeline Image App.
First of all the server of the AI Pipeline Image App has to be adjusted. Please open the testAPI.py file once.
The file can be found in the following path of the AI Pipeline Image App.
Path: ~/AI-Pipeline-Imge-App/server/testAPI.py
Open the file in a test editor and replace the IP address with the IP address of your own computer on which the REST API of the Training Suite is accessible. At the very end, the IP address of the AI Pipeline Image App itself is entered for communication within the AI Pipeline Image App.
In the following figure you can see two places where the IP address has to be replaced by the IP address of your own server. Please do not change the port here but leave it as it is. In total, the IP addresses have to be changed in four places.
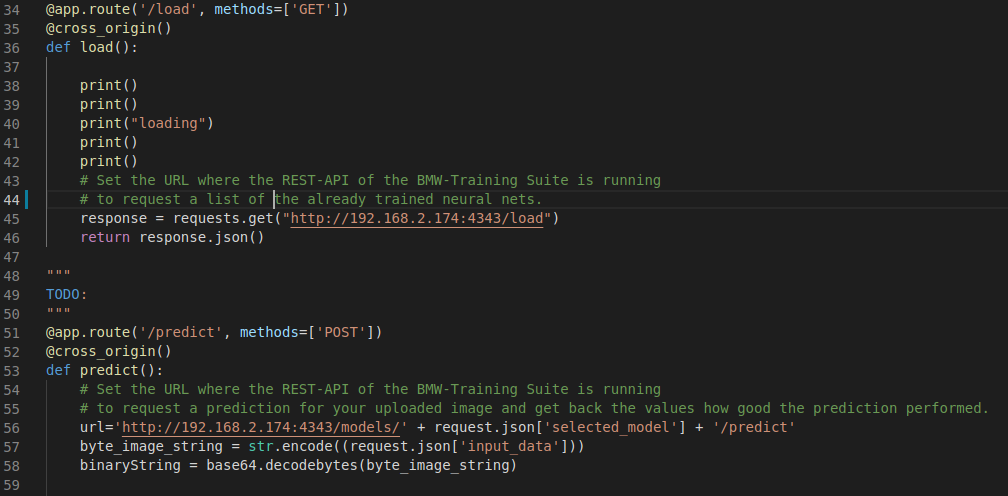
No Code AI Pipeline – Image App IP adress setup
After the IP addresses have been adjusted in the testAPI.py file, the IP address of the AI Pipeline Image App server must be stored in the web app itself.
Please open the file in the following path of the AI Pipeline Image App.
Path: ~/AI-Pipeline-Imge-App/app/src/app/services/api.service.ts
In the api.service.ts file, the IP address of the AI Pipeline Image App Server must be entered at exactly one place in the file.
In the following figure you can see the place where the IP address has to be adjusted. If the port in the testAPI.py file has been adjusted then the port must also be adjusted here so that the ends fit together again.

No Code AI Pipeline – Image App IP adress setup service.ts
Now everything should be prepared so far that a proper communication between Training Suite and AI Pipeline Image App as well as within the AI Pipeline Image App itself is ensured.
In the next section, we will now describe how the startup process of the individual components should proceed.
Running the AI Pipeline Image App
After the AI Pipeline Image App has been successfully installed, it can be executed. Please pay attention to the following information box.
Note: Start Training Suite
For the AI Pipeline Image App to work at all, the Training Suite must be started and running in the background. This is because the AI Pipeline Image App relies on the REST API interface of the Training Suite. Otherwise there will be an error because the communication with the REST API of the Training Suite does not work.
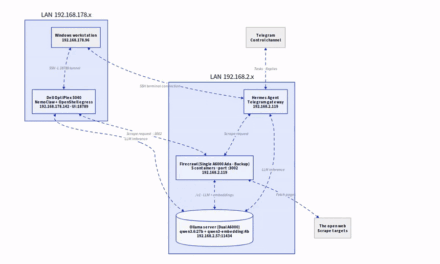
After the Training Suite has been started, the Python server of the AI Pipeline Image App (AIPIA) must be started first. This takes over the communication with the Training Suite, its REST API interface and the communication with the web application AIPIA.
The following graphic shows the flow of communication between the individual services / programs of the AI Pipeline Image App.
<Image still to be created>
Now please change to the following path in an extra terminal window.
Path: ~/AI-Pipeline-Image-App/server
Within this path now execute the following command to start the AI Pipeline Image App server.
Command: python3 testApi.py
Only now the web app, i.e. the AI Pipeline Image App, can be started. The following command starts the AI Pipeline Image App which relies on the previously started Python server for the communication with the Training Suite’s own REST API interface.
Please change now in an extra terminal window to the following path.
Path: ~/AI-Pipeline-Image-App/app
Within this path now execute the following command to start the Web App i.e. the AI Pipeline Image App.
Command: npm start
Jetzt ist die AI Pipeline Image App gestartet und kann über die IP Adresse des Rechners gefolgt vom Port <IP Adresse>:<Port> geöffnet werden.
Example URL: 192.168.2.174:5010
In the browser (please always use the Chrome browser) the AI Pipeline Image App is now visible and should look like shown in the following picture. The application still looks empty because you have to select a few parameters in the app first.

No Code AI Pipeline – Image App initial load screen
The next post will explain how to use the AI Pipeline Image App.
Article Overview - How to set up the AI pipeline:
AI Pipeline - Introduction of the tutorialAI Pipeline - An Overview
AI Pipeline - The Three Components
AI Pipeline - Hardware Basics
AI Pipeline - Hardware Example Configurations
AI Pipeline - Software Installation of the No-Code AI Pipeline
AI Pipeline - Labeltool Lite - Installation
AI Pipeline - Labeltool Lite - Preparation
AI Pipeline - Labeltool Lite - Handling
AI Pipeline - Tensorflow Object Detection Training-GUI - Installation
AI Pipeline - Tensorflow Object Detection Training GUI - Run
AI Pipeline - Tensorflow Object Detection Training GUI - Usage
AI Pipeline - Tensorflow Object Detection Training GUI - SWAGGER API testing the neural network
AI Pipeline - AI Pipeline Image App Setup and Operation Part 1-2
AI Pipeline - AI Pipeline Image App Setup and Operation Part 2-2
AI Pipeline - Training Data Download
AI Pipeline - Anonymization-Api


The tutorial offers a clear and practical guide for setting up and running the Tensorflow Object Detection Training Suite. Could…
This works using an very old laptop with old GPU >>> print(torch.cuda.is_available()) True >>> print(torch.version.cuda) 12.6 >>> print(torch.cuda.device_count()) 1 >>>…
Hello Valentin, I will not share anything related to my work on detecting mines or UXO's. Best regards, Maker
Hello, We are a group of students at ESILV working on a project that aim to prove the availability of…