


In the previous article you have configured and installed the Training Suite on your computer. In the following article, we will explain how to use the Training Suite. The goal is to train a neural network with your own images that were previously labeled in the Labeltool Lite. In case you are worried that this manual is going to be very technical, you are wrong and I can assure you that the basic settings do a lot of parameterization for you in the background. During the development of the Training Suite it was important to the BMW colleagues that the core of the No-Code AI Pipeline is very easy to use with the goal to keep the complexity away from the user.
But now we want to create the first training of a neural network. To do this, the Training Suite must be started if this has not already happened. Below are the commands from the previous article on how to start the Training Suite manually. But I would always recommend to activate the autostart function.
Start GPU version
Command: sudo docker-compose -f run_gpu.yml up
Start CPU version
Command: sudo docker-compose -f run_cpu.yml up
After the Docker containers are started, the Training Suite is accessible via the <IP address>:<4200>. Please remember to always use the Chrome browser to avoid problems.
ExampleURL: 192.168.2.174:4200
Introduction – Web interface
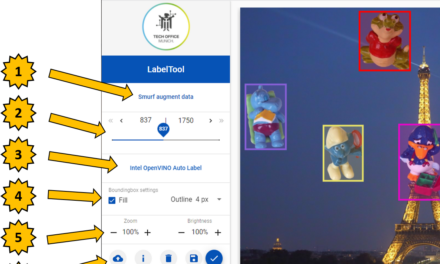
After opening the web interface of the Training Suite, a large red button with an arrow should appear in the browser as shown in the following figure in the left part of the image.
- Now click on the big red button with arrow to load the next screen and the “+” button to create a new project will appear.
- Then press the button with the + symbol to create a new training project.

No Code AI Pipeline Training Suite new job
After clicking on the + button to create a new project, the user interface of the Training Suite should appear as shown in the following figure at the top left.
Now three screens follow in which a few parameters have to be set. Afterwards the training of the neural network starts in the Training Suite.
- This screen shows the web interface view of a still empty training project.
- Please select in the drop down box “Dataset Folder” the training data that should be used for the training of the neural network. This is the folder with your images plus the labels.
- In the drop down box “Label Types” select the format JSON as this is the format in which the labels were saved in the Labeltool Lite.
- Now click on the Next button.
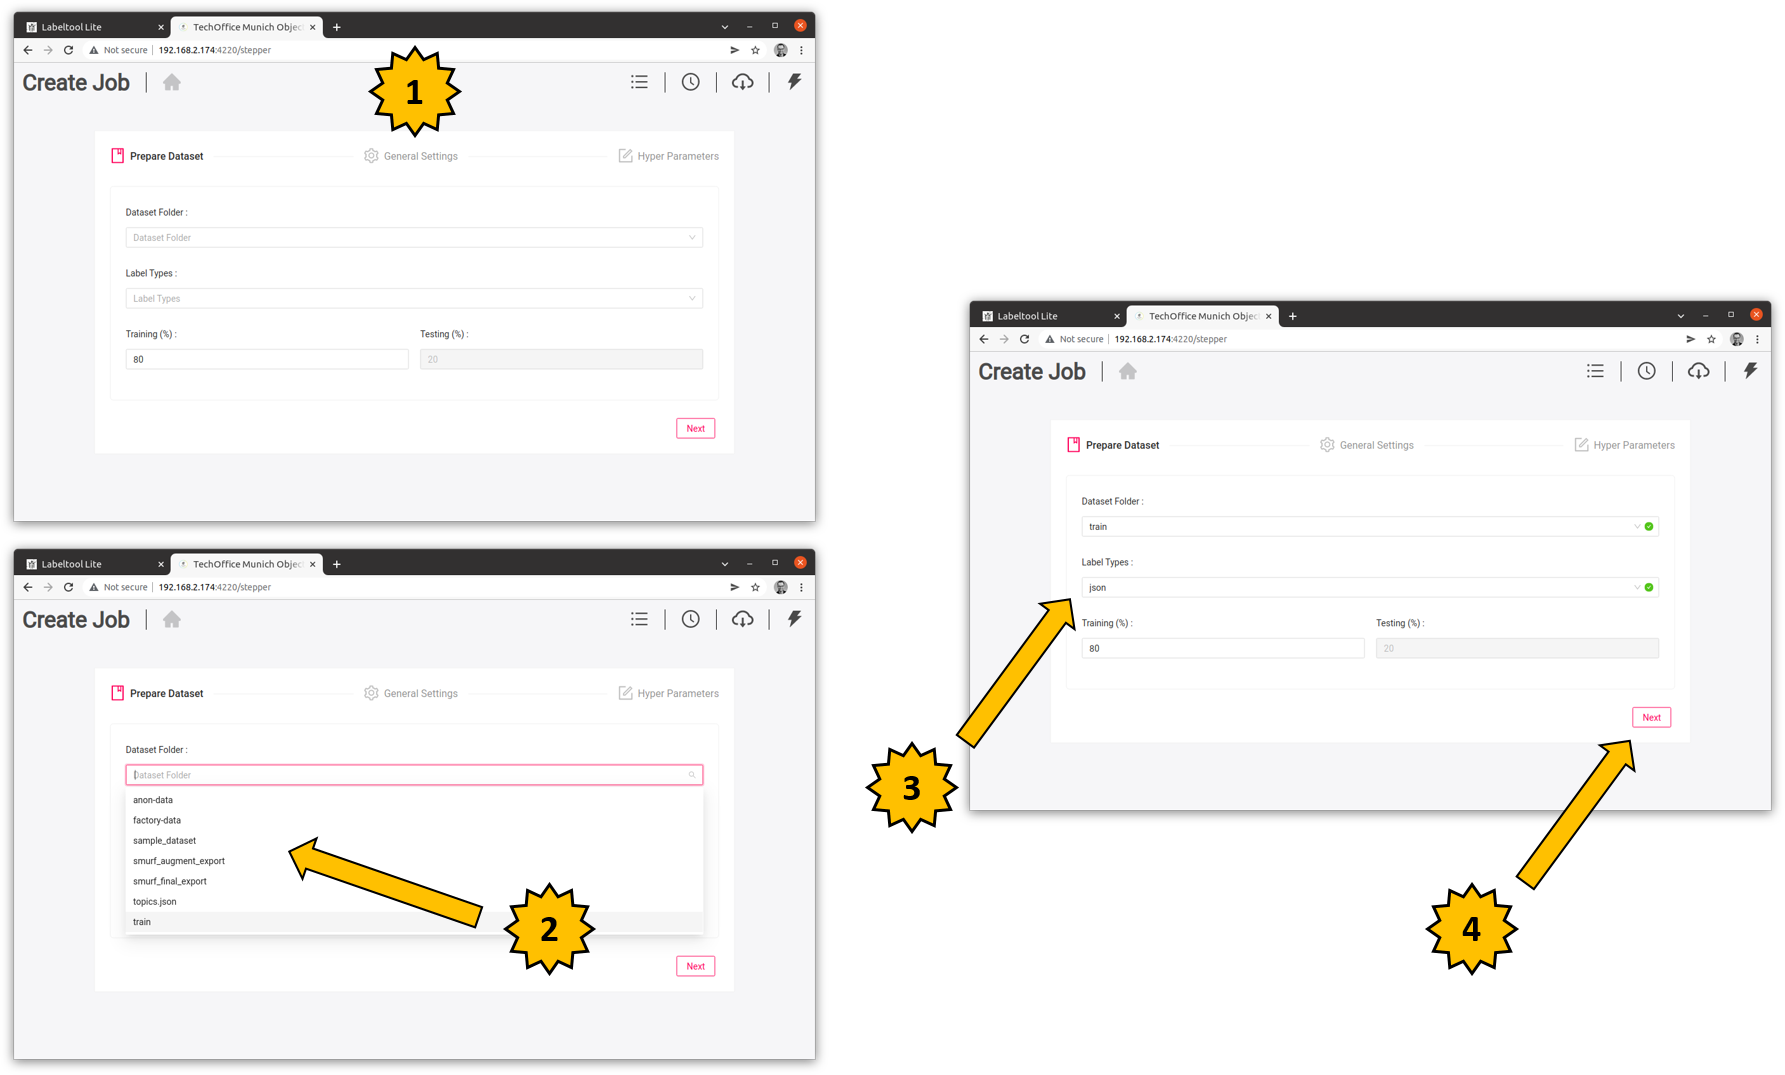
No Code AI Pipeline Training Suite new job konfiguration
Now the next screen opens in which a few more parameters have to be set.
Note: Project name
If the Training Suite is used by several employees, it is important to think about a naming convention for the training projects and thus also the training neural networks. This is the only way to distinguish the training neural networks later on and to recognize the different versions and statuses.
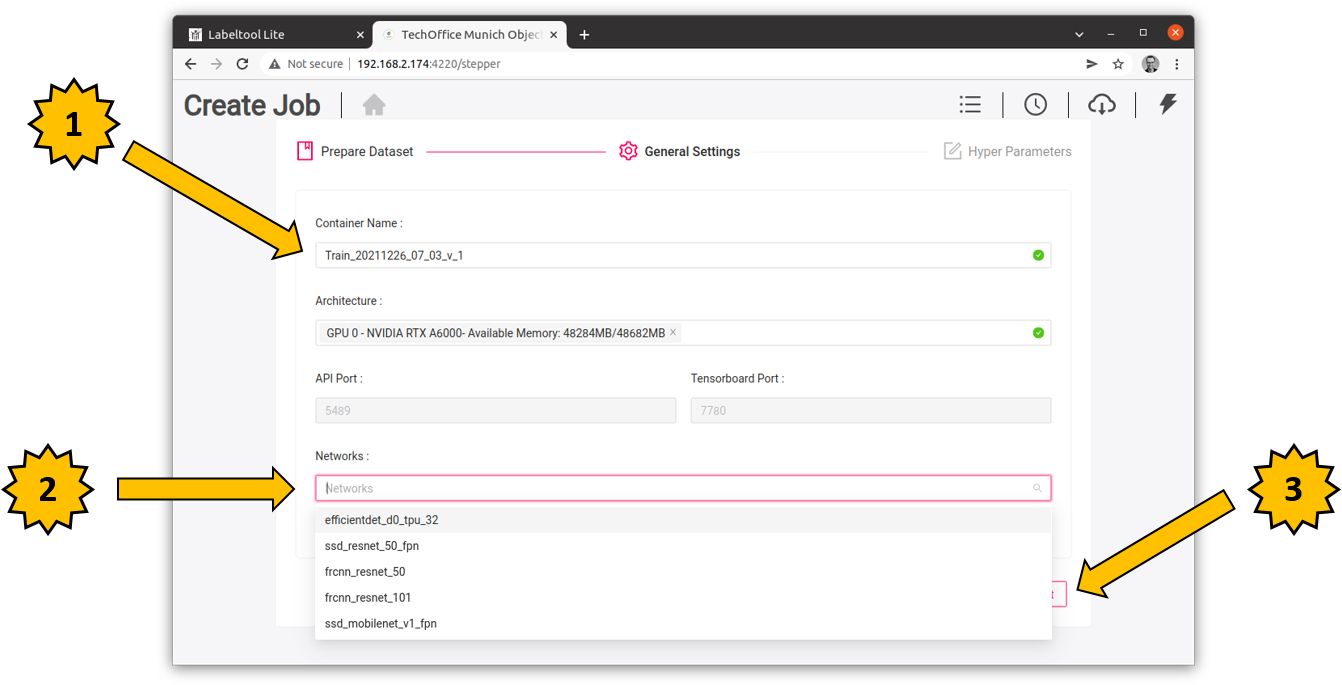
In the following figure you can see the next points that have to be parameterized.
- For the container name and thus also for the neural network, please choose a meaningful name with versioning.
- It always makes sense to note in the name or separately in an Excel file on which training data the neural network was trained.
- In the drop down box Networks please select a pre-trained neural network from the Tensorflow Modle Zoo.
- Then click on the Next button.
No Code AI Pipeline Training Suite new job konfiguration 2
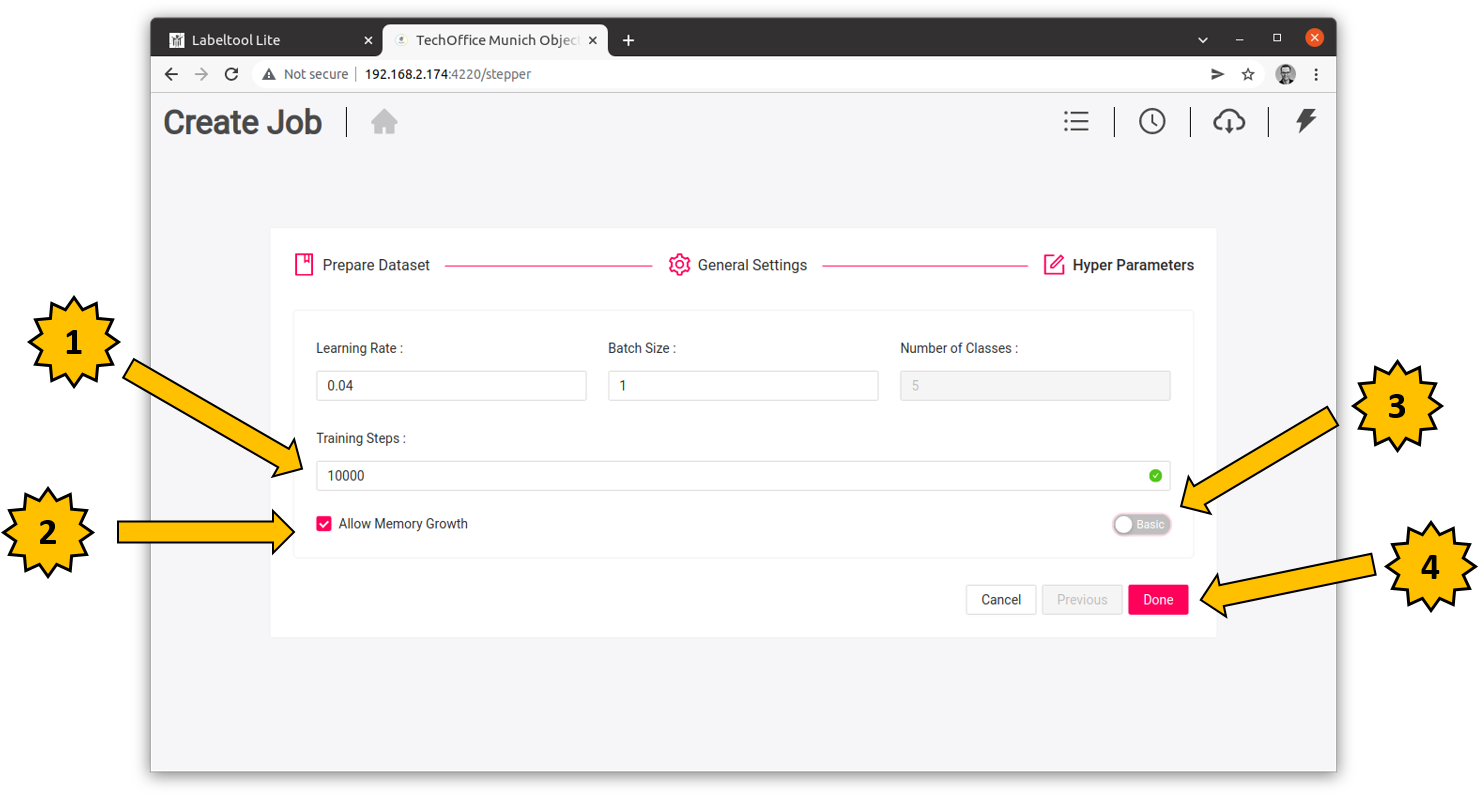
Now follows the last screen that can be seen in the following figure before the training of the neural network starts.
- Here you set a value of 5,000 to 10,000 for the number of training steps. This is a good number to get started and take the first steps.
- Important is still the check box “Allow Memory Growth” a still experimental feature of Tensorflow. Tensorflow then only uses as much memory on the graphics card as is currently needed for the training of this neural network. Thus, several projects or trainings can be started in parallel on the graphics card by your employees. If the checkbox is not set, then Tensorflow also occupies the entire memory of the graphics card for a project.
- Later or for experts the switch Basic is interesting. If this switch is activated, then the hyperparameters for the training of the neural network can be set manually. With these parameters you can have a much stronger influence on the way the neural network is trained.
- Now click on the button “Done” to start the training of the neural network.
No Code AI Pipeline Training Suite new job konfiguration 3
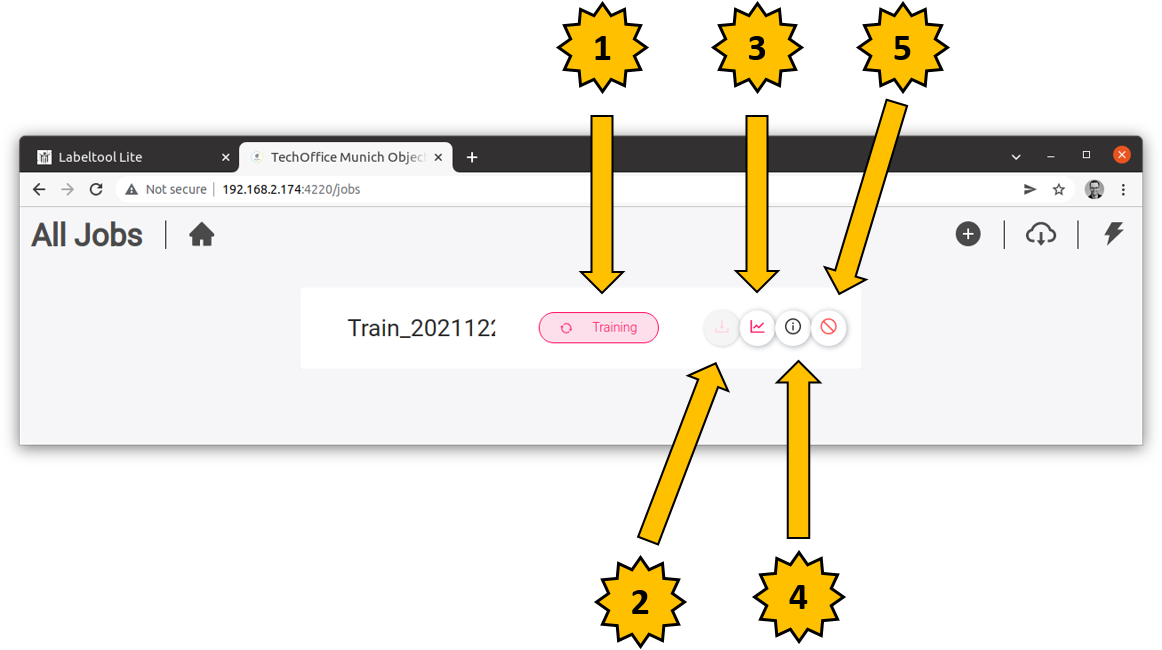
Now the training starts and the screen as shown in the following figure appears.
- This screen shows the status of the training, whether it is still active or has been successfully completed.
- If the training has been completed successfully, the trained neural network can be downloaded via this button.
- This button opens the tensorboard for exactly this training. However, the training must still be active.
- Here the output of the console is displayed which allows to draw conclusions how the training is currently running.
- This button can be used to cancel a training. Sometimes the training process hangs up and then you have to delete such a ghost training job.
No Code AI Pipeline Training Suite new job monitor
Now the training is running and also in the terminal window on the central server you can watch how the NVIDIA graphics card works with the following command.
Command: watch -n 1 nvidia-smi
With the watch -n 1 command the NVIDIA tool nvidia-smi updates the memory usage and GPU load of the graphics card every second.
- The output of the nvidia-smi command looks like shown in the following figure on the left.
- On the right side of the following figure you can see the monitoring output of the training process. This can help quite a bit with any troubleshooting.
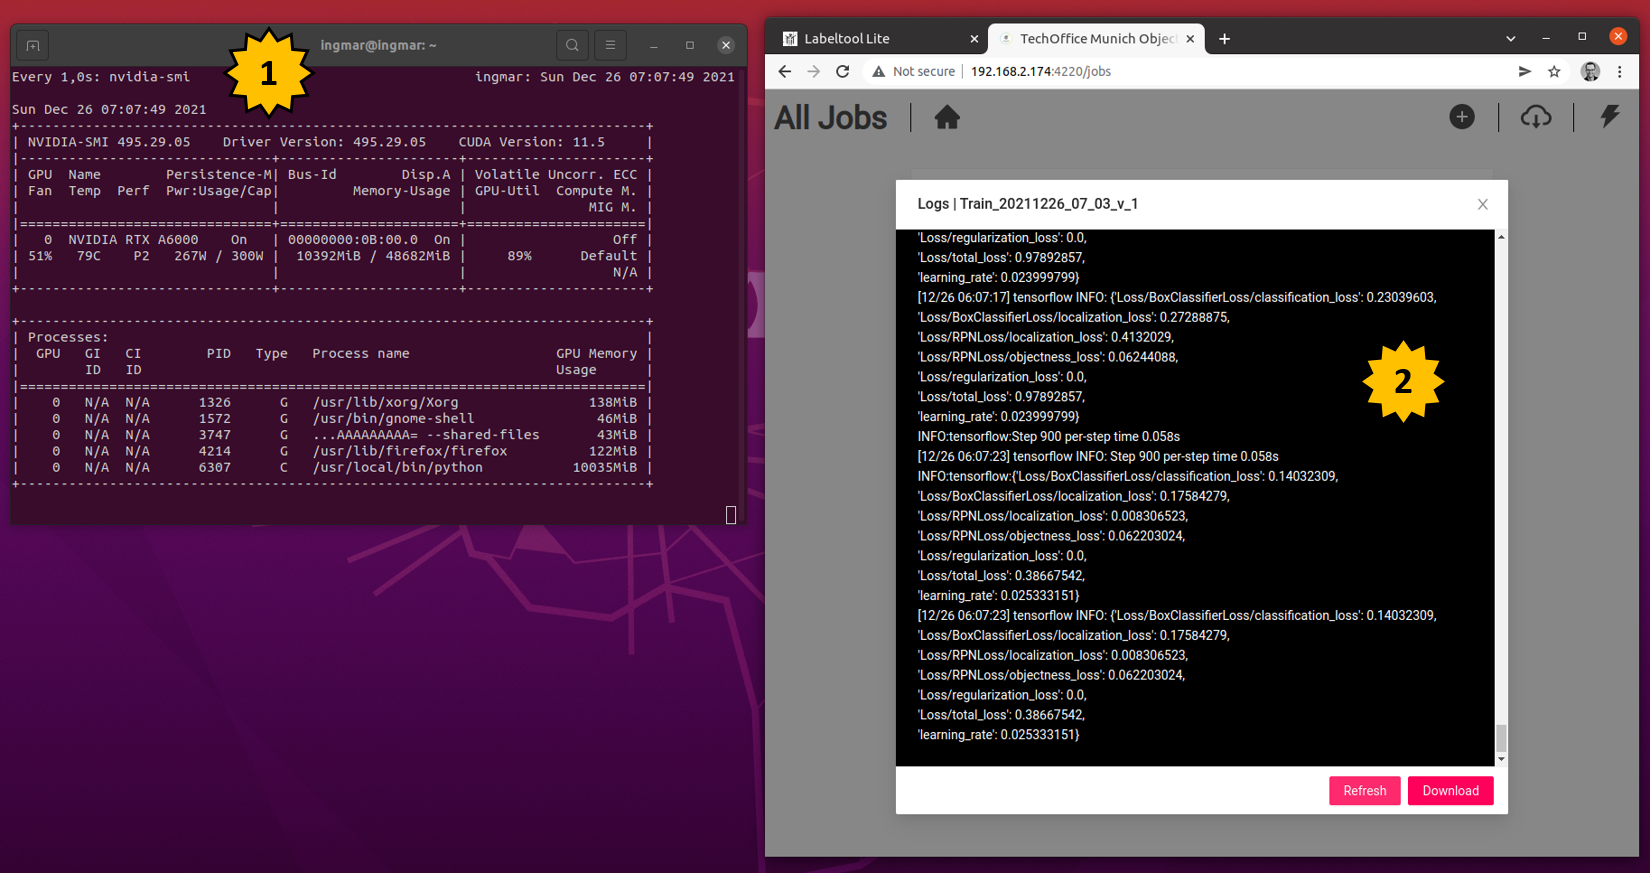
No Code AI Pipeline Training Suite new job status
While the training process is still active, you can display the TensorBoard for this training process using the button numbered 3 in the figure “No Code AI Pipeline Training Suite new job monitor”. Here you can see many details about how well the training is running or has run. This display as shown in the following figure can only be called up as long as the training is still active (in a newer version of the Training Suite this information should be preserved.
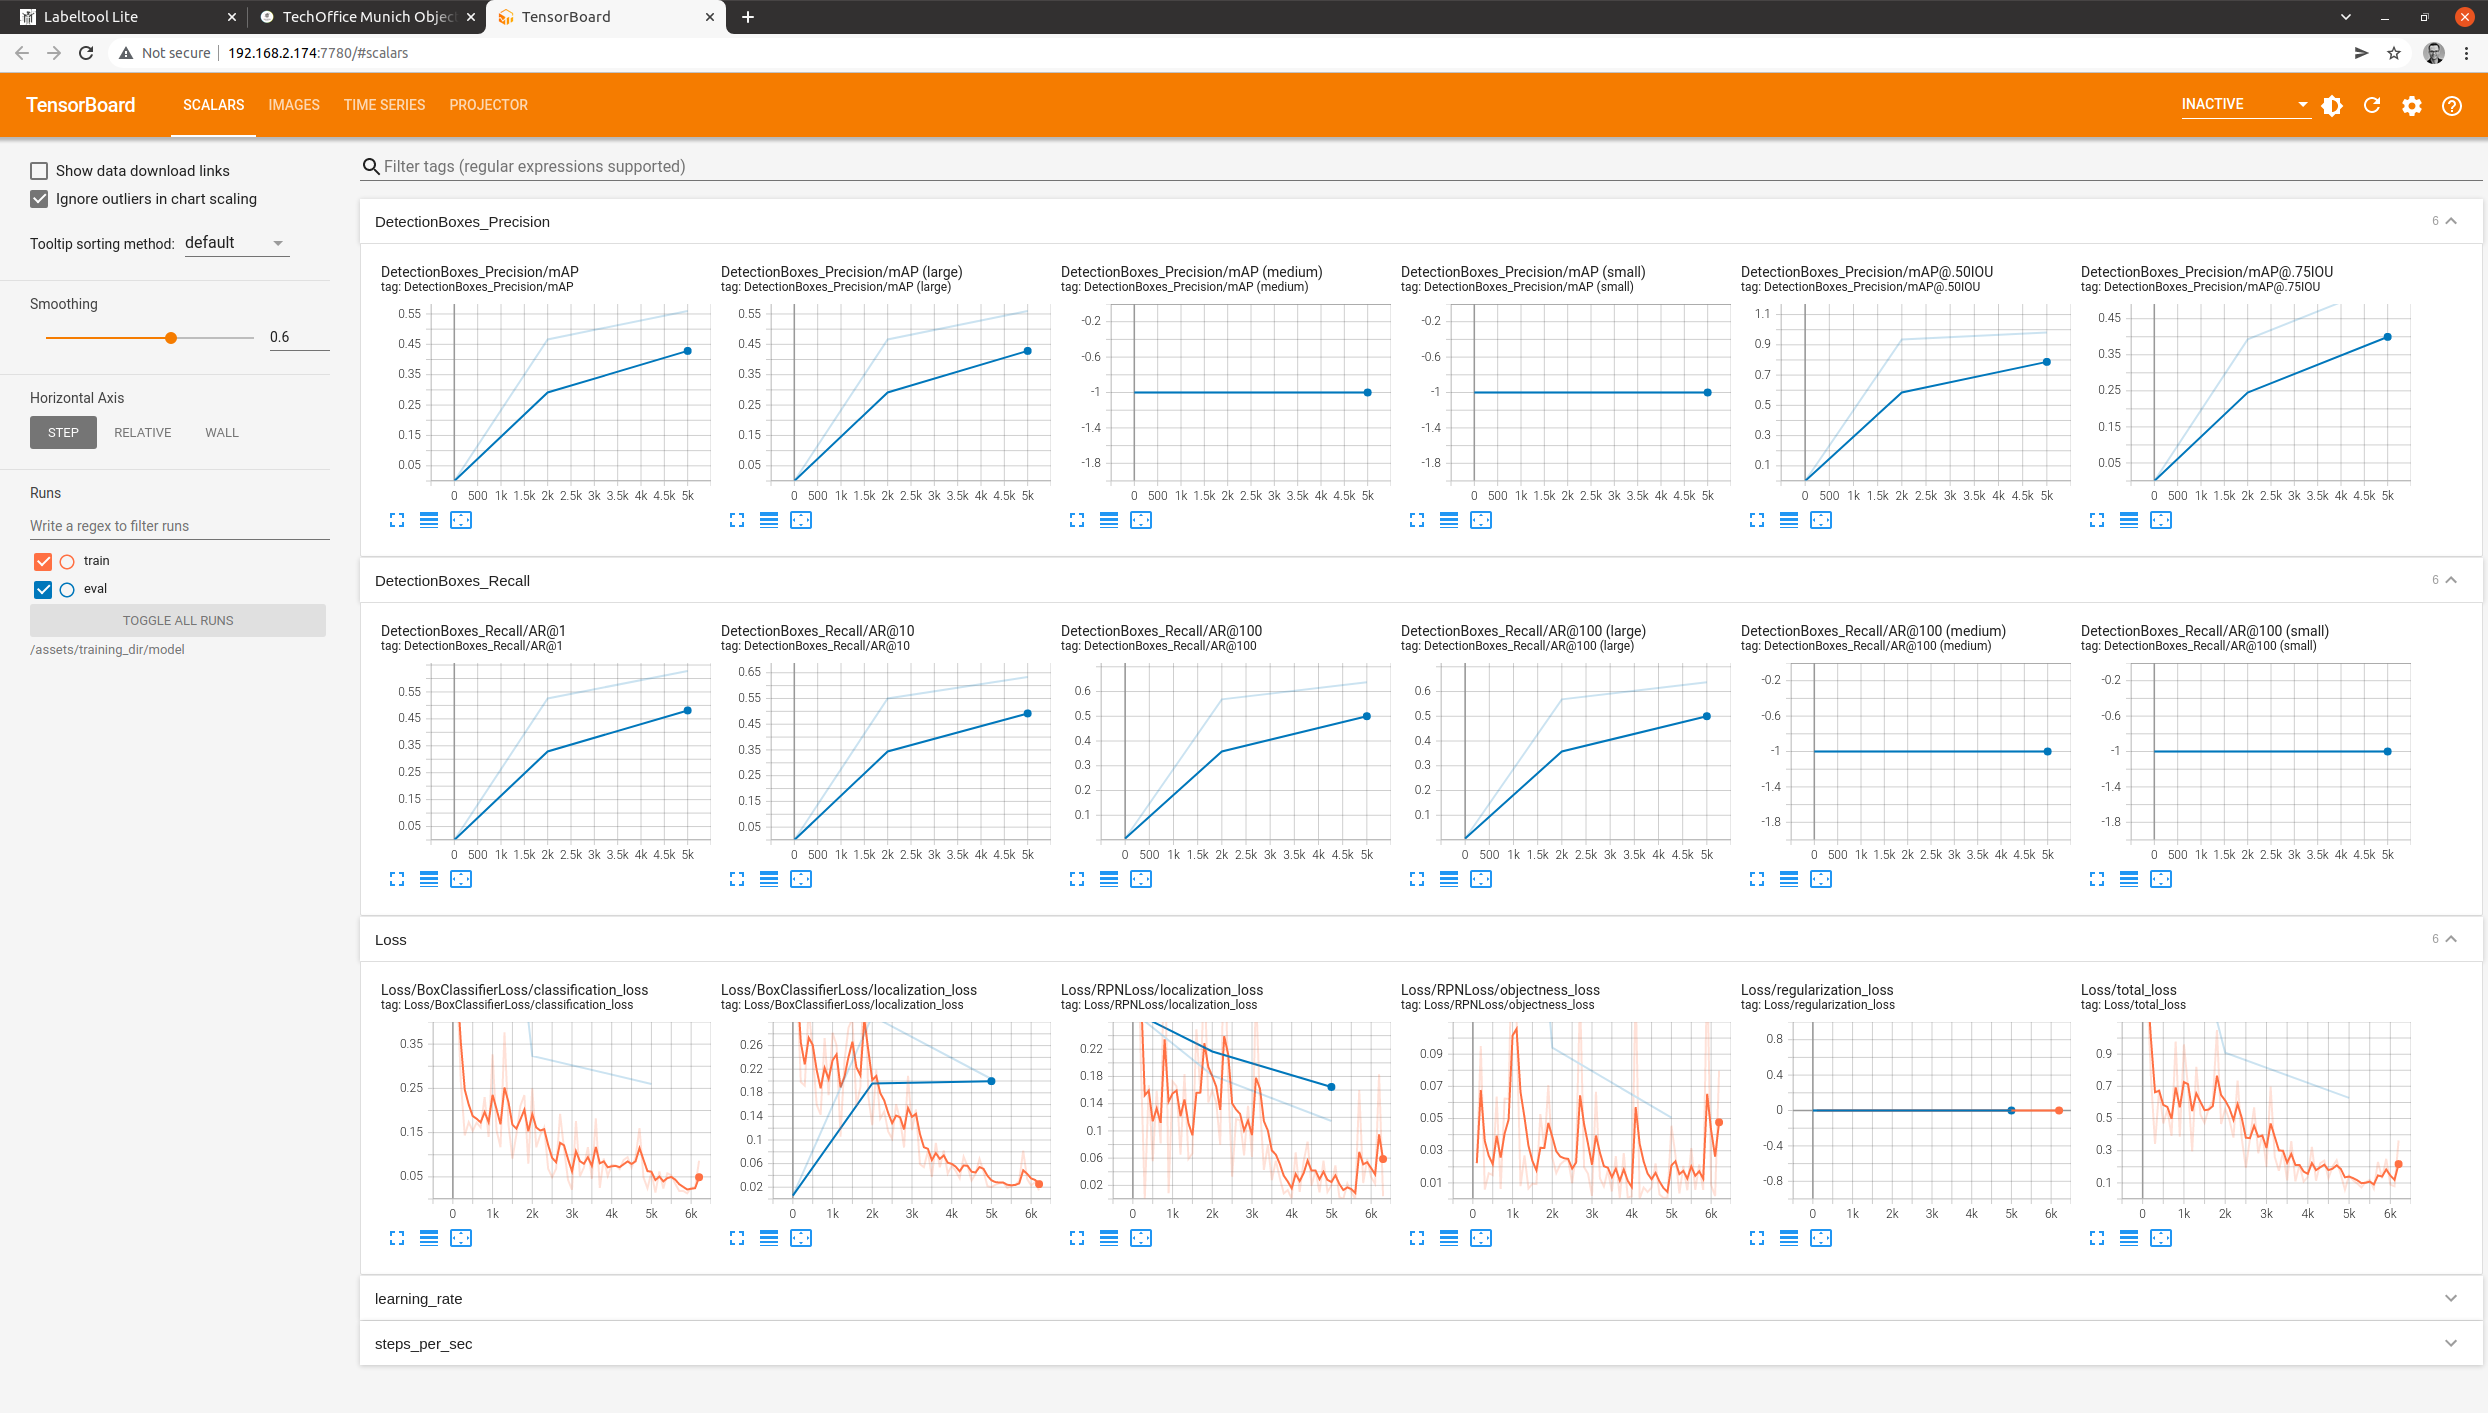
No Code AI Pipeline Training Suite Tensor Board
Now the Training Suite still offers the possibility to try out the transected neural networks by hand via the SWAGGER API. However, I would recommend to install and use the AI Pipeline Image App as explained in another article.
Nevertheless, in the following article I would like to discuss the SWAGGER API and how it can be used to test the quality of the freshly trained neural network.
Article Overview - How to set up the AI pipeline:
AI Pipeline - Introduction of the tutorialAI Pipeline - An Overview
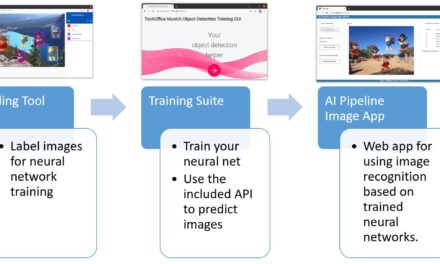
AI Pipeline - The Three Components
AI Pipeline - Hardware Basics
AI Pipeline - Hardware Example Configurations
AI Pipeline - Software Installation of the No-Code AI Pipeline
AI Pipeline - Labeltool Lite - Installation
AI Pipeline - Labeltool Lite - Preparation
AI Pipeline - Labeltool Lite - Handling
AI Pipeline - Tensorflow Object Detection Training-GUI - Installation
AI Pipeline - Tensorflow Object Detection Training GUI - Run
AI Pipeline - Tensorflow Object Detection Training GUI - Usage
AI Pipeline - Tensorflow Object Detection Training GUI - SWAGGER API testing the neural network
AI Pipeline - AI Pipeline Image App Setup and Operation Part 1-2
AI Pipeline - AI Pipeline Image App Setup and Operation Part 2-2
AI Pipeline - Training Data Download
AI Pipeline - Anonymization-Api


The tutorial offers a clear and practical guide for setting up and running the Tensorflow Object Detection Training Suite. Could…
This works using an very old laptop with old GPU >>> print(torch.cuda.is_available()) True >>> print(torch.version.cuda) 12.6 >>> print(torch.cuda.device_count()) 1 >>>…
Hello Valentin, I will not share anything related to my work on detecting mines or UXO's. Best regards, Maker
Hello, We are a group of students at ESILV working on a project that aim to prove the availability of…