

The BMW Tensorflow Object Detection Training GUI is the heart of the No-Code AI pipeline. It is the answer to encapsulate the complexity of neural network training from the user and to make neural network training as simple as possible. The user can train his own neural network with a few mouse clicks if he likes. Thanks to the many available pre-trained neural networks from the Tensorflow Model Zoo, very good results are possible in a very short time, even with little training data. However, the configuration and subsequent installation of the Training Suite is extensive and requires your full attention so that no mistakes happen.
The BMW Tensorflow Object Detection Training GUI, hereinafter referred to as Training Suite, provides you with a state-of-the-art solution for training neural networks. Within the Training Suite a small selection of pre-trained neural networks from the TensorFlow Model Zoo is available. With these already tested and pre-trained neural networks you can save a lot of time and energy by using them. Therefore, these networks are very suitable to be used as a starting point for your own domain-specific requirements. An overview of the different pre-trained neural networks that are offered in the TensorFlow Model Zoo can be viewed in detail via the following URL.
URL Model Zoo: https://github.com/tensorflow/models/blob/master/research/object_detection/g3doc/tf2_detection_zoo.md
With this knowledge in mind and which network is well suited for which subject purpose, you can then train your own neural networks.
Note: Time required
The time needed for the installation of the Training Suite as described below is about 1 hour. Most of this time is taken up by the installation process to download the necessary data from the Internet. In this time you can do something else in parallel like drinking a fresh coffee..
Install NVIDIA Docker support
You still need to install the NVIDIA Docker Toolkit so that the build of the Training Suite in the next step works without problems under Docker and the Training Suite can be started.
A description of how to perform the installation can be found at the following URL and ideally you should follow it.
After the successful installation of the NVIDIA Docker Toolkit, please test if the installation worked with the following command.
Command: sudo docker run –rm –gpus all nvidia/cuda:11.0-base nvidia-smi
The first time you run the command, it downloads several hundred MB of files such as images that NVIDIA Docker needs to function.
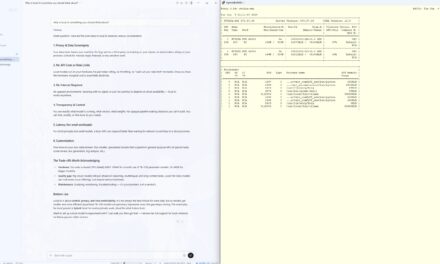
Afterwards, the display should look like the one shown in the figure below. If the output looks like this, the installation of NVIDIA Docker was successful.
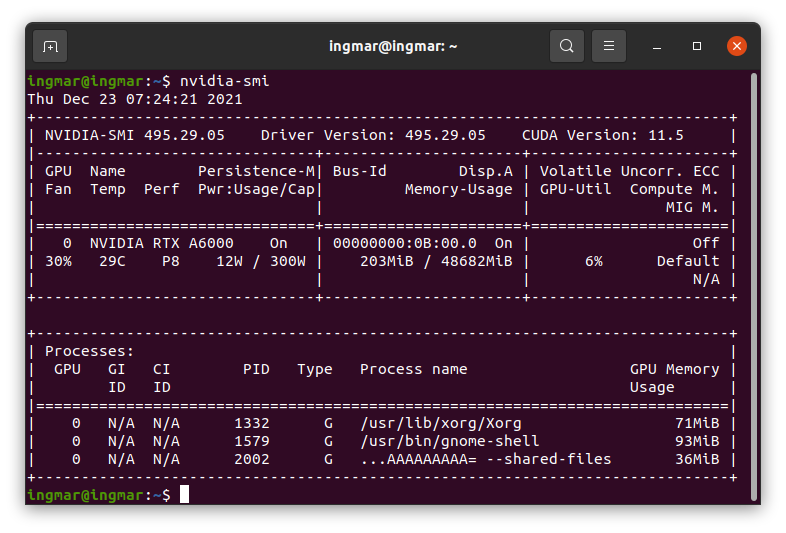
No Code AI Pipeline NVIDIA SMI output
Please restart the computer now.
Command: sudo reboot
Download the software and run checks
The following command now downloads the repository of the Tensorflow Object Detection Training GUI.
The repository is located at the following URL on the GitHub account of BMW InnovationsLab or TechOffices Munich. You can open the URL to learn more about the software.
URL: https://github.com/BMW-InnovationLab/BMW-TensorFlow-Training-GUI
Back in the terminal window on your Ubuntu system, now run the following command to download this repository.
Command: git clone https://github.com/BMW-InnovationLab/BMW-TensorFlow-Training-GUI.git
After the repository has been successfully downloaded, a series of commands must be executed. Please execute all the following commands in the given order.
Command: cd BMW-TensorFlow-Training-GUI
Now, to ensure a successful installation, check if Docker and Docker-Compose have been installed correctly as described in the previous article.
Check if docker-ce is already installed:
Command: docker –version
If no Docker version is found then you have to follow the installation process from the article AI Pipeline – Software Installation der No-Code AI Pipeline be made up.
Use the following command to check if docker-compose is already installed:
Command: docker-compose –version
If no Docker version is found then you have to follow the installation process from the article AI Pipeline – Software Installation der No-Code AI Pipeline be made up.
Use the following command to check if docker-compose is already installed:
Command: dpkg -l | grep nvidia-docker
Now the check if the Nvidia CUDA 11.2 version is installed. The installation of NVIDIA CUDA 11.2 was described in the article AI Pipeline – Software Installation der No-Code AI Pipeline described in detail.
Command: nvidia-smi
If the check returns no result, then the NVIDIA CUDA 11.2 version must be installed as described.
Now everything should be installed so far that you can continue with the configuration of the Training Suite.
Training Suite – Configuration
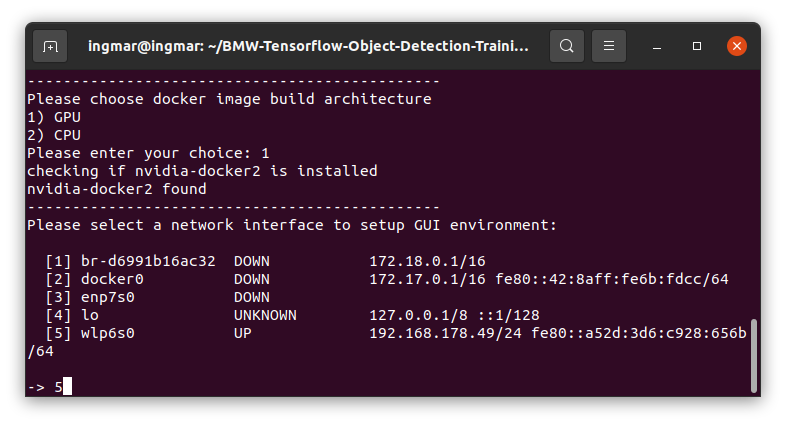
The Training Suite supports the two worlds CPU and GPU. Depending on the hardware you have, you have to choose one of these worlds. I assume as mentioned quite early in this tutorial that an NVIDIA GPU is installed in the target computer. This means that if there is no NVIDIA GPU in your computer then you have to choose the CPU installation. If a GPU is present then the GPU version of the Training Suite installation should be selected.
With the following command, different configurations of the Training Suite can be set before the installation via a simple text menu. The installation is then executed according to the selection made. To display the small text menu, please execute the following command in the terminal window.
Command: chmod +x setup_solution_parameters.sh && source setup_solution_parameters.sh
If a GPU is installed in the computer that is to be used for training the neural networks, option 1 must be selected. If the CPU is to be used, then option 2 must be selected. The described menu can be seen in the following figure.

No Code AI Pipeline Trainings GUI installation selection gpu
After the type of installation has been defined (1 or 2), the guided selection of the various options continues.
In the next step, the network card must be selected via which the Training Suite should be accessible in the network. The different options are shown as an example in the following figure.
No Code AI Pipeline Trainings GUI installation selection network
Often relevant in corporate networks but not in private networks is the setting of a proxy over which the communication takes place. This can be done with the option as shown in the following figure. I did not set a proxy in my setup.
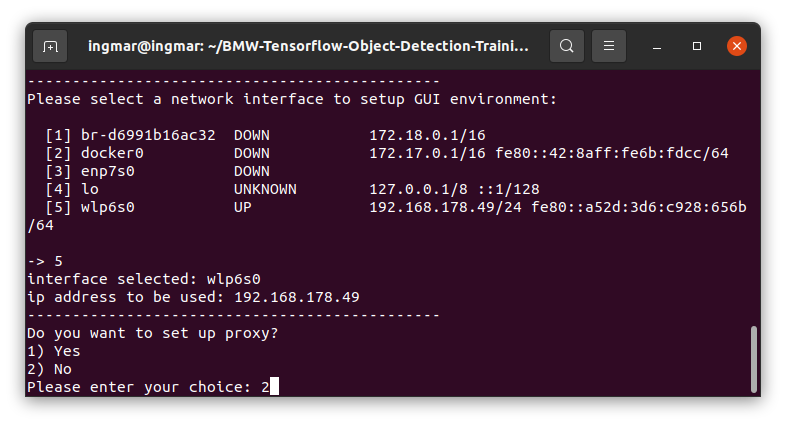
No Code AI Pipeline Trainings GUI installation selection proxy
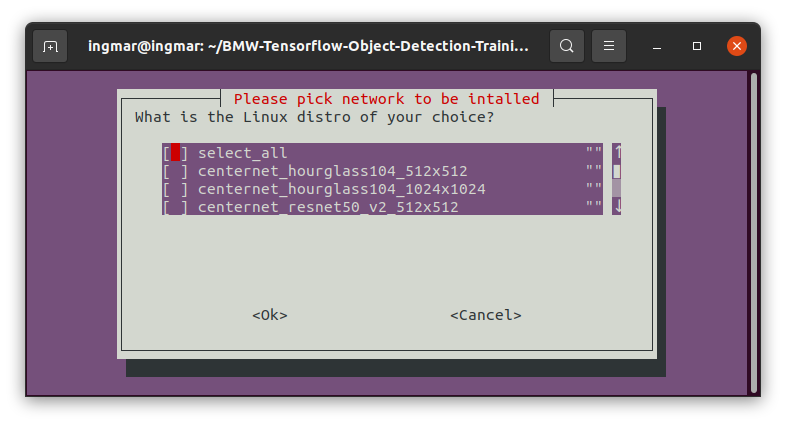
Here still from the designation somewhat misleadingly however with the now following menu the pre-trained neural nets are selected from the TensorFlow Model Zoo. The now selected neural networks will later form the basis on which the training of your own network is started. This saves you many hours of training time and leads to very good results with little effort in terms of training data, time and energy. I always recommend to download all nets to have the maximum flexibility.
Therefore, if the internet connection and storage space allow it, I recommend to select the option select_all. However, downloading all selected neural nets then takes 1 ½ hours depending on the internet connection. This is because each selected net is between 200 MB and 450 MB in size.
Therefore, for the beginning, depending on the Internet connection and time, it is better to select a few selected networks and let them install.
My recommendation would be to download the following networks initially, because they worked very well with the sample image data of this tutorial:
- faster_rcnn_resnet50_v1_1024x1024
- faster_rcnn_resnet50_v1_800x1333
- faster_rcnn_resnet101_v1_1024x1024
- faster_rcnn_resnet101_v1_800x1333
- ssd_resnet_50_v1_fpn_1024x1024
- ssd_resnet_101_v1_fpn_1024x1024
- ssd_resnet_152_v1_fpn_1024x1024
No Code AI Pipeline Trainings GUI installation selection network
With the selection of the pre-trained neural networks completed, the installation of the Training Suite now follows. During the installation of the Training Suite, several GB of images and other components are downloaded via the Internet.
Training Suite – Install
After the installation has been prepared with the small text-based menu and a few checks have been made to ensure that everything fits, it is now time to install the Training Suite. As explained in the previous section, there are two versions CPU and GPU to consider during the installation, the commands for each of these variants are listed belowt.
GPU Installation
If the Docker environment is built for the first time for GPU support then the following command should be taken.
Command: sudo docker-compose -f build_gpu.yml build
If the environment has already been built for GPU use and is to be rebuilt as a Docker container, use the following command.
Command: sudo docker-compose -f build_gpu.yml build –no-cache
This command with the extension of the –no-cache parameter has proven to avoid possible problems if something has been changed in the configuration files and it must be ensured that these changes are really transferred to the Docker container.
CPU Installation
If the environment is built for the first time for CPU support then the following command is to be taken.
Commandsudo docker-compose -f build_cpu.yml build
If the environment has already been built for CPU then the following command is to be taken.
Command: sudo docker-compose -f build_cpu.yml build –no-cache
This command with the extension of the –no-cache parameter has proven to avoid possible problems if something has been changed in the configuration files and it must be ensured that these changes are also really transferred to the Docker container.
Now the Training Suite is successfully installed and ready to run for the first time. More about this in the following article.
Artikelübersicht - Wie setze ich die AI Pipeline auf:
AI Pipeline - Vorstellung der AnleitungAI Pipeline - Die No-Code AI Pipeline ein Überblick
AI Pipeline - Die drei Bestandteile der No-Code AI Pipeline
AI Pipeline - Grundlagen zum Thema AI Hardware
AI Pipeline - Hardware Beispiel-Konfigurationen
AI Pipeline - Software Installation der No-Code AI Pipeline
AI Pipeline - Labeltool Lite - Installation
AI Pipeline - Labeltool Lite Vorbereitung der Trainingsdaten
AI Pipeline - Labeltool Lite - Bedienung
AI Pipeline - Tensorflow-Object-Detection-Training-GUI - Installation
AI Pipeline - Tensorflow-Object-Detection-Training-GUI - Ausführen
AI Pipeline – Tensorflow-Object-Detection-Training-GUI - Bedienung
AI Pipeline - Tensorflow-Object-Detection-Training-GUI - Inference API testen des neuronalen Netzes
AI Pipeline - AI Image App Einrichten und Bedienen - Teil 1-2
AI Pipeline - AI Image App Einrichten und Bedienen - Teil 2-2
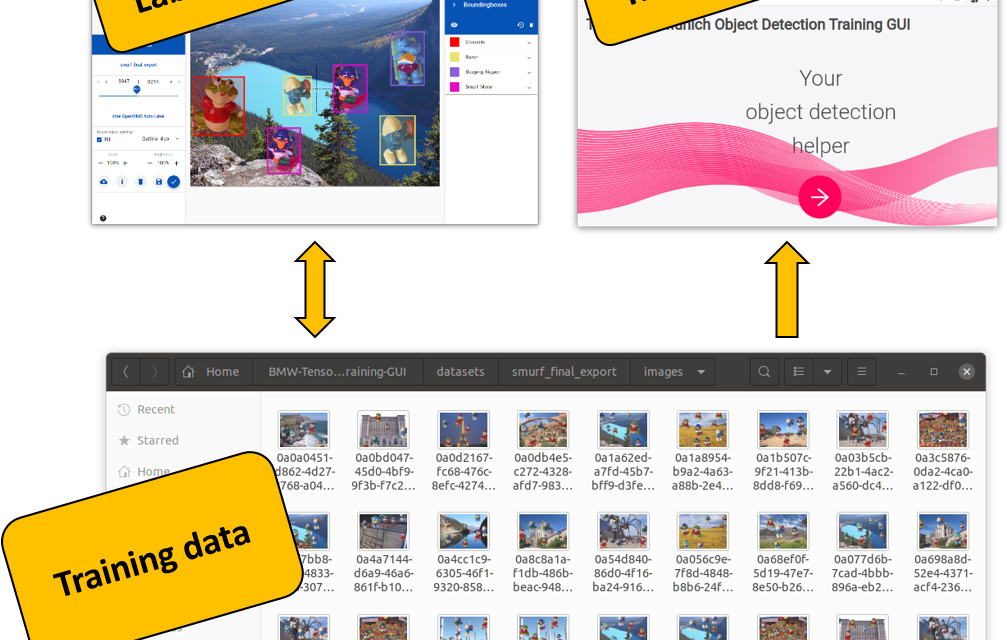
AI Pipeline - Trainingsdaten Download
AI Pipeline - Bilder und Video Anonymization API


The tutorial offers a clear and practical guide for setting up and running the Tensorflow Object Detection Training Suite. Could…
This works using an very old laptop with old GPU >>> print(torch.cuda.is_available()) True >>> print(torch.version.cuda) 12.6 >>> print(torch.cuda.device_count()) 1 >>>…
Hello Valentin, I will not share anything related to my work on detecting mines or UXO's. Best regards, Maker
Hello, We are a group of students at ESILV working on a project that aim to prove the availability of…