

This paper is about training a neural network based on YOLOv5. This YOLO network should be able to recognize PFM-1 anti-personnel mines in order to support the automated detection of these mines. Since this is my first time working with YOLOv5 and synthetic data, I am curious about the results that a validation dataset will provide. It is not clear to me at the time of writing how good such a trained network will be when it encounters non-synthetic images of the real PFM-1 mine and has to detect these mines.
For the synthetic data, I took three approaches.
- In the first part of creating the synthetic data, I created images of the PFM-1 antipersonnel mines using Blender and placed these rendered images on various background images as foreground. In Blender or for the rendered images of the anti-personnel mine I chose the top view of the mine since the mines are mostly flat on the ground. Also I worked with different textures and colors to have once more training data here.
- In the second approach I used stable diffusions to create so-called background images on which again images of the PFM-1 mine were placed, i.e. those rendered and also images of real landmines. The advantage here is that the images created in this way are very easy to generate and the time required is significantly reduced.
- The third approach was much more complex. Here, a stable diffusion network was taught to directly generate PFM-1 anti-personnel mines in different landscapes, scenes etc..
Then I combined all the data in more than 30 tests, tested them individually, etc. to see how well these networks, depending on the type of training data used, are able to detect real PFM-1 mines that have been deployed in videos and images.
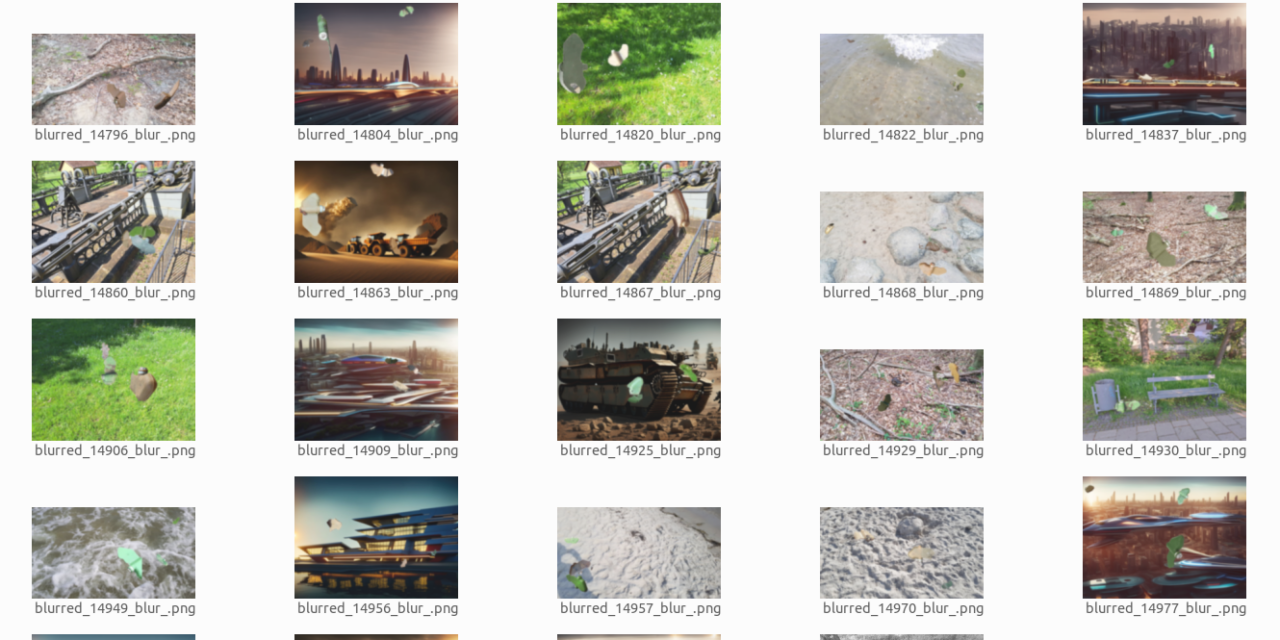
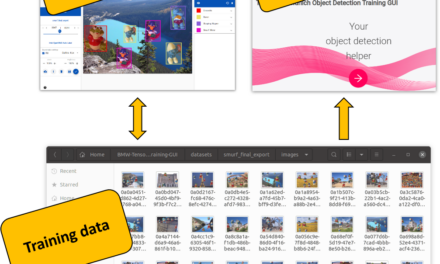
Here is a picture showing the synthetic training data created.

PFM-1 anti-personnel landmine training data overview
First of all, the following section describes how to set up Yolov5 on an Ubuntu 22.04 system. Since I always use Anaconda for the different environments, here is also a short explanation of how to create a corresponding Anaconda environment. Also, as already described several times here on my blog, CUDA from NVIDIA should be installed for the graphics card so that the GPU also accelerates the training of the neural network.
Set up Anaconda environment
First of all, create the Anaconda environment with the name yolov5.
Command: conda create --name yolov5
The following command can be used to display the various environments that have already been created.
Command: conda info --envs
Whenever we will work with yolo now the environment yolov5 must be activated.
Command: conda activate yolov5
Now here is the link to the GitHub project I will use.
URL: https://github.com/ultralytics/yolov5/wiki/Train-Custom-Data
Set up YoloV5 locally
Now clone the yolov5 repository.
Command: git clone https://github.com/ultralytics/yolov5
After cloning the repository, please change to the yolov5 folder.
Command: cd yolov5
Now install all the necessary libraries.
Command: pip install -r requirements.txt
After everything has been installed, yolov5 is ready for use and the training data must be prepared.
Create training data set of PFM-1 antipersonnel mines
Now please create the training data. As described at the beginning, I used Blender to render the corresponding images of the PFM-1 mine or searched for images of this mine on the Internet. These images of the PFM-1 mines I have then automatically processed to training data and immediately create the YOLO labels for the bounding boxes. I wrote Python programs that automatically placed the transparent images as foreground images on different background images, created the labels for the bounding boxes and applied various filters to the images. So I have created well over 100,000 training datasets or generated over 100GB of data for training. How good the data really is and my approach to it remains to be seen.
Training with Negative Images
To reduce the fals positive during the detection process of YOLO it is important to add to your training data images with no labels. You need to know from your environment which objects in your picture will result in a false positive detecion. After adding those images to you data set and when the dataset is being scanned these images should show up as ‘missing’ (if you have not supplied a label file), or ’empty’ if you supplied an empty label file. Those images with an empty label file or missing one are both treated identically and both types of images will help you to reduce false positive detections. In my case a lot of leaves are detected as PFM-1 mines which are false positive detections I do not want.

PFM-1 anti-personnel landmine false positive
Training data with Yolo labels
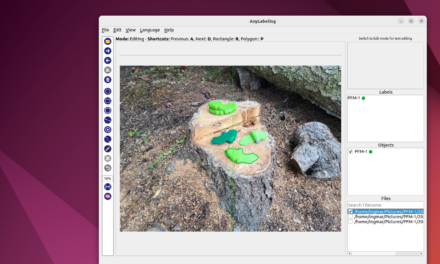
To check if my training data created with my Python programs really have the appropriate labels I installed labelImg and sampled the training data.
Prepare training dataset for YoloV5
Here is the structure of a training data set that follows exactly the specifications of YOLO with the division between image and label and the various subfolders for training, testing and validation during training.
- dataset_pfm-1
- images
- test
- train
- val
- labels
- test
- train
- val
- images
Split data
Again, I let a Python program do the partitioning, creating the training data set as follows in its distribution.
- train: 70%
- test: 20%
- val: 10%
Example calculation:
- 2,300 records and one record consists of image and label so 4,600 files.
- 2.300 / 100 = 23
- Number of training data: 70 * 23 = 1.610
- Number of test data: 20 * 23 = 460
- Number of validation data: 10 * 23 = 230
Training Konfigurieren
To start the training you need a configuration file that describes where exactly the data for the training is located. This pfm-1.yaml file looks like this.
# Train/val/test sets as 1) dir: path/to/imgs, 2) file: path/to/imgs.txt, or 3) list: [path/to/imgs1, path/to/imgs2, ..]
path: /media/ingmar/data/Pictures/02_PFM-1-Pictures/02_training_data/20230514_new_training_data # dataset root dir
train: images/train # train images (relative to 'path') 128 images
val: images/val # val images (relative to 'path') 128 images
test: images/test # test images (optional)
# Classes
names:
0: PFM-1
Here is an overview of which pre-trained Yolo models are available. For my tests and experiments I used the model YOLOv5m.
| Model | size (pixels) |
mAPval 50-95 |
mAPval 50 |
Speed CPU b1 (ms) |
Speed V100 b1 (ms) |
Speed V100 b32 (ms) |
params (M) |
FLOPs @640 (B) |
Kommentar |
|---|---|---|---|---|---|---|---|---|---|
| YOLOv5n | 640 | 28.0 | 45.7 | 45 | 6.3 | 0.6 | 1.9 | 4.5 | |
| YOLOv5s | 640 | 37.4 | 56.8 | 98 | 6.4 | 0.9 | 7.2 | 16.5 | okay |
| YOLOv5m | 640 | 45.4 | 64.1 | 224 | 8.2 | 1.7 | 21.2 | 49.0 | |
| YOLOv5l | 640 | 49.0 | 67.3 | 430 | 10.1 | 2.7 | 46.5 | 109.1 | |
| YOLOv5x | 640 | 50.7 | 68.9 | 766 | 12.1 | 4.8 | 86.7 | 205.7 | |
| YOLOv5n6 | 1280 | 36.0 | 54.4 | 153 | 8.1 | 2.1 | 3.2 | 4.6 | |
| YOLOv5s6 | 1280 | 44.8 | 63.7 | 385 | 8.2 | 3.6 | 12.6 | 16.8 | |
| YOLOv5m6 | 1280 | 51.3 | 69.3 | 887 | 11.1 | 6.8 | 35.7 | 50.0 | |
| YOLOv5l6 | 1280 | 53.7 | 71.3 | 1784 | 15.8 | 10.5 | 76.8 | 111.4 | |
| YOLOv5x6 + TTA |
1280 1536 |
55.0 55.8 |
72.7 72.7 |
3136 – |
26.2 – |
19.4 – |
140.7 – |
209.8 – |
Quelle: https://github.com/ultralytics/yolov5#pretrained-checkpoints
Start training
Once the training data is prepared and the configuration file is created, the training can be started. The command looks like this.
Command: python3 train.py --img 640 --batch 32 --epochs 30 --data /media/ingmar/data/data_backup/yolo/pfm-1-single-dataset-yolo/pfm-1.yaml --weights yolov5s.pt
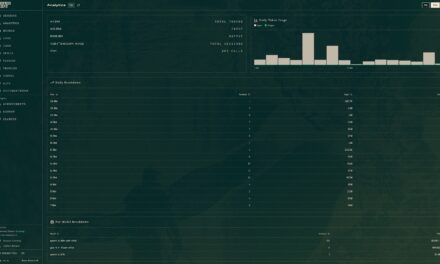
Here is a screenshot of the current training exp031 which takes me over 7 days and uses 75,000 records.
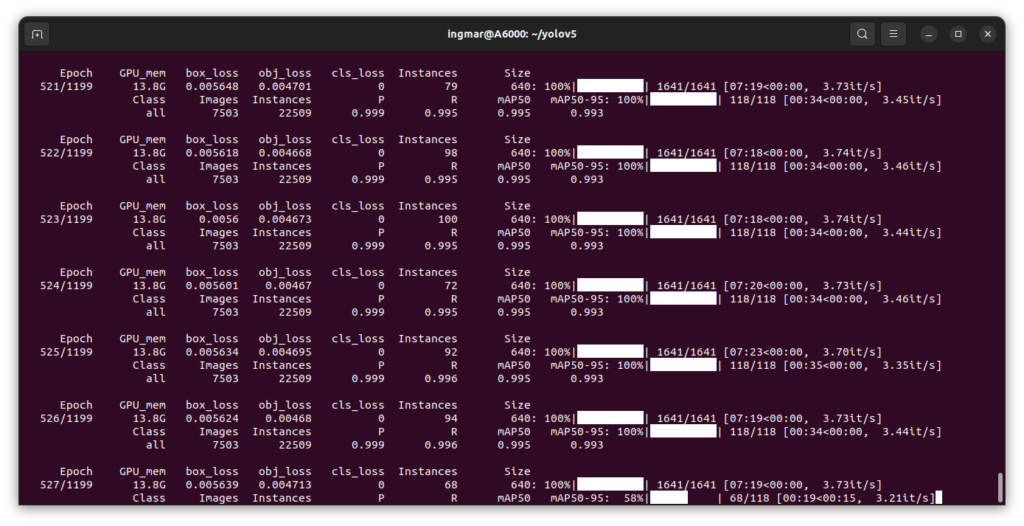
PFM-1 anti-personnel landmine active YOLOv5m training
Test neural network
Now it is of course exciting how well the own neural network or the YOLOv5m network works. For this I have a few test images that I give to the neural network and draw the bounding boxes.
Command: python3 detect.py --source /media/ingmar/data/data_backup/pfm-1-internet --weights runs/train/exp5/weights/best.pt --conf 0.6 --iou 0.45 --augment --project run_pfm_1 --name detect_pfm_1_test
Of course, such a test is very subjective and does not really tell anything. Therefore, there is also a Python program for YOLOv5 that helps you professionally with the evaluation. The command looks like this to start the evaluation. The only important thing is that the data set used for the evaluation was not part of the training data.
Command: python3 val.py –batch 64 –data /media/ingmar/data/Pictures/02_PFM-1-Pictures/04_validation_data/data.yaml –weights runs/train/exp31/weights/best.pt –task train –project runs_pfm_1_test –name Validation –augment
Now you get a detailed evaluation of how well your trained YOLO net recognizes the object it was trained for.
The following video shows an intermediate state of my work. For the recording I printed out a PFM-1 antipersonnel mine and colored it green.
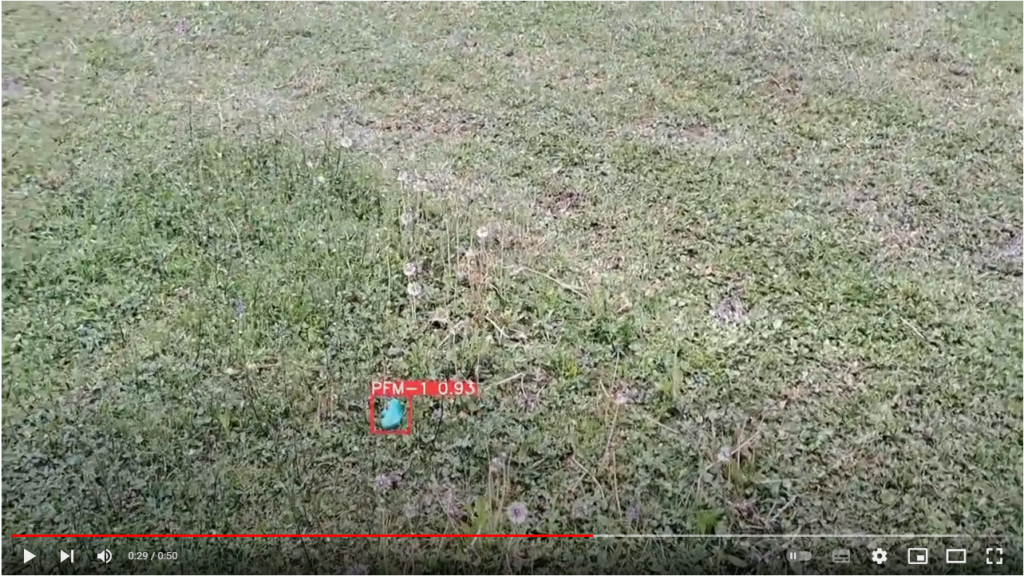
PFM-1 anti personnel landmine video exp031
Summary
I am so far satisfied how well the training with synthetic data works. As the small video shows, the training data set still has potential to be improved. In exchange with other groups working on this topic I think it will be possible to build a good detector for this type of mines even if the environment has a big influence on the detection. But it is an excellent example to use artificial intelligence for something very positive for people.


Hello,
We are a group of students at ESILV working on a project that aim to prove the availability of using infrared images to detect mines with deep learning. We are at the beginning of the project and we would like to try your yolov5 to have see the possible performances. Is it possible that you send us the weigths of your network by mail : XXXX. This file will not be published or anything its just for us to test things on it for the beginning of the project.
You can also search me on linkedin if you have doubt.
Thanks by advance for your response.
Best regards,
Valentin
Hello Valentin,
I will not share anything related to my work on detecting mines or UXO’s.
Best regards,
Maker