


After the successful installation of the Labelingtool Lite, as described in the previous article, now follows a short introduction on how to best create the images and configure the Labeltool Lite. Important for the further following of the tutorial until the training of the neural networks are the images that should be provided with labels. You will learn how to define classes that divide the information in the images. These classes must be defined in advance and stored in the Labeltool Lite. So that everything works without problems I have described the procedure step by step in the following article. Furthermore, some peculiarities of the Labeltool Lite are described so that the operation is easier and above all without problems. In addition I have included one or the other hint. So it should be easy for you to create good training data with the Labeltool Lite for the training of neural networks.
It is important that the training data reflect the business requirements as well as possible. This is the only way to successfully train a neural network that delivers satisfactory results. This means that already during the creation of the training images considerations have to be made how the training images have to be recorded. I will explain more about this in the following paragraph.
Create training data
This section is about how to best capture and label images for training a neural network. Right at the beginning of your own AI application you should think about how the training images are created. Because the big effort of every AI application is still in the creation of the training data and in our case of the No-Code AI Pipleine this starts with collecting training images or creating them yourself. If you have the possibility to automatically record training images of an object then I would recommend the following procedure:
- Record the training images in a very high resolution.
- This is because the resolution of the images can later be automatically scaled, i.e. reduced.
- The advantage of recording the images with a very high resolution is that even years later you have the chance to use these images for other applications.
- The images should be recorded in color.
- If for the training of the neural network and later for the planned application e.g. monochrome pictures are sufficient, the pictures recorded in color can be converted in an additional run into other color spaces.
- Name the images directly in a meaningful way.
- A good name is a descriptive name like the captured object is called or what it represents with a running number.
- Automatic file names of the camera like DCM102003 lead to many problems in the later use of these images by humans.
Prepare training data
I would like to take you now into my experience and thoughts on how best to prepare the training data. BMW’s TechOffice Munich also offers open source solutions such as the “” but I would like to write more about this in a separate post.
- Choose the right resolution for the training images.
- The images should be based on the typical resolution of the pre-trained neural network selected later in the training.
- A typical resolution would be 1024×800 pixels which is expected as input image from the pre-trained neural network.
- If the AI application uses monochrome images later, they should be converted to this color space before training and labeling.
- The size of the image files
- It is also possible to set the compression of the images used for training quite high. This saves space in the graphics card memory and the training runs faster.
- But here you have to try out which settings give the best results. Often it is not that easy to get the optimum between saving resources and quality of the neural network.
With these suggestions and thoughts you are well prepared to start labeling the images. After all, we have to start at some point in order to gain any experience at all.
Labeltool Lite – Import images
First of all, the images must be made known to the Labeltool Lite. Since I had already created many images for an internal competition at BMW, it makes sense to use these images in this tutorial. With this data set you will be able to train a simple neural network that will recognize the objects, in this case small figures, on the test images. The goal is to understand how everything works and to have a sense of achievement. If you are then sure that everything works, then you start with your own images and will certainly train a much broader neural network that will recognize your objects much better.
The images we will use in this tutorial can be downloaded as a ZIP file from the following path. This ZIP file does not yet contain the finished labels. You have to put them around the small figures yourself with the Labeltool Lite.
Download: https://www.ai-box.eu/smurf_training_data_small.zip
After you have downloaded the ZIP file, it must be unpacked. After unpacking, you will find a folder on your computer with the name smurf_data in which the images are stored. Copy this folder smurf_data with the images to the following location within Labeltool Lite. This way Labeltool Lite can access the images.
Path: ~/BMW-Labeltool-Lite/data/training-data/
After you have copied the folder please open the objectclasses.json file which is located in the folder with the images. As the file name objectclasses.json suggests, the classes of the objects that are to be labeled in the image are defined here.
Path: ~/BMW-Labeltool-Lite/data/training-data/smurf_data/
If you have opened the objectclasses.json file, you will see the classes or the information that you can later select as labels in Labeltool Lite when you apply labels to the images. The following figure shows the structure of the configuration file objectclasses.json.
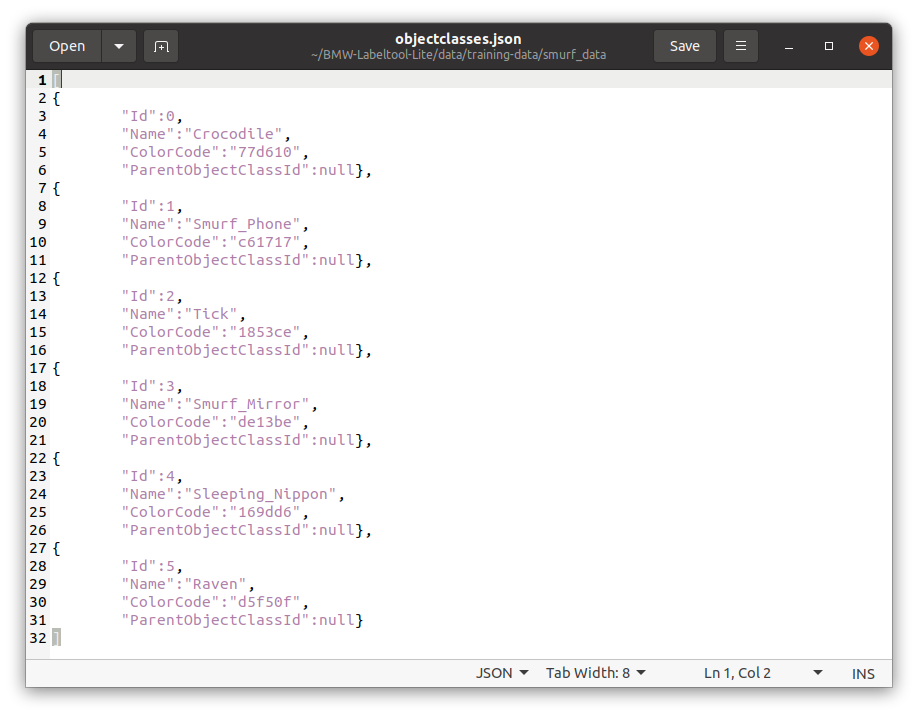
No Code AI Pipeline objectclasses smurf
So that the newly created folder smurf_data with the images can also be selected in Labeltool Lite, the topics.json file must be adapted. In this configuration file the folders with the pictures are administered and/or made known to the Labeltool Lite which are to be provided with labels. The topics.json file is located in the following path of the installed Labeltool Lite.
Path: ~/BMW-Labeltool-Lite/data/training-data
The structure of the file is very structured and if a new entry is added, i.e. a folder with images, simply copy the previous entry and adjust the ID, name and path accordingly. Please make sure to put the comma between the previous and the new entry as shown in the following figure.

No Code AI Pipeline topics json
Now everything is prepared and you can start labeling the images in Labeltool Lite. To do this, start Labeltool Lite with the following command.
Command: sudo docker-compose up
The Labeltool Lite would be callable after it is started over the following URL <IP address>:8081 over the network. This is because the IP address of the computer on which Labeltool Lite is installed was stored in the installation file when Labeltool Lite was installed.
The following article explains step by step how to use Labeltool Lite.
Article Overview - How to set up the AI pipeline:
AI Pipeline - Introduction of the tutorialAI Pipeline - An Overview
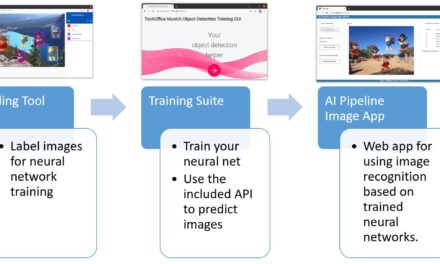
AI Pipeline - The Three Components
AI Pipeline - Hardware Basics
AI Pipeline - Hardware Example Configurations
AI Pipeline - Software Installation of the No-Code AI Pipeline
AI Pipeline - Labeltool Lite - Installation
AI Pipeline - Labeltool Lite - Preparation
AI Pipeline - Labeltool Lite - Handling
AI Pipeline - Tensorflow Object Detection Training-GUI - Installation
AI Pipeline - Tensorflow Object Detection Training GUI - Run
AI Pipeline - Tensorflow Object Detection Training GUI - Usage
AI Pipeline - Tensorflow Object Detection Training GUI - SWAGGER API testing the neural network
AI Pipeline - AI Pipeline Image App Setup and Operation Part 1-2
AI Pipeline - AI Pipeline Image App Setup and Operation Part 2-2
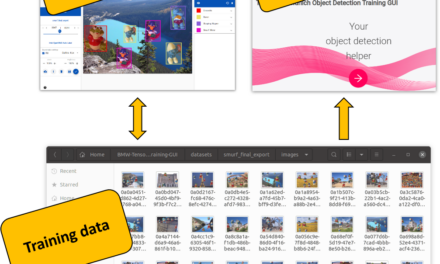
AI Pipeline - Training Data Download
AI Pipeline - Anonymization-Api


The tutorial offers a clear and practical guide for setting up and running the Tensorflow Object Detection Training Suite. Could…
This works using an very old laptop with old GPU >>> print(torch.cuda.is_available()) True >>> print(torch.version.cuda) 12.6 >>> print(torch.cuda.device_count()) 1 >>>…
Hello Valentin, I will not share anything related to my work on detecting mines or UXO's. Best regards, Maker
Hello, We are a group of students at ESILV working on a project that aim to prove the availability of…