


I am still fascinated by the topic of stable diffusion and image generation. In order to make some progress here and not always just use Automatic1111, I have decided to familiarise myself with ComfyUi. ComfyUi promises me the possibility to further automate processes and, above all, to be able to combine different steps much better or, I hope, to automatically generate variations of images in a more targeted way than is possible with Automatic1111. Therefore, my blog posts will first deal with the installation and configuration of ComgyUi. Once I have gained experience, I will publish further posts on image generation itself.
ComfyUi – installation
As I have a large number of projects running on my computer, I always encapsulate these projects in their own virtual Anaconda environments. The first step is to create a virtual environment for ComfyUi. You do this with the following command. In this way, we achieve a separation between the various projects and our underlying system.
Command: conda create --name comfyUi
Now use the following command to activate the ComfyUi Anaconda environment in which ComfyUi will then be installed.
Command: conda activate comfyUi
Now follow a few commands to install ComfyUi on an Ubuntu system.
Command: git clone https://github.com/comfyanonymous/ComfyUI.git
To ensure that all necessary software packages are installed, please execute the following command in the active Anaconda environment.
Command: pip install -r requirements.txt
Everything should now be installed and you can start ComfyUi. With the following command, ComfyUi can also be accessed via the intranet from other computers in the network.
Command: python3 main.py --listen
ComfyUI Manager – installation
It is also very helpful to install the ComfyUi Manager. You do this as described below.
Use the following command to switch to the ComfyUi/custom_nodes folder.
Command: cd ~/ComfyUI/custom_nodes
Now clone the ComfyUi Manager into this directory with the following command:
Command: git clone https://github.com/ltdrdata/ComfyUI-Manager
After installing and restarting ComfyUi, you will see the ComfyUi Manager in the box below.

ComfyUi Manager
Set custom models path
As I already have Automatic1111 installed and use a large number of models, it makes sense to use these with ComfyUi as well. This way I can save disc space and, above all, the multiple management of these many models. The path to models used by Automatic1111, for example, is set in the extra_model_paths.yaml file.
In my case, the adjustments in the extra_model_paths.yaml file look like this.

ComfyUi extra model paths yaml
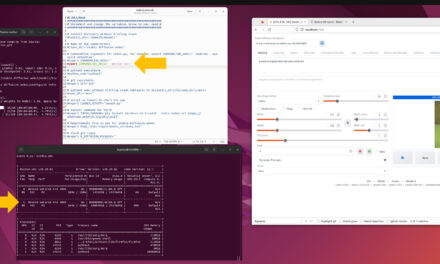
If you now restart ComfyUi, you should see in the terminal window whether the customisation of the custom paths has worked. In my case it now looks as shown below. You can clearly see where I have inserted my own path and where the default configuration still applies.

ComfyUi start screen
Here is a picture of what the default page of ComfyUi looks like if you have not yet configured or tried anything else. The ComfyUi Manager is also clearly visible.

ComfyUi default Workflow
ComfyUI – autostart
Now I would like to start ComfyUi automatically every time I switch on the computer. I have been realising this for years using a cron job and a small shell script that contains the necessary commands. It’s nothing exciting, but it works reliably and writes a decent log file.
To do this, create a ComfyUi.sh file in your home directory. Make this executable with the following command.
Command: sudo chmod 777 ComfyUi.sh
The following lines must now be inserted so that the ComfyUi script can also start. It is important that you enter the correct path in which you have installed ComfyUi and that the Anaconda environment is named as you have created it.
#!/bin/bash
# Autor: Ingmar Stapel
# Date: 20231202
# This script starts ComfyUi in an Anaconda virtual environment
source /home/ingmar/anaconda3/bin/activate comfyUi >> /home/ingmar/ComfyUi-anaconda.log 2>&1 &
sleep 10
python3 ~/ComfyUI/main.py --listen >> ~/ComfyUi-main-$(date +"%Y_%m_%d_%I_%M_%p").log 2>&1 &
Now the ComfyUi.sh script must be stored in the /etc/crontab so that it is executed after each restart of the computer and ComfyUi is started. This then looks like the following image.

Ubuntu crontab
Here is a picture of the initial demo workflow with a slightly customised prompt that I have otherwise left unchanged.

ComfyUi default Workflow executed
Summary
The installation of ComfyUi was completed within a few minutes. Well, I have to say that I install tools like this all the time and have already gone through many tears when it comes to installing NVIDIA CUDA and other special packages that are simply needed for such projects. But overall I’m very excited and looking forward to getting started with the workflows. This should speed up the image generation process considerably.


The tutorial offers a clear and practical guide for setting up and running the Tensorflow Object Detection Training Suite. Could…
This works using an very old laptop with old GPU >>> print(torch.cuda.is_available()) True >>> print(torch.version.cuda) 12.6 >>> print(torch.cuda.device_count()) 1 >>>…
Hello Valentin, I will not share anything related to my work on detecting mines or UXO's. Best regards, Maker
Hello, We are a group of students at ESILV working on a project that aim to prove the availability of…