

In the previous part I described why I’m tackling TensorRT-LLM on my RTX A6000 Ada: as practical preparation for the Edge-LLM ecosystem, so that later on Jetson Thor and friends I don’t have to start from scratch. In this part it’s all about the concrete installation and configuration on an Ubuntu 24.04 server. So exactly the setup that will later make it possible to build out the build pipeline.
If you’d like to follow along with this little weekend project, you should have the following prerequisites in place:
- Ubuntu as the operating system
- NVIDIA driver 545.x or newer
- Docker, NVIDIA Container Toolkit
- at least 100 GB of free storage for the container image and models.
I’m assuming the base setup is already in place; if not, my own server_setup.sh, which I described here (Preparing an Ubuntu 24.04 server for AI inference: CUDA, Docker, NVIDIA Container Toolkit), takes care of the preparation in one go.
Why the container route instead of a native installation
Before I start with the actual installation, a quick word on why I picked the container approach: TensorRT-LLM has very specific dependencies on the CUDA toolkit, cuDNN, the TensorRT version, and a PyTorch build with the matching ABI. The wheels on PyPI are built against PyTorch 2.9.1 with CUDA 13.0. Anyone trying to install this natively quickly ends up in a version swamp, where a single pip install tears the whole Python environment apart. Over time, and with quite a few new grey hairs, I decided to go the container route. It simply saves an enormous amount of nerves.
The NGC release container solves this for you: NVIDIA packages everything that works together into a 20 GB Docker image. CUDA toolkit, cuDNN, TensorRT, PyTorch, TRT-LLM itself, all examples, the trtllm-build CLI. Everything we need for this project is inside that container. On your host machine all you need are the drivers, Docker, the NVIDIA Container Toolkit, and a GPU — ideally one with Ada support. The update strategy of the setup becomes “switch the image tag”, and it’s easily transferable from my system to your system if you follow this guide.
The command is then:
Command: docker pull nvcr.io/nvidia/tensorrt-llm/release:1.2.1
Which tag is currently stable can be checked at catalog.ngc.nvidia.com. Tags like 1.3.0rc14 are release candidates. With an rcXX tag: hands off for productive use. Plain tags like 1.2.1 without a suffix are the official releases that we want to use.
Sanity check: bringing your GPU to light
Before the 20 GB pull, a quick check is worth doing to see whether everything is ready. Think back here to my blog post about setting up the server:
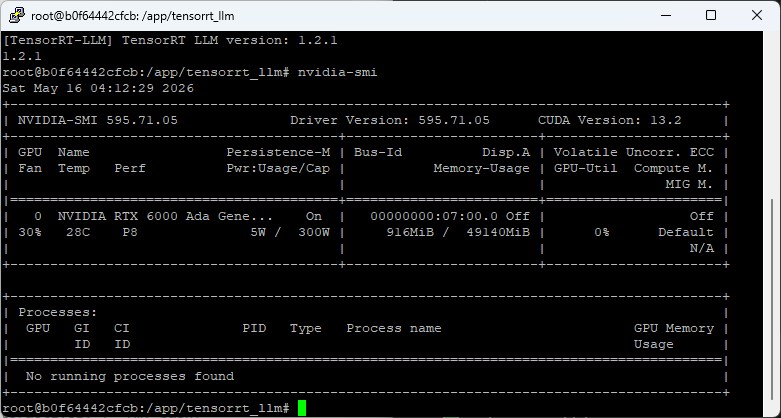
nvidia-smi                                          # GPU + driver version
docker --version                                    # Docker installed?
docker run --rm --gpus all ubuntu:24.04 nvidia-smi  # GPU visible in container?
df -h /var/lib/docker                               # at least 50 GB free
The third command is the important one: it proves that the NVIDIA Container Toolkit is set up correctly and that Docker containers have access to the GPU. If this fails, something in your setup isn’t right yet.
In my case the first command shows NVIDIA RTX 6000 Ada Generation, 49140 MiB — the professional Ada card with 48 GB. The driver version should be at least 545.x.
Directory layout
Before I start the container, I create a clean directory structure on the host, which I’ll later mount into the container. Here everyone has to decide for themselves where the data lives. For simplicity I write everything directly onto the root partition at the top level:
Command: sudo mkdir -p /data/trtllm/
Command: sudo chown -R $USER:$USER /data/trtllm
The reason I created this directory is twofold:
Persistence. When the container is stopped, model downloads and built engines would otherwise be lost. That would be especially annoying with model downloads. A Qwen-7B checkpoint alone is 14 GB, and a re-download takes another few minutes, depending on your connection.
Accessibility from the host. When the engines live on the host filesystem, I can easily inspect them through my operating system’s file manager, back them up, or push them over to another server with scp without even having to start and enter the container. That is exactly the build-vs-deploy pattern that Edge-LLM uses as well.
The container later gets this mount mapping:
/data/trtllm (Host) ⇄ /workspace (Container)
Inside the container everything therefore lives under /workspace. Outside, on the host — that is, your filesystem — it lives under /data/trtllm. Same data, two perspectives.
Setting up the HuggingFace token
For most open models (Qwen, Mistral) no HuggingFace token is required. For Llama and Llama derivatives (including the FP8 variants from NVIDIA) you have to accept the respective model provider’s license once on HuggingFace and create a read token. In my case some of these date back a few years already, and I had completely forgotten about it until the HF token was demanded.
Note: If you don’t yet have a token for the models, sign in once at HF and create one under huggingface.co/settings/tokens, then store it persistently:
echo 'export HF_TOKEN="hf_xxxxxxxxxxxxxxxxxxxxx"' >> ~/.env_trtllm
chmod 600 ~/.env_trtllm
Using a separate file instead of putting it directly into .bashrc makes it easier to rotate the token later, and protects against accidentally checking it into a repo. It’s simply the standard way to manage your keys.
Helper scripts: setup_trtllm.sh and start_trtllm.sh
Running all the now-required commands in a single sequence quickly gets unwieldy. That’s why I built two helper scripts. I needed them myself to find my way through the many stumbling blocks and to always have the commands and their order in front of me:
setup_trtllm.sh — for the one-time installation
The setup_trtllm.sh automates the full first run:
- Sanity check: driver version, GPU detection (with an FP8 note if Ada/Hopper), Docker, GPU pass-through into the container, disk space
- HuggingFace token setup: if not set, interactive prompt, save to
~/.env_trtllmwithchmod 600 - Directories: create
/data/trtllm/with the right permissions - Container pull:
docker pullwith the configured version
Idempotent: by the time I got to where I wanted to be, I had run this script umpteen times. Meaning: it’s built in such a way that running it multiple times is safe. If the image is already there, no new pull is attempted, since depending on your internet connection that can take a very long time. If the directories exist, they aren’t overwritten.
Now please download and run the script so that your server is set up and prepared accordingly.
Here’s the link to the script on GitHub: tensorrt-llm-edge-prep-script
From here on I assume that all the scripts you download in the course of this post live in your working directory, which in my case is /data/trtllm/.
You run the script itself as follows:
Command: chmod +x setup_trtllm.sh
Command: ./setup_trtllm.sh
start_trtllm.sh — container lifecycle
The start_trtllm.sh is intended for the day-to-day operation of the container and is executed again whenever the container isn’t running.
Here’s the link to the script on GitHub: tensorrt-llm-edge-prep-script
Command: chmod +x start_trtllm.sh
Command: ./start_trtllm.sh
./start_trtllm.sh           # start detached (default)
./start_trtllm.sh shell     # interactive (--rm, bash) for quick tests
./start_trtllm.sh exec      # jump into the running container
./start_trtllm.sh status    # container status + GPU utilization
./start_trtllm.sh logs      # docker logs -f
./start_trtllm.sh stop      # stop the container
Note: The default starts the container detached with --restart unless-stopped. That way it survives server reboots, and I can simply run ./start_trtllm.sh exec to enter the running container whenever I have something to test.
The important Docker run options, briefly explained:
docker run -d \
  --gpus all \
  --ipc=host \
  --ulimit memlock=-1 \
  --ulimit stack=67108864 \
  -p 8000:8000 \
  -v /data/trtllm:/workspace \
  -e HF_TOKEN="${HF_TOKEN}" \
  -e HF_HOME=/workspace/cache \
  --name trtllm \
  --restart unless-stopped \
  nvcr.io/nvidia/tensorrt-llm/release:1.2.1 \
  sleep infinity
--ipc=host and the --ulimit options are important for MPI communication between TRT-LLM workers — even for single-GPU inference, TRT-LLM uses MPI internally. More on that in a moment. The port -p 8000:8000 is for later (when we start trtllm-serve as an OpenAI-compatible server). HF_HOME inside the volume makes the model cache persistent, so that you don’t have to re-download the models from HF every time.
First model test with TinyLlama
After the first ./setup_trtllm.sh and ./start_trtllm.sh I’m inside the container and can verify the setup. To do so, please run the following command:
Command: ./start_trtllm.sh exec
python3 -c "import tensorrt_llm; print(tensorrt_llm.__version__)"
# 1.2.1
nvidia-smi
# shows the A6000 Ada with 48 GB
You should now see something like the following in your terminal window.
Tensor RT LLM – container test
As a smoke test we’ll now run a tiny model — namely TinyLlama with 1.1 billion parameters — inside the container. It’s about 2 GB in size and has to be downloaded. For this to work you now have to switch into the working directory “workspace” inside the container.
Command: cd /workspace
To be able to run the smoke test you also need the smoke.py Python program. You can find it here.
Download: tensorrt-llm-edge-prep-script
Then execute the smoke.py Python file.
Command: python smoke.py
On the first run of the script the model is downloaded, which is about 2 GB. Then it takes about a minute for the model init, after which two generated sentences are produced — anyone who has looked at the script will certainly have noticed: TinyLlama practically doesn’t speak German. So the outputs are often nonsense (“Peter und bin 25 Jahre alt…”). That’s okay, the smoke test checks the pipeline, not the model quality. All we wanted to know was whether everything works.
If the script ran through successfully, it prints the following success message at the end:
=== Smoke Test erfolgreich abgeschlossen ===
The MPI trap: if __name__ == '__main__': is mandatory
One stumbling block I got stuck on during my first attempt was that TensorRT-LLM internally uses MPI (Message Passing Interface) for its worker processes. The MPI protocol is used even for single-GPU inference. That has corresponding implications for any Python script that uses the LLM API directly.
If you write the code the naive way:
# WRONG — doesn't work!
from tensorrt_llm import LLM, SamplingParams

llm = LLM(model="TinyLlama/TinyLlama-1.1B-Chat-v1.0")
sp = SamplingParams(max_tokens=64)
# ...
…you get an abrupt abort when running it:
The main script or module attempted to spawn new MPI worker processes.
This probably means that you have forgotten to use the proper idiom...
    if __name__ == '__main__':
The reason: when the LLM object is initialized, TRT-LLM starts worker processes using multiprocessing.spawn. If the main script isn’t protected by if __name__ == '__main__':, the workers try to re-execute the entire module code (including the LLM(...) call), which in turn leads to an infinite spawn loop. Fortunately, the Python MPI bindings detect this behavior and abort the process directly.
The fix was then quickly done: wrap the Python for llm... into a main() function and start it with the guard:
def main():
    llm = LLM(...)
    # ...

if __name__ == '__main__':
    main()
That isn’t TRT-LLM-specific, it’s Python standard for anything that uses multiprocessing. But if you’re working through the topic for the first time, like me, and come from the Ollama-style user perspective, it’s easy to run into.
The two backends in TRT-LLM 1.x
While reading the logs, the following also caught my eye, and I had to read up on it a little more closely.
[TRT-LLM] [I] Using LLM with PyTorch backendMeaning: TRT-LLM 1.x has two parallel backends, and since 1.x the default API uses the PyTorch backend, which doesn’t build a TensorRT engine at all. Instead it runs the model with PyTorch + optimized kernels — similar to vLLM. Quick to set up, good for iteration, but not a deployable engine artifact. That’s why I never found a file ending in .engine.
The classical TensorRT backend — which is the one we want, the one Edge-LLM uses, and the one that actually produces an .engine file — can be obtained through a different import:
from tensorrt_llm._tensorrt_engine import LLM # TensorRT backend# vs.
from tensorrt_llm import LLM # PyTorch backend (default)That is an architectural fork I hadn’t noticed, and I really had to dig a bit for it. For the goal I’ve set myself — playing through the Edge-LLM-equivalent pipeline on the A6000 Ada — the TensorRT backend is exactly the right one. For quick experiments the PyTorch backend is enough.
Script inventory after part 2
After this part, you should — like me — have the following three scripts sitting on your server, all of which you’ve successfully executed:
/data/trtllm/setup_trtllm.sh— one-time setup/data/trtllm/start_trtllm.sh— container lifecycle/data/trtllm/smoke.py— validation test with TinyLlama
Inside the container these scripts are visible — thanks to the persistent mount to your local filesystem — as /workspace/setup_trtllm.sh, /workspace/start_trtllm.sh, /workspace/smoke.py. The scripts are freely available under the MIT license and uploaded to GitHub.
In the next part we get to the heart of it: the two-stage build pipeline with convert_checkpoint.py and trtllm-build, custom build scripts for FP16 and FP8, and the story of how my first FP8 engine turned into a perfectly fast, completely unreadable token-salad monster.
Article overview - TensorRT-LLM on the RTX A6000 Ada:
Preparing an Ubuntu 24.04 Server for AI Inference: CUDA, Docker, NVIDIA Container ToolkitTensorRT-LLM on the RTX A6000 Ada: Preparing for the Edge-LLM Ecosystem
TensorRT-LLM on Ubuntu 24.04: Setup with Docker and Helper Scripts
TensorRT-LLM Pipeline: Building Persistent Engines with FP16 and FP8
TensorRT-LLM in Numbers: FP16 vs. FP8 on the RTX A6000 Ada


The tutorial offers a clear and practical guide for setting up and running the Tensorflow Object Detection Training Suite. Could…
This works using an very old laptop with old GPU >>> print(torch.cuda.is_available()) True >>> print(torch.version.cuda) 12.6 >>> print(torch.cuda.device_count()) 1 >>>…
Hello Valentin, I will not share anything related to my work on detecting mines or UXO's. Best regards, Maker
Hello, We are a group of students at ESILV working on a project that aim to prove the availability of…