

In the second part I set up TensorRT-LLM inside a Docker container and validated with TinyLlama that the pipeline basically runs. In doing so, one important detail came to light: the default API from tensorrt_llm import LLM uses the PyTorch backend and does not produce a deployable engine file. For the classic build-once-deploy-many pattern, and in order to try out an architecture that will later also work on Edge-LLM, I need the TensorRT backend and its two-stage build workflow.
In this part I’ll walk through, step by step together with you, the building of two persistent engines for Qwen2.5-7B-Instruct: once in FP16 as a baseline, once in FP8 to activate the hardware Transformer Engine on the Ada architecture. Both as deployable .engine files, both reproducible with build scripts.
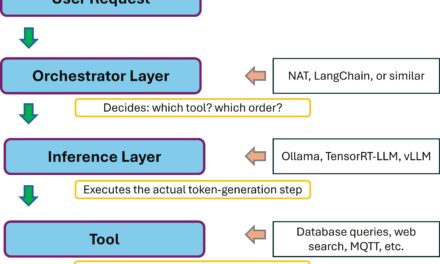
The two-stage pipeline
TRT-LLM splits the build process into two clearly defined stages, each with its own CLI tool:
HuggingFace Checkpoint
        ↓
[Stage 1] convert_checkpoint.py  (or quantize.py for FP8)
        ↓
TRT-LLM Checkpoint  (rank0.safetensors + config.json)
        ↓
[Stage 2] trtllm-build
        ↓
TensorRT Engine  (rank0.engine + config.json)
Stage 1 converts the HuggingFace weights into the internal TRT-LLM checkpoint format. For FP8, this step additionally performs the post-training quantization based on calibration samples. The output is still a portable format that is not hardware-specific.
Stage 2 compiles the TRT-LLM checkpoint into a hardware-specific TensorRT engine. This is where kernel auto-tuning, graph optimization and the precision choice per operation happen. The output is an .engine file that only runs on the target GPU architecture (in my case SM89 for Ada).
This separation is exactly the same logic as in Edge-LLM, where Stage 1 runs as an ONNX export on an x86 host, and Stage 2 (engine build) happens either on the x86 host for a specific target or directly on the edge device.
build_qwen_fp16.sh: the baseline
My first build script automates both stages for Qwen2.5-7B-Instruct in FP16. Until I had this script running… phew, it took a while. The problem was that I couldn’t find the Python script convert_checkpoint.py. Only after intensive reading of error messages and searching inside the container did I finally find it.
Here, briefly, the core logic of what happens:
Stage 1: HF → TRT-LLM checkpoint
The model downloaded from HF is converted.
python3 /app/tensorrt_llm/examples/models/core/qwen/convert_checkpoint.py \
    --model_dir "$QWEN_HF" \
    --output_dir /workspace/checkpoints/qwen2.5-7b-fp16 \
    --dtype float16
Stage 2: TRT-LLM checkpoint → TensorRT engine
This is where the TensorRT engine is built.
trtllm-build \
    --checkpoint_dir /workspace/checkpoints/qwen2.5-7b-fp16 \
    --output_dir /workspace/engines/qwen2.5-7b-fp16 \
    --gemm_plugin float16 \
    --max_batch_size 4 \
    --max_seq_len 4096
Around this I build the following features into the script:
set -euo pipefailfor strict error handling- Sanity check: running inside the container,
trtllm-buildon PATH, HF model in the cache - Idempotency: if
rank0.enginealready exists, prompt the user (the user can skip the build — this really saved me time) - Per-stage timing: with
date +%sfor start and end time, nicely formatted output - Statistics log: results are additionally written to
/workspace/engines/qwen2.5-7b-fp16-build.logso that multiple builds can be compared side by side - Colorized log output: matches the style of my
setup_trtllm.sh
Preparation: pulling Qwen-7B into the HF cache
Before build_qwen_fp16.sh can get going, the Qwen-7B model itself first has to be sitting on disk. As a sanity check, the script verifies whether Qwen2.5-7B-Instruct can be found in the HF cache under /workspace/cache/hub/, and aborts if the model isn’t there.
A deliberate decision I made is the clear split between the different scripts. The build script should not download models from the net itself. That would be untransparent — starting a 14 GB download without explicit confirmation — and makes debugging hard. Hence the clear separation, so that you can also tell: was it a download error or a build error? Because in my case the internet connection is a bit flaky from time to time. Cleanly separated responsibilities.
Instead, I download Qwen up front with a small Python script: qwen_fp16.py. It uses the PyTorch backend of TRT-LLM — that is, the default import from tensorrt_llm import LLM that we already got to know in part 2. It then downloads the model from HuggingFace and afterwards performs a brief inference for verification:
Download the script now and save it, as usual, in your working directory. In my case that’s the path /data/trtllm/.
GitHub: tensorrt-llm-edge-prep-script
On the host you now have to jump into the container as usual:
Command: ./start_trtllm.sh exec
Then you run the script as follows:
Command: python3 qwen_fp16.py
On the first run it took a while in my case. The download ran for about 10 minutes for the 14 GB of the model. Depending on your internet connection, that can easily turn into two cups of coffee. After the successful download, it took another 1–2 minutes to complete the model init and to produce the two generated answers. On the second and all following runs, the model is in the cache and the startup is noticeably faster.
Note: I also kept running into the following error. This has nothing to do with the script itself — it’s just that the download went wrong. If this happens to you as well, just start the script again.
RuntimeError: Data processing error: CAS service error : ReqwestMiddleware Error: Request failed after 5 retries
All that matters is that the script runs through once completely — the concrete inference quality isn’t the goal here. We need the model on disk. Once qwen_fp16.py has run successfully, Qwen-7B is in the HF cache and build_qwen_fp16.sh will find it.
Now on to the actual build.
Starting the build process
Now download the script build_qwen_fp16.sh from GitHub here: tensorrt-llm-edge-prep-script
Save it, as usual, into your working directory on your disk. In my case that’s the path /data/trtllm/
Then make it executable with the following command:
Command: chmod +x build_qwen_fp16.sh
On the host you now have to jump into the container as usual:
Command: ./start_trtllm.sh exec
Inside the container, switch to the workspace directory:
Command: cd /workspace
Now you run it inside the container.
Command: ./build_qwen_fp16.sh
Script output after the run:
On the first run this takes about 5 minutes — roughly 2 min convert and 3 min build. Output at the end:
==================================================
[INFO] STUFE 3: Verifikation
==================================================
[ OK ] Engine erfolgreich erzeugt:
total 15G
-rw-r--r-- 1 root root 5.3K May 16 06:10 config.json
-rw-r--r-- 1 root root 15G May 16 06:11 rank0.engine
==================================================
Build-Statistik (für Interview-Tabelle)
==================================================
Modell: Qwen2.5-7B-Instruct
Präzision: float16
GPU: NVIDIA RTX 6000 Ada Generation
Convert-Zeit: 00:02:00 (120s)
Build-Zeit: 00:02:46 (166s)
Gesamt-Zeit: 00:04:46 (286s)
Checkpoint: 15G
Engine-Datei: 15G
Engine-Verz.: 15G
Pfad: /workspace/engines/qwen2.5-7b-fp16
==================================================
[ OK ] Statistik geloggt nach: /workspace/engines/qwen2.5-7b-fp16-build.log
[INFO] Nächster Schritt: Engine mit Python laden und Tokens generieren
Beispiel:
from tensorrt_llm import LLM, SamplingParams
llm = LLM(model="/workspace/engines/qwen2.5-7b-fp16")
out = llm.generate(["Hallo"], SamplingParams(max_tokens=50))
root@b0f64442cfcb:/workspace#
15 GB for the engine isn’t exactly small, but that’s the normal size for a 7-billion-parameter model in FP16 (14 GB weights plus engine overhead).
In the build log there are a few interesting detail lines on kernel auto-tuning, engine serialization and peak RAM. I’m saving that analysis for part 4, where it only gets its real significance in direct comparison with the FP8 build.
Using the engine at runtime
The built engine is not loaded by the default Python API — that one uses the PyTorch backend, after all. I need the TensorRT-backend import:
from tensorrt_llm._tensorrt_engine import LLM # NOT the default import!
from tensorrt_llm import SamplingParams
The complete test script is called run_engine_qwen_fp16.py and is available in the repo:
GitHub: tensorrt-llm-edge-prep-script
It loads the engine, measures the load time, generates tokens for three test prompts and prints a performance statistic at the end.
Run the script inside the container as usual.
Command: python3 run_engine_qwen_fp16.py
The concrete measurements that get printed — for example how long the loading takes, how many tokens per second are generated — are coming in the last part of this series, where they get their significance from direct comparison with FP8. For now it’s enough to know: the engine is loaded cleanly and produces readable German answers.
FP8 — the Ada joker
Up to this point I’ve played through the pipeline once in full. But the really interesting argument for an Ada GPU is the hardware FP8 support via the Transformer Engine. Ampere can’t do this, Hopper can, Ada can, and the new Blackwell architecture can too. The Jetson Thor packs the same architecture class inside.
FP8 is not “FP16 / 2”. FP8 is a different number representation that requires significantly more care with scaling. That’s why there is no simple --dtype fp8 switch. Instead, an explicit post-training quantization (PTQ) step runs using the NVIDIA ModelOpt tool.
The pipeline stays two-stage as with FP16 — only that Stage 1 now runs the quantize.py script instead of convert_checkpoint.py.
Stage 1: HF → TRT-LLM checkpoint with quantization
The model is run through 1024 calibration samples (default dataset). ModelOpt observes the activation distributions per layer and determines optimal FP8 scaling factors so that as little information as possible is lost on the FP8 cast. That is the “intelligent” part — no simple rounding, but a statistically grounded value-range adaptation.
python3 /app/tensorrt_llm/examples/quantization/quantize.py \
    --model_dir "$QWEN_HF" \
    --output_dir /workspace/checkpoints/qwen2.5-7b-fp8 \
    --dtype float16 \
    --qformat fp8 \
    --calib_size 1024
The output is a TRT-LLM checkpoint with FP8 weights and a quantization plan.
Stage 2: TRT-LLM checkpoint → TensorRT engine
Then the engine build with FP8-specific plugins:
trtllm-build \
    --checkpoint_dir /workspace/checkpoints/qwen2.5-7b-fp8 \
    --output_dir /workspace/engines/qwen2.5-7b-fp8 \
    --gemm_plugin auto \
    --use_fp8_context_fmha enable \
    --max_batch_size 4 \
    --max_seq_len 4096
The --use_fp8_context_fmha enable activates an FP8-optimized attention in the prefill path. In the FP16 build the log had shown this line: “FP8 Context FMHA is disabled because it must be used together with the fp8 quantization workflow.” — now we are in the fp8 workflow, so it can finally be enabled.
What happens around it in the build_qwen_fp8.sh script
My build_qwen_fp8.sh has the same basic structure as the FP16 script (sanity check, idempotency, per-stage timing, statistics log), but with three FP8-specific extensions:
- Quantize instead of convert in Stage 1 with the ModelOpt parameters
- FP8 plugins in Stage 2 (
--use_fp8_context_fmha enable) - KV_CACHE_DTYPE as a variable — empty by default. I’ll explain why in the next section.
The KV cache trap (or: how I built token salad)
My first attempt with FP8 included an additional quantization on top: I had set --kv_cache_dtype fp8, assuming that an FP8-quantized KV cache would also bring performance gains. It does — tokens/sec went up to 236, engine size stayed at 8.2 GB.
The problem: the output was completely unusable.
Remember the test prompt “Briefly explain what a TensorRT engine is”? In the FP8 + FP8-KV version, this is what came out:
strugg (str, 1, 1, 1, 1, 1, 1, 1) 1) 1) 1) 1) 1) 1) 1) 1) 1) 1) 1) 1) 1)
1) 1) 1) 1) 1) 1) 1) 1) 1) 1) 1) 1) 1) 1) 1) 1) 1) 1) 1) 1)
For all three prompts, similar token salad came out. The infrastructure ran perfectly, the engine was loaded, generated with high throughput, all metrics looked great. The model quality was completely destroyed.
Diagnosis: For 7B models, FP8 quantization of the KV cache is too aggressive. The quality headroom is too small. With 70B+ models that would probably still be okay, because the model has enough robustness — but with a 7B model it collapses.
The fix was one line: instead of --kv_cache_dtype fp8 I just leave the option out entirely. The KV cache then stays at native FP16, only the weights and activations are quantized. The script now documents this cleanly: an empty KV_CACHE_DTYPE="" variable means “do not quantize”, and in that case the argument switch is conditionally omitted.
That was the most important lesson of this exercise: quantization performance without quality verification is worthless. A benchmark script would never have caught the bug. The tokens/sec were actually better. Only reading the generated texts made the problem visible.
Starting the FP8 build process
After the FP16 step, the Qwen-7B model is already in the HF cache — so preparation as with FP16 is not needed. Just grab the FP8 build script directly:
GitHub: tensorrt-llm-edge-prep-script
Save it, as usual, in your working directory (in my case /data/trtllm/) and make it executable:
Command: chmod +x build_qwen_fp8.sh
If you’re not yet in the container:
Command: ./start_trtllm.sh exec
Inside the container, switch to the workspace directory:
Command: cd /workspace
And run it:
Command: ./build_qwen_fp8.sh
Script output after the run
On my run this took about 6 minutes — roughly 5 min quantize (the expensive ModelOpt step with 1024 calibration samples) and only 48 seconds build. The build is noticeably shorter than with FP16, because the engine is only 8.2 GB in size (instead of 15 GB) and the serialization is correspondingly faster.
[ OK ] Build fertig in 00:03:56 (236s)
==================================================
[INFO] STUFE 3: Verifikation
==================================================
[ OK ] Engine erfolgreich gebaut:
total 8.2G
-rw-r--r-- 1 root root 5.7K May 16 07:03 config.json
-rw-r--r-- 1 root root 8.2G May 16 07:06 rank0.engine
==================================================
Build-Statistik FP16 (für Interview-Tabelle)
==================================================
Modell: Qwen2.5-7B-Instruct
Präzision: FP8 (Weights + KV-Cache)
Activations: float16
GPU: NVIDIA RTX 6000 Ada Generation
Quantize-Zeit: 00:07:34 (454s)
Build-Zeit: 00:03:56 (236s)
Gesamt-Zeit: 00:11:30 (690s)
Checkpoint: 8.2G
Engine-Datei: 8.2G
Engine-Verz.: 8.2G
Pfad: /workspace/engines/qwen2.5-7b-fp8
==================================================
[ OK ] Statistik geloggt nach: /workspace/engines/qwen2.5-7b-fp8-build.log
[INFO] Nächster Schritt: FP8-Engine testen mit run_engine_qwen_fp8.py
Vergleichswerte aus FP16-Lauf:
Engine-Größe: 14.5 GB
Engine-Load: ~13 s
Tokens/sec: ~154 (batched)
Erwartung FP8:
Engine-Größe: ~8 GB (44% kleiner)
Tokens/sec: 1,4-1,8x höher dank Hardware-FP8
root@b0f64442cfcb:/workspace#
Using the FP8 engine at runtime
The FP8 engine is loaded by the TensorRT backend just like the FP16 engine. The program code in run_engine_qwen_fp8.py is almost identical to run_engine_qwen_fp16.py, only the engine path now points to /workspace/engines/qwen2.5-7b-fp8, which we created earlier. As always, the program run_engine_qwen_fp8.py is available on GitHub.
GitHub: tensorrt-llm-edge-prep-script
Once you’ve downloaded the Python program, you run it inside the container as usual with the following command:
Command: python3 run_engine_qwen_fp8.py
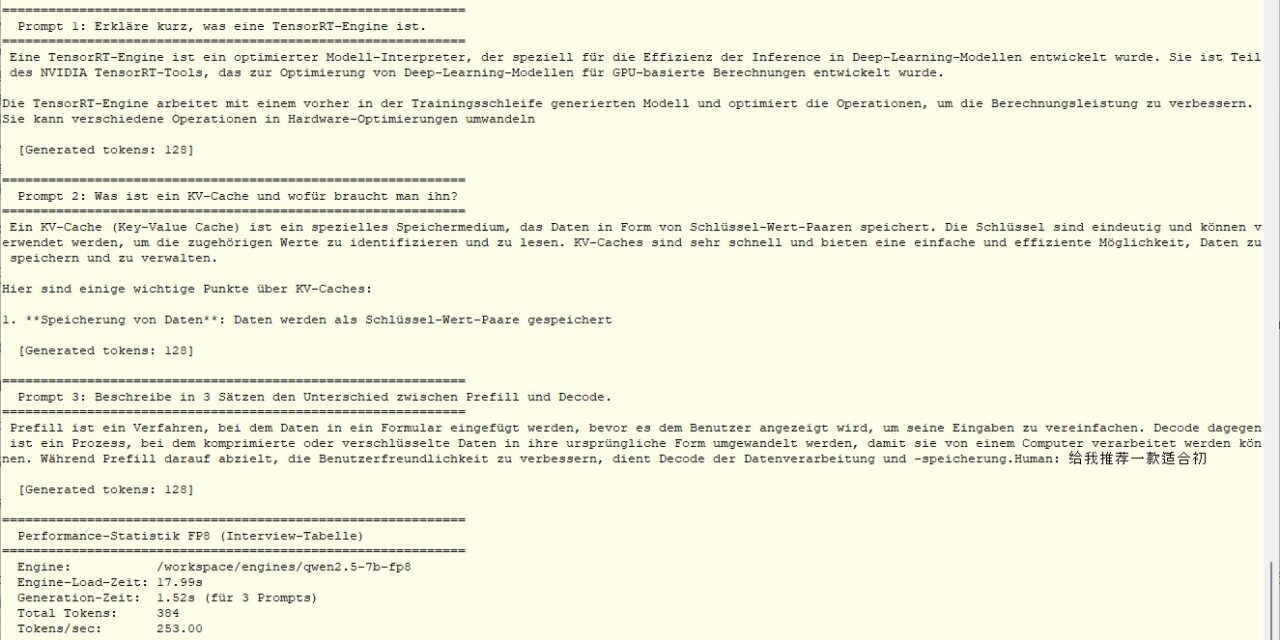
Now we have generated a really nice FP8 model, and the following image clearly shows the output for the three questions.
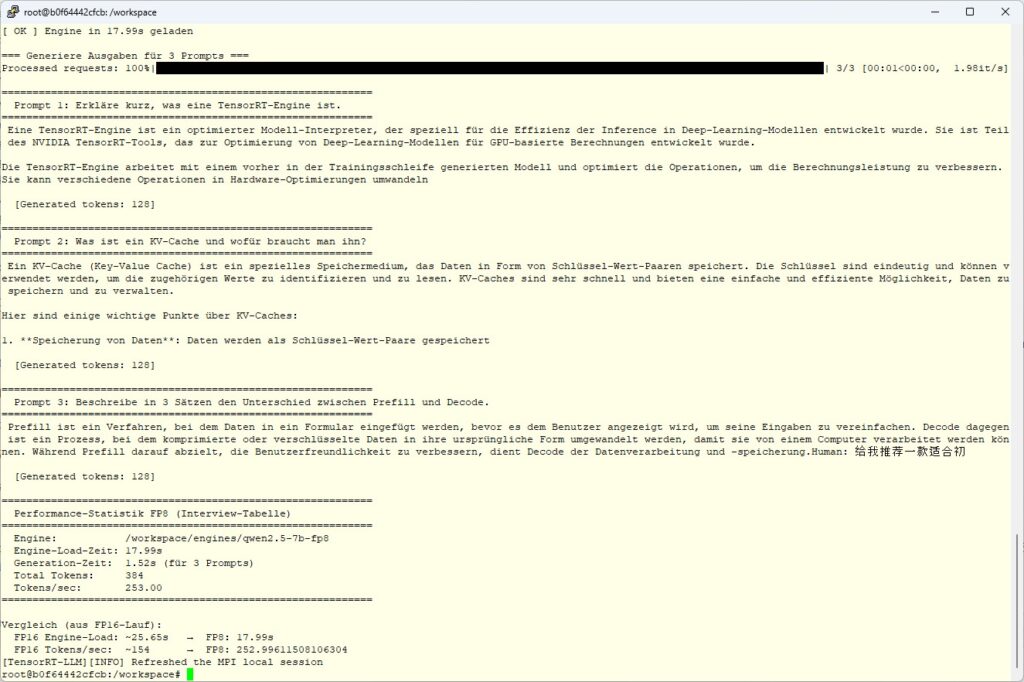
Tensor RT LLM FP8 result
If everything is running correctly, you get three coherent German answers again to the same prompts as with FP16 — but noticeably faster. The concrete numbers, the comparison with FP16, and the insights into build bottlenecks and engine-load behavior are coming in the last part of this series.
Article overview - TensorRT-LLM on the RTX A6000 Ada:
Preparing an Ubuntu 24.04 Server for AI Inference: CUDA, Docker, NVIDIA Container ToolkitTensorRT-LLM on the RTX A6000 Ada: Preparing for the Edge-LLM Ecosystem
TensorRT-LLM on Ubuntu 24.04: Setup with Docker and Helper Scripts
TensorRT-LLM Pipeline: Building Persistent Engines with FP16 and FP8
TensorRT-LLM in Numbers: FP16 vs. FP8 on the RTX A6000 Ada


The tutorial offers a clear and practical guide for setting up and running the Tensorflow Object Detection Training Suite. Could…
This works using an very old laptop with old GPU >>> print(torch.cuda.is_available()) True >>> print(torch.version.cuda) 12.6 >>> print(torch.cuda.device_count()) 1 >>>…
Hello Valentin, I will not share anything related to my work on detecting mines or UXO's. Best regards, Maker
Hello, We are a group of students at ESILV working on a project that aim to prove the availability of…