

Real-time speech recognition is one of the building blocks I absolutely want to self-host for sovereign voice agents. My vision is always to run everything locally – without a cloud API, without my audio recording ever leaving my network. With the model updated in March 2026, NVIDIA Nemotron ASR Streaming (0.6B), there is now a very attractive option for exactly that: a compact 600-million-parameter model that transcribes English speech with punctuation and capitalization and is designed for both low-latency streaming and batch processing.
In this post I’ll show you step by step how I got the model running on my local inference server (dual RTX A6000, Ubuntu). Conveniently, NVIDIA even officially lists the A6000 as tested hardware. That makes the ASR model a perfect fit for my homelab setup – or your workstation, if it has comparable hardware.
What is Nemotron ASR Streaming?
Nemotron-ASR-Streaming is based on the Cache-Aware FastConformer-RNNT architecture with 24 encoder layers and an RNN-Transducer decoder. The key difference from classic “buffered” streaming: instead of repeatedly recomputing overlapping audio windows, the model keeps caches for all self-attention and convolution layers. Each new audio chunk is therefore processed exactly once. This approach saves compute time and reduces latency without sacrificing accuracy.
What I find especially exciting is the runtime flexibility: the chunk size can be chosen at inference time, with no retraining at all. So you move freely along the Pareto curve between latency and accuracy. This makes it possible to tune the model – and your own setup – anywhere from 80 ms for highly reactive voice agents up to 1120 ms for maximum transcription quality.
Key facts at a glance
- Architecture: FastConformer-CacheAware-RNNT (24 encoder layers, RNNT decoder)
- Parameters: 600M
- Language: English (en-US), trained on roughly 530k hours of audio
- Chunk sizes: 80 ms, 160 ms, 560 ms, 1120 ms
- Features: punctuation & capitalization natively, optional ITN and translation via the pipeline
- License: NVIDIA Open Model License (usable commercially and non-commercially)
Requirements
Before we get started, a quick look at the requirements. You don’t need much hardware, because the model is small:
- Operating system: Linux (I use Ubuntu Server)
- GPU: NVIDIA GPU of the Volta, Ampere, Hopper or Blackwell architecture. Tested on V100, A100, A6000 and DGX Spark, among others. With 600M parameters, a few GB of VRAM are easily enough.
- Driver & CUDA: a current NVIDIA driver, matching the installed PyTorch CUDA version
- Python: 3.10 or 3.11 (I recommend a clean venv environment)
- Runtime: NeMo 25.11 or newer
Step 1: Install system packages
NeMo needs libsndfile and ffmpeg for audio processing. We install these first at the system level. We also need the venv module for our virtual Python environment. It is very likely already present, but on many distributions it lives in the python3-venv package:
Command: sudo apt-get update && sudo apt-get install -y libsndfile1 ffmpeg python3-venv python3-pip
Step 2: Create a Python venv
So that the NeMo dependencies don’t collide with other projects or the system Python, I always work in an isolated virtual environment (venv). This keeps the setup clean and can be removed without any residue at any time – just delete the folder.
First create the venv with Python 3.11 (adjust the path as you like) and then activate it:
Next we create a virtual environment named nemotron-asr in the ~/venv/ folder of the home directory using Python 3.11.
Command: python3.11 -m venv ~/venvs/nemotron-asr
Now the environment that has been set up still needs to be activated with the following command.
Command: source ~/venvs/nemotron-asr/bin/activate
Once the venv is active, you’ll see its name in your prompt, e.g. (nemotron-asr). First, we bring pip and the build tools up to date – this saves you many a build error later on:
Command: pip install --upgrade pip setuptools wheel
Tip: For every new terminal session you have to activate the environment again with source ~/venvs/nemotron-asr/bin/activate. You can leave it at any time with deactivate.
Step 3: Install PyTorch and NeMo
NVIDIA explicitly recommends this order: first Cython and a current PyTorch, then the NeMo toolkit. Install PyTorch with the CUDA version that matches your driver (example here: CUDA 130).
All of the following commands run inside the activated venv:
First, Cython and packaging are installed.
Command: pip install Cython packaging
Install a current PyTorch with CUDA support inside the virtual environment. Important: please watch the CUDA version and adjust it if necessary!
Command: pip install torch torchvision torchaudio --index-url https://download.pytorch.org/whl/cu130
NeMo toolkit with ASR extras directly from the main branch.
Command: pip install "nemo_toolkit[asr] @ git+https://github.com/NVIDIA/NeMo.git@main"
Important note:
The updated checkpoint from March 2026 requires the main branch of NeMo. A release package installed via pip is often not current enough here. That’s why I prefer installing directly from GitHub.
Step 4: First test – load the model and transcribe
Now the exciting moment. With just a few lines of Python, the model loads directly from Hugging Face and transcribes an audio file in offline mode (the whole file at once). This is the fastest way to check whether everything is installed correctly.
Download the small Python program here and unzip it. I saved it locally in a folder ~/asr/.
Download: https://github.com/custom-build-robots/nemotron-asr-local-streaming-demo
So that HF doesn’t throw an error, set the HF token once in the shell here.
Command: export HF_TOKEN="hf_xxxxxxxxxxxxxxxxxxxxx"
Now run the previously created script and pass the audio file directly in the command.
Command: python transcribe.py audio.wav
If a correctly transcribed text output with punctuation appears here, your setup is working. With that, the real hurdle – the installation – is already cleared.
I made the small mistake of using a stereo WAV file and got the following error.
Input shape expected = (batch, time)
Input shape found : torch.Size([1, 2, 631520])
More on that in the following Step 5, because my stereo file that caused this error cannot be processed.
Step 5: Prepare the audio correctly
The model expects mono audio in WAV format. You can convert stereo recordings or other sample rates most easily with ffmpeg. 16 kHz, mono, 16-bit PCM has proven reliable:
ffmpeg -i input.mp3 -ar 16000 -ac 1 -c:a pcm_s16le audio.wavThere is no fixed maximum length – the upper limit depends solely on the available GPU memory. On my A6000 with 48 GB this is not an issue in practice.
Step 6: Streaming inference with the cache-aware script
For real streaming, i.e. continuous processing in chunks, NeMo ships a ready-made example script. Important upfront: this script needs neither a screen nor a microphone and can be used via SSH. It reads audio files from disk and writes the transcripts to a file. So it’s exactly right for my headless A6000 Ada server, on which I set everything up via SSH. The script simulates streaming on already existing files – it feeds them in chunk by chunk to test the streaming behavior – and is not a live microphone capture.
First we clone the NeMo repository:
Command: cd ~
Command: git clone https://github.com/NVIDIA/NeMo.git
Command: cd NeMo
Then you start the cache-aware streaming inference. The central parameter is att_context_size, which controls the latency:
python examples/asr/asr_cache_aware_streaming/speech_to_text_cache_aware_streaming_infer.py \
    model_path=<model_path> \
    dataset_manifest=<dataset_manifest> \
    batch_size=<batch_size> \
    att_context_size="[70,13]" \
    output_path=<output_folder>
This command looks more cryptic at first glance than it is. The <...> are pure placeholders that you have to replace with real values:
- model_path – path to the local
.nemomodel file (exactly the file that was downloaded byfrom_pretrainedin Step 4). - dataset_manifest – a JSONL file listing which audio files should be transcribed (NeMo manifest format).
- batch_size – simply a number, e.g.
16. On the A6000 Ada (48 GB) you can go higher. - att_context_size – your latency control (more on that in Step 7), here
[70,13]= 1.12 s chunk size. - output_path – a folder into which the results are written.
To make this concrete, I’ll walk through it step by step.
1. Place the .nemo file locally. If you don’t want to search for the path in the HF cache, you can download the model file directly:
hf download nvidia/nemotron-speech-streaming-en-0.6b \
    nemotron-speech-streaming-en-0.6b.nemo \
    --local-dir ~/asr/models
For me, though, the file was quite easy to find in my home directory in the folder ~/.cache/huggingface/..., as shown in the path below:
Path: ~/.cache/huggingface/hub/models--nvidia--nemotron-speech-streaming-en-0.6b/snapshots/<commit-hash>/
2. Build a manifest.
The manifest is a simple text file in which each line contains a JSON object with the audio path:
Command: nano ~/asr/manifest.jsonl
Then the following is inserted into the file, here using my home directory as an example.
{"audio_filepath": "/home/ingmar/asr/audio.wav", "duration": 25.0, "text": ""}
Save the file with Ctrl + x followed by y.
The value for duration can be rough, text stays empty for pure inference. For multiple files, simply append more lines.
3. The finished command with real values.
Now you replace the placeholders with your actual paths. For me it looked like this.
Command: python ~/NeMo/examples/asr/asr_cache_aware_streaming/speech_to_text_cache_aware_streaming_infer.py \
model_path=/home/ingmar/.cache/huggingface/hub/models--nvidia--nemotron-speech-streaming-en-0.6b/snapshots/7a9b763e6c5fb103da690219c049fac917aa50b1/nemotron-speech-streaming-en-0.6b.nemo\
dataset_manifest=/home/ingmar/asr/manifest.jsonl \
batch_size=16 att_context_size="[70,13]"\
output_path=/home/ingmar/asr/results \
It’s best to write the command on a single line without backslashes so that nothing can go wrong when pasting:
Command: python ~/NeMo/examples/asr/asr_cache_aware_streaming/speech_to_text_cache_aware_streaming_infer.py model_path=/home/ingmar/.cache/huggingface/hub/models--nvidia--nemotron-speech-streaming-en-0.6b/snapshots/7a9b763e6c5fb103da690219c049fac917aa50b1/nemotron-speech-streaming-en-0.6b.nemo dataset_manifest=/home/ingmar/asr/manifest.jsonl batch_size=16 att_context_size="[70,13]" output_path=/home/ingmar/asr/results
You’ll then find the finished transcripts in the folder ~/asr/results.
Note on the NeMo version: Which Hydra keys the script expects exactly (model_path= versus possibly pretrained_name=) and whether duration is mandatory in the manifest depends on the current state of the main branch. Before you guess, it’s worth a quick look at the script’s built-in help:
Command: python examples/asr/asr_cache_aware_streaming/speech_to_text_cache_aware_streaming_infer.py --help
The second value in att_context_size is the right context and may take one of the values {0, 1, 6, 13}. That is exactly your latency control.
Step 7: Understanding chunk sizes and the latency control
The latency is defined via att_context_size = {left_context, right_context}, measured in 80 ms frames. The chunk size results from the current frame plus the right context:
| att_context_size | Chunk size | Latency | Recommended use |
|---|---|---|---|
| [70, 0] | 1 frame | 0.08 s | Maximum reactivity (voice agent) |
| [70, 1] | 2 frames | 0.16 s | Highly reactive live applications |
| [70, 6] | 7 frames | 0.56 s | Good compromise |
| [70, 13] | 14 frames | 1.12 s | Best accuracy / live captioning |
Each chunk is processed strictly non-overlapping – this is the efficiency gain of the cache-aware architecture compared to classic buffering.
Step 8: End-to-end pipeline with punctuation, ITN and translation
If you want more than just plain transcription, use the pipeline method. It builds on the configuration file cache_aware_rnnt.yaml and provides complete workflows including punctuation & capitalization (PnC), inverse text normalization (ITN) and optional translation.
You’ll find the configuration file in the NeMo repository under examples/asr/conf/asr_streaming_inference/cache_aware_rnnt.yaml. After that, the following code is enough:
from nemo.collections.asr.inference.factory.pipeline_builder import PipelineBuilder
from omegaconf import OmegaConf

# Path to the cache_aware_rnnt.yaml
cfg_path = 'cache_aware_rnnt.yaml'
cfg = OmegaConf.load(cfg_path)

# Paths of all audio files to be transcribed
audios = ['/path/to/your/audio.wav']

# Create the pipeline object and run inference
pipeline = PipelineBuilder.build_pipeline(cfg)
output = pipeline.run(audios)

# Output
for entry in output:
    print(entry['text'])
Performance: What can you expect?
NVIDIA measures accuracy via the Word Error Rate (WER) on the datasets of the HuggingFace OpenASR leaderboard. The latency-accuracy trade-off is clearly visible here: the larger the chunk, the lower the error rate.
| Chunk size | Ø WER | LS test-clean | LS test-other | AMI |
|---|---|---|---|---|
| 1.12 s | 6.93 % | 2.32 % | 4.84 % | 11.73 % |
| 0.56 s | 7.07 % | 2.46 % | 5.07 % | 11.88 % |
| 0.16 s | 7.67 % | 2.56 % | 5.57 % | 14.71 % |
| 0.08 s | 8.43 % | 2.80 % | 6.01 % | 18.29 % |
Remarkable: even at the most aggressive latency of 80 ms, the average WER is still below 9% – and for clean audio (LibriSpeech test-clean) even below 3%. For live applications, that’s an excellent value.
Tips for production use
- Parallel streams: Thanks to the efficient cache architecture, far more simultaneous streams fit on the GPU at the same VRAM than with buffered approaches. The good thing about this: it lowers the cost per transcription.
- Choosing the right chunk size: For an interactive voice agent I’d start with [70, 1] or [70, 6]; for captioning or transcripts go with [70, 13] instead.
- Check the audio format: Mono is mandatory. Wrong sample rates are the most common source of errors. When in doubt, always convert the audio file with ffmpeg beforehand.
- Hosted variant for testing: If you first want to experiment without a local GPU, you can call the model via the NVIDIA NIM API on build.nvidia.com using
nvidia-riva-client. For sovereign operation, though, the local installation remains my favorite.
Live Demo Web App
Now we’ve set everything up, and basically the only thing still missing is a small web application that shows what NVIDIA Nemotron ASR is capable of. The Python program has to be started in the virtual environment as usual.
Command: source ~/venvs/nemotron-asr/bin/activate
The Python program asr_gradio_app.py is available for download here.
Download: https://github.com/custom-build-robots/nemotron-asr-local-streaming-demo
Now save the Python program in a folder on your computer.
Option 1 – SSH tunnel:
Next I had to set up an SSH tunnel to my server, because otherwise the microphone isn’t supported since I don’t have HTTPS encryption. To do this, I ran the following command in my Windows PowerShell, which establishes an SSH tunnel to my server.
Command: ssh -L 3000:localhost:7860 ingmar@192.168.2.119
After that I could simply enter the following URL in the browser and open the Gradio web app. It was then also possible to use the microphone for recording.
URL: http://localhost:3000/
Option 2 – Gradio public share URL:
In the last line of the script I set share=True. This makes the Gradio app generate an https link that can be called from anywhere on the internet if you know the URL. Then you don’t have to work with the SSH tunnel and can also use the microphone directly.
Starting the web app
Now start the Python program as follows.
Command: python asr_gradio_app.py
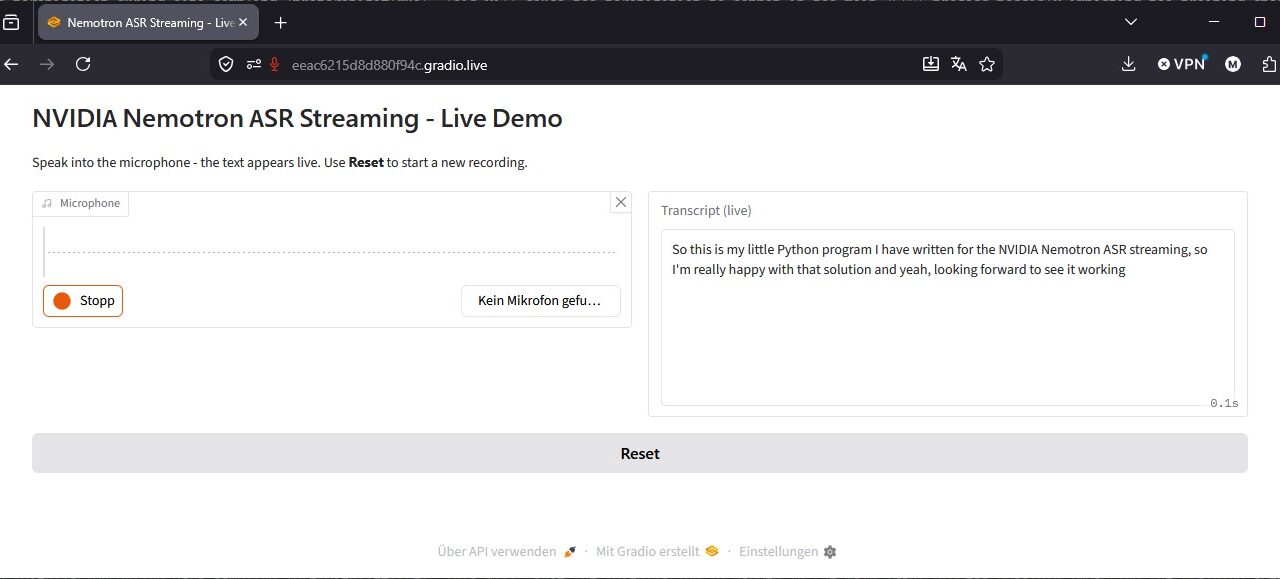
For me, the web interface looks like this.
NVIDIA Nemotron ASR Streaming
Conclusion
With Nemotron ASR Streaming you get a surprisingly powerful, compact speech recognition model that can be set up locally in under an hour. The Cache-Aware FastConformer-RNNT architecture delivers exactly what I need for a sovereign voice agent: low latency, good accuracy and the freedom to decide the trade-off at runtime myself. And all of that on your own hardware, without speech data wandering off into someone else’s cloud.
For me, this is another building block in building a fully self-hosted AI stack. As a next step, I’d like to integrate the model into Open WebUI as an STT backend and combine it with a local TTS into an end-to-end voice loop. But that’s material for a separate post, if I get around to it.
If you build this setup yourself: feel free to write in the comments which chunk size gives you the best results for your use case.


The tutorial offers a clear and practical guide for setting up and running the Tensorflow Object Detection Training Suite. Could…
This works using an very old laptop with old GPU >>> print(torch.cuda.is_available()) True >>> print(torch.version.cuda) 12.6 >>> print(torch.cuda.device_count()) 1 >>>…
Hello Valentin, I will not share anything related to my work on detecting mines or UXO's. Best regards, Maker
Hello, We are a group of students at ESILV working on a project that aim to prove the availability of…