

In my last post I ran NVIDIA Nemotron ASR Streaming directly with NeMo locally. That was the “bare” route via the framework. In this post I go one step further and dive into NVIDIA NIM. NIM stands for NVIDIA Inference Microservices, the microservice variant NVIDIA uses to ship its models as ready-made, optimized containers. The goal: run a German speech recognition service as a local microservice that later slots cleanly into a complete voice agent. And, as always, the aim is for everything to run on my own hardware, locally, without the cloud.
What is NVIDIA NIM?
NIM (NVIDIA Inference Microservices) packages a model together with an optimized inference engine into a single Docker container. Instead of building an environment with PyTorch, NeMo and the matching dependencies yourself like in Part 1, you pull a ready-made container from the NVIDIA registry (`nvcr.io`) and start it. The container ships a standardized API (HTTP and gRPC), so you can address the service just like a cloud API only locally.
For me this is exciting for two reasons:
- First, bringing it up is much faster and more reproducible than a manual framework build.
- Second, NIM is the building block NVIDIA also uses as the deployment layer in its own voice-agent architecture.
So anyone who wants to build a complete voice agent later will hardly get around NIM.
The goal of this post
We run an ASR NIM for German based on the streaming-capable, multilingual Parakeet model. Unlike a plain file upload, this time it is about real live streaming: in the end you speak into the microphone and watch your transcript appear live in the browser and I will stress it once more, completely local, that is my goal.
This ties directly into Part 1, and that is exactly where the interesting difference lies:
- In Part 1 the model ran inside your Python process (NeMo, cache-aware). The small Gradio web app loaded the model itself.
- In this part the model sits behind a microservice. Our web app becomes a thin streaming client that sends the microphone audio chunk by chunk to the local NIM endpoint.
Same UX in the browser, a completely different foundation and that is exactly what makes the microservice idea tangible. We wire up the app for it (nim_asr_gradio_app.py) to the service at the end of the post.
Does it really stay local? Riva ≠ cloud
A question that comes up right away: we are about to talk to the Riva client and an important point for me. Does using Riva send my voice data out of my network? No. “Riva” is not a cloud service but NVIDIA’s speech framework, i.e. the API layer. There is a Riva client and a Riva server. Where the data goes depends solely on which server the client points to:
--server 0.0.0.0:50051→ your local NIM container on your own GPU. The audio runs over localhost, it does not leave the machine.- If you point the client at an NVIDIA-hosted endpoint instead, then the audio would go to the cloud. We deliberately do not do that here.
Once the container is running, you could even disconnect the machine from the internet (air-gapped) and transcription would keep working. The only outbound traffic is the one-time model download from nvcr.io on first start and the license check via the API key. Never your voice material.
Note: Parakeet is a great starting point because it supports streaming and is therefore closer to the later agent. If you need maximum accuracy or additional translation, you can use the Canary NIM instead. The steps are almost identical, only the container ID and profile change. That is exactly the topic of Part 3.
Requirements
- Operating system: Linux (I use Ubuntu Server)
- GPU: NVIDIA GPU with compute capability ≥ 8.0 and at least 16 GB VRAM. My RTX A6000 Ada (48 GB) clears that easily.
- Docker and the NVIDIA Container Toolkit (you already have this if you run containers with GPU access)
- A current NVIDIA driver
- A free NGC account and an NGC API key to pull the NIM containers
- A Python venv for the client and the web app (as in Part 1)
Step 1: Create an NGC account and API key
The NIM containers live in the NVIDIA registry and are access-restricted. You therefore need a free NGC account and a personal API key.
First, register at ngc.nvidia.com so you can then generate an API key.
URL: ngc.nvidia.com
After successful registration, open the following page.
URL: org.ngc.nvidia.com
You should now see the following dashboard.
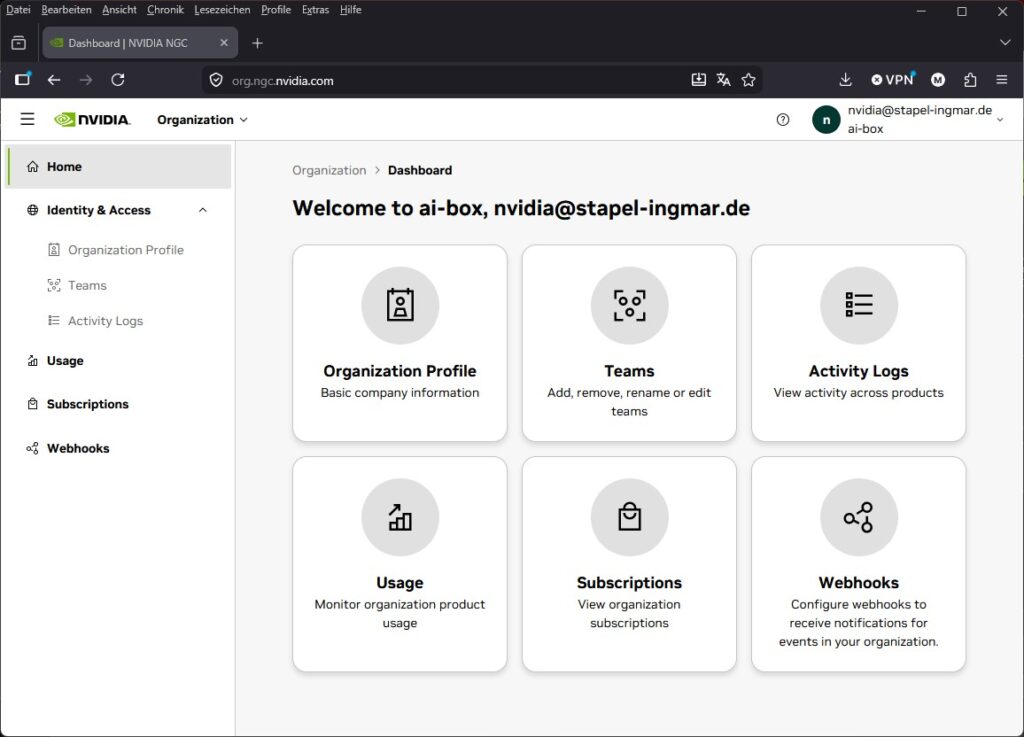
NVIDIA NGC dashboard organization management
Now open the following URL to create the personal key we need.
URL: org.ngc.nvidia.com/setup/personal-keys
On the Setup page you will see the button for the Personal Key. For our local NIM use you take exactly this one, so you click the “Generate Personal Key” button. In the dialog:
- Give it a name and choose a generous expiration
- Under Services Included make sure to tick NGC Catalog (otherwise the container pull will not work later)
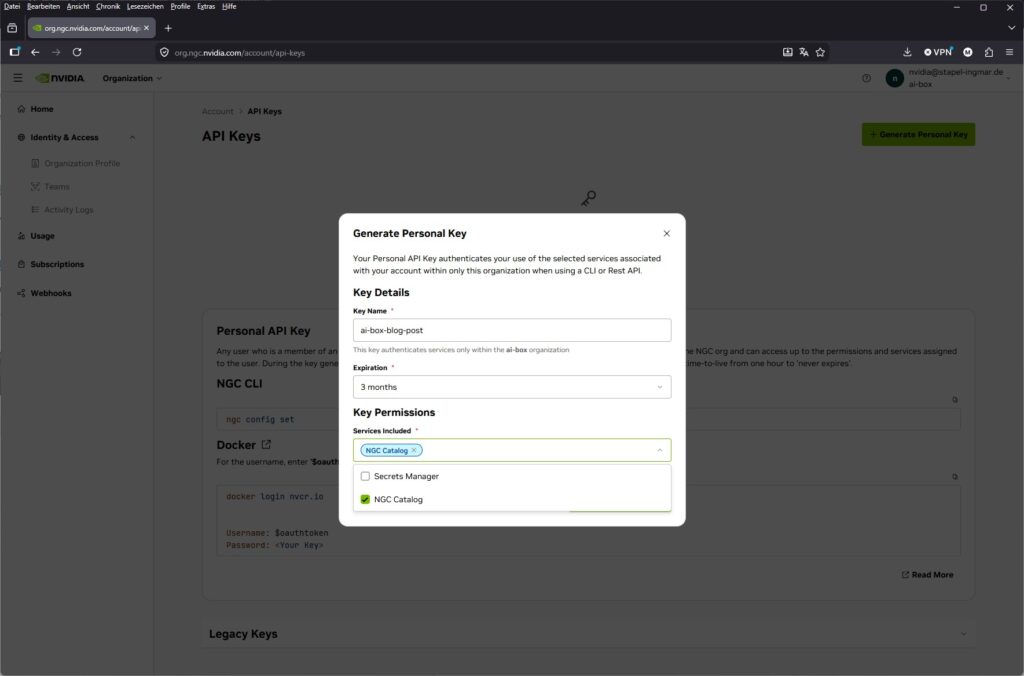
NVIDIA NGC dashboard personal key config
You do not need the Secrets Manager entry for our purpose, so I did not select it.
Now continue and yes, store the key safely.
Step 2: Log Docker in to the NVIDIA registry
You use the API key to log Docker in to the registry nvcr.io. The username is the fixed value $oauthtoken, the password is your API key.
Command: docker login nvcr.io
At the prompt, enter $oauthtoken as the username and your NGC API key as the password.
For me the terminal showed the following:
ingmar@A6000Ada:~$ docker login nvcr.io
Username: $oauthtoken
Password:WARNING! Your credentials are stored unencrypted in ‘/home/ingmar/.docker/config.json’.
Configure a credential helper to remove this warning. See
https://docs.docker.com/go/credential-store/Login Succeeded
ingmar@A6000Ada:~$
Note: You only really need the stored login to pull the container image. Once the image is on disk locally (after the first docker run), you can remove the credentials again with the following command.
Command: docker logout nvcr.io
This removes the credentials from the file. The image stays in the local cache, and the running container authenticates via the NGC_API_KEY environment variable, not via the Docker login. Only when you want to update the image do you log in again briefly.
Step 3: Prepare the API key and cache
So the container can use the key, we store it as an environment variable. We also set up a local cache directory so the model is not downloaded again on every start.
Command: export NGC_API_KEY="nvapi-xxxxxxxxxxxxxxxxxxxxx"
In addition we create a local cache directory. The background: on first start the NIM downloads the model (several GB) from the NGC registry. Since we start the container with --rm, it is completely deleted when it stops. If the cache lived only inside the container, the model would be re-downloaded on every restart. That is why in Step 4 we mount this host directory into the container (-v ~/.cache/nim:/opt/nim/.cache). The model then stays on your machine’s disk, and the service is ready in seconds on the second start instead of after a minutes-long download.
We create the directory ourselves beforehand so it belongs to your user and is not created by Docker as root:
Command: mkdir -p ~/.cache/nim
Step 4: Start the German ASR NIM in streaming mode
Now we start the actual microservice. The basic structure of a NIM start looks like this: we pass the GPU through, set the API key, open the HTTP and gRPC ports and pick a model profile via NIM_TAGS_SELECTOR.
Since our goal is the live voice path, we take the streaming profile with low latency: mode=str. As the model we use the multilingual Parakeet, which includes German out of the box:
Command: export CONTAINER_ID=parakeet-1-1b-rnnt-multilingual
Command: export NIM_TAGS_SELECTOR="mode=str"
Command: docker run -it --rm --name=$CONTAINER_ID --runtime=nvidia --gpus '"device=0"' --shm-size=8GB -e NGC_API_KEY -e NIM_HTTP_API_PORT=9000 -e NIM_GRPC_API_PORT=50051 -p 9000:9000 -p 50051:50051 -e NIM_TAGS_SELECTOR -v ~/.cache/nim:/opt/nim/.cache nvcr.io/nim/nvidia/$CONTAINER_ID:latest
The first start takes a while because the container downloads the model and prepares the inference engine. The service is ready once a corresponding “running” line appears in the logs.
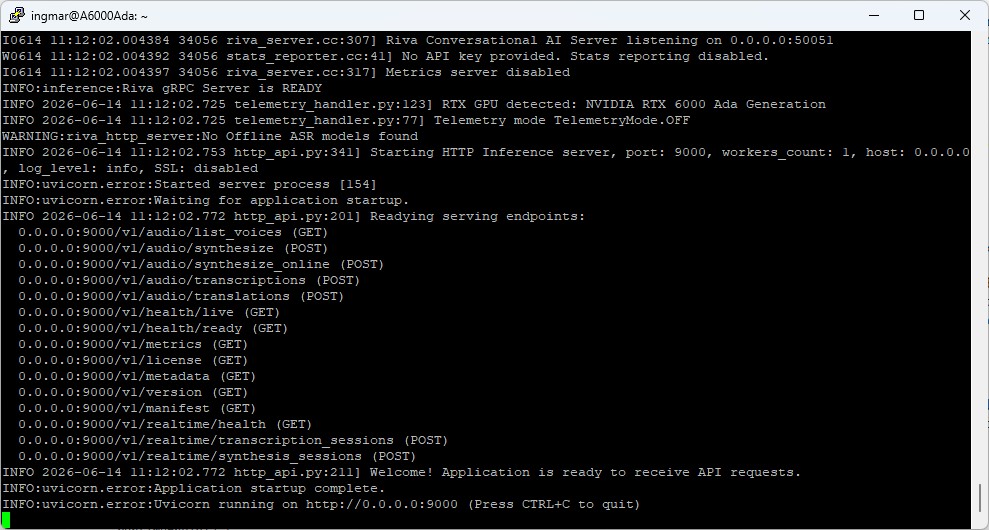
NVIDIA NIM container setup
Note on container ID and profile: Both come from the current NIM ASR support matrix. Should NVIDIA rename the model or change profiles, you will find the valid values there or on the model page at build.nvidia.com. We look at the available profiles (str, str-thr, ofl) more closely in Step 8.
Step 5: Check the container status
In a second terminal you can check whether the service is running.
Command: docker ps
Command: curl http://localhost:9000/v1/health/ready
If the health check answers as shown below, your ASR microservice is up.
ingmar@A6000Ada:~$ curl http://localhost:9000/v1/health/ready
{"object":"health.response","message":"ready","status":"ready"}ingmar@A6000Ada:~$
Step 6: Quick functional test on the command line
Before we hook up the web app, we quickly check with the official Riva client whether the service transcribes correctly. Since the service runs locally, we do not need cloud authentication – we simply point at localhost and the gRPC port.
First we create another virtual environment with the following command.
Command: python3 -m venv ~/venvs/riva-client
Now we activate this virtual environment.
Command: source ~/venvs/riva-client/bin/activate
Important: from now on we always run the following commands inside this venv. In other words, it must always be active, or be re-activated when, for example, the machine was rebooted or the SSH connection had to be rebuilt.
Command: pip install nvidia-riva-client
The following command downloads the nvidia-riva repository onto the machine.
Command: git clone https://github.com/nvidia-riva/python-clients.git
Because we run the streaming profile, we use the streaming script transcribe_file.py that is already included. It streams the file chunk by chunk to the service, which is exactly the behavior we need live in a moment.
Note: as in Part 1, the rule is mono WAV, 16 kHz – convert with ffmpeg beforehand if in doubt.
Make sure that a file audio.wav, recorded in mono and not in stereo, sits in a folder such as /home/ingmar/audio/.
Command: python python-clients/scripts/asr/transcribe_file.py --server 0.0.0.0:50051 --language-code de-DE --automatic-punctuation --input-file /home/ingmar/audio/audio.wav
For me the spoken text was then printed in the terminal.
Check the language code: The multilingual Parakeet partly detects the spoken language automatically, and the exact expected language codes depend on the loaded profile. The following call lists which models and codes your container actually offers. We then enter the matching value in one place in the web app:
python python-clients/scripts/asr/transcribe_file.py \
    --server 0.0.0.0:50051 --list-models
If a clean German transcript with punctuation comes back, the foundation is done and we can dock the live app.
Step 7: Dock the live app to the NIM
Now comes the bridge to Part 1. Instead of loading the model itself like before, our Gradio app becomes a streaming client: it captures the microphone, converts the audio to mono/16 kHz and sends it chunk by chunk via the Riva gRPC streaming API to localhost:50051. The transcripts come back live into the browser.
We install the required packages in the riva-client venv:
Command: pip install gradio nvidia-riva-client numpy scipy
Then you start the app. Enter the language code from Step 6 at the top of the file under LANGUAGE_CODE; NIM_SERVER stays at localhost:50051.
Command: python nim_asr_gradio_app.py
Download: You can download the Python program here.
As in Part 1, for microphone access you need either an SSH tunnel to the server or the Gradio share URL (share=True), because without HTTPS the browser will not grant microphone access.
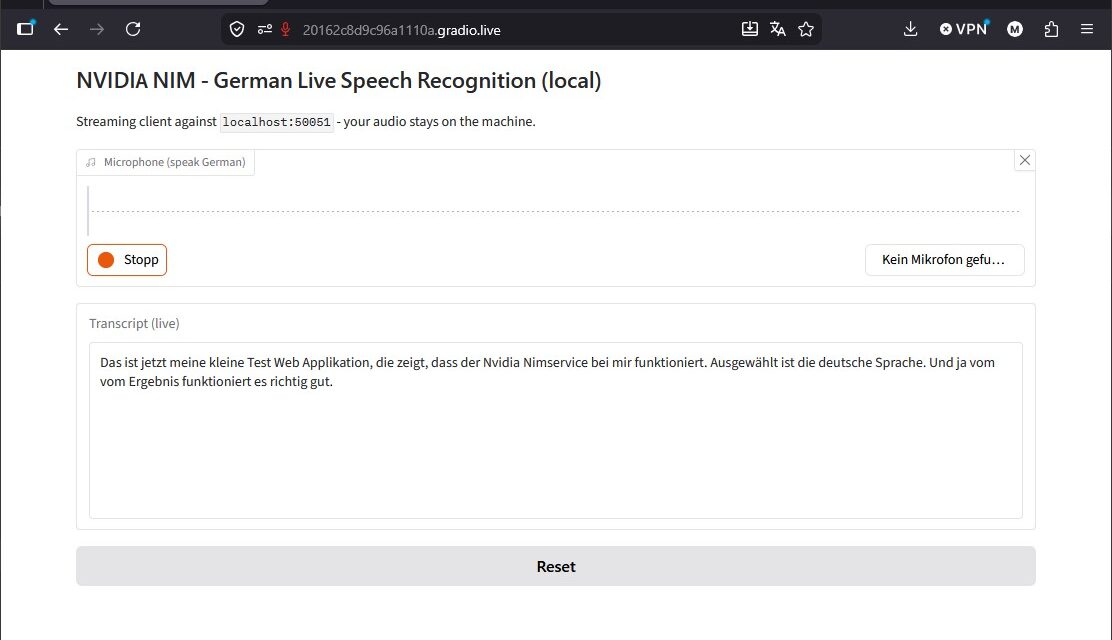
Web app screenshot:
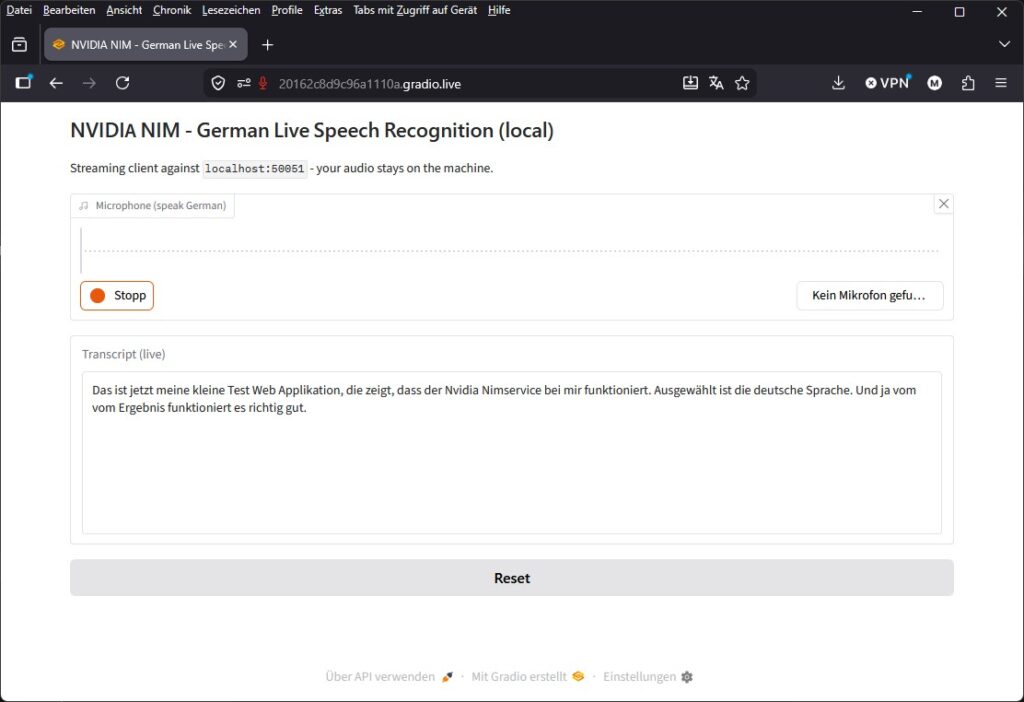
NVIDIA NIM ASR web app
Step 8: The NIM profiles at a glance
NIM provides several profiles for a model, which you select via NIM_TAGS_SELECTOR. For the later voice agent the low-latency streaming profile is decisive. That is why I chose mode=str above.
| NIM_TAGS_SELECTOR | Mode | When to use? |
|---|---|---|
mode=str |
Streaming, low latency | Live transcription, voice agent (our choice) |
mode=str-thr |
Streaming, high throughput | Many parallel streams at once |
mode=ofl |
Offline / batch | Whole files at once, highest accuracy |
Tips and troubleshooting
- Keep an eye on VRAM: Use
nvidia-smito check that the container occupies the GPU and that enough memory is free. - Wrong GPU: With
--gpus '"device=0"'you select a specific card. On a multi-GPU machine that matters. - Audio format: Mono, 16 kHz – the most common source of errors, just like with Nemotron in Part 1. The web app normalizes the microphone audio automatically before sending.
- Microphone in the browser: No microphone without HTTPS. Either set up an SSH tunnel to the server or use the Gradio share URL.
- Ports in use: If 9000 or 50051 are already taken, simply remap them to free ports in the
docker runcommand. - Empty transcript despite a working microphone: If you adapt the app, note that Gradio delivers the microphone audio already on the int16 scale (values up to ±32767), often as a float dtype, not in the [-1, 1] range. Clipping it to [-1, 1] before sending crushes the signal into full-scale noise and the service recognizes nothing. The audio must stay on the int16 scale (exactly what the
to_pcm16_16kfunction in the app does).
Conclusion
With NIM, the manual framework build from Part 1 becomes a clean, reproducible microservice: one container, a standardized API, German live speech recognition on your own hardware. The same web app as in Part 1, but with a swapped foundation. The key change is that the model is now a service and the app is merely its client. This fits exactly the idea of sovereign AI that runs through my entire stack. The data is mine and stays with me, and so does control.
In the next part I take on the sister model: NVIDIA Canary as a NIM. Canary shines at accuracy and can additionally translate, producing English text directly from German audio. After that, Magpie TTS adds the voice output, and step by step the complete local voice agent grows out of it.
If you rebuild the setup: drop me a comment about which model profile gives you the best balance of latency and accuracy on which hardware.


The tutorial offers a clear and practical guide for setting up and running the Tensorflow Object Detection Training Suite. Could…
This works using an very old laptop with old GPU >>> print(torch.cuda.is_available()) True >>> print(torch.version.cuda) 12.6 >>> print(torch.cuda.device_count()) 1 >>>…
Hello Valentin, I will not share anything related to my work on detecting mines or UXO's. Best regards, Maker
Hello, We are a group of students at ESILV working on a project that aim to prove the availability of…