

The two halves of a voice agent are in place: with Parakeet (Part 2) and Canary (Part 3) the agent listens, with Magpie (Part 4) it answers. What’s still missing is the brain: the layer that turns recognized text into a decision and triggers the matching answer or action. That’s exactly what I take on in this part with the NVIDIA NeMo Agent Toolkit (NAT). With NAT I build the orchestrator that later sits between ASR and TTS in the voice loop.
What is the NeMo Agent Toolkit – and is it part of NIM?
A quick note up front, because I had exactly this question: NAT is not a NIM. The two things live on different levels.
A NIM is a delivery format for NVIDIA models – a Docker container that serves a model (ASR, TTS or an LLM) behind a standardized API. The NeMo Agent Toolkit, by contrast, is a framework, i.e. a Python library that you install separately (pip install nvidia-nat) and drive via the CLI nat with YAML workflows. NAT itself needs no GPU; it only calls models.
So the relationship is: NAT is the conductor, the NIMs (and your Ollama LLM) are the orchestra. Which LLM NAT uses for reasoning you enter in the YAML via, for example, the base URL and the interface type. The LLM can be an LLM NIM or, as in my case, my existing Ollama server. So NAT doesn’t sit “inside the NIM” but one level above it.
Note: I’ve already covered the NAT fundamentals in dedicated posts. There’s one on the setup with Ollama in “From inference layer to orchestrator layer”, one on the ReAct loop and a custom Python tool, and one on the multi-agent supervisor pattern. In this post I deliberately do not repeat all of that, but build the lean part I need for the voice loop.
The goal of this post
We build a minimal, local agent workflow following the pattern text in -> decision/LLM -> text out. This exact interface is later fed by the ASR in Part 6 (it supplies the text) and read out by the TTS (it speaks the answer). At the end we expose the workflow as a small API service so that Pipecat can talk to it in the next part. As the reasoning backend I use my existing Ollama server.
Requirements
- A running local LLM backend. For me that’s my Ollama server (on a separate machine); any OpenAI-compatible backend works.
- Python 3.11 and a clean venv, just like in the other parts.
- Network access from the NAT machine to the LLM backend (IP/port of the Ollama server).
- The speech NIMs from Parts 2–4 don’t need to be running for this part – we wire them in only in Part 6.
Step 1: Install NAT
NAT goes into its own venv, separate from the riva-client environment. Create and activate it:
Command: python3.11 -m venv ~/venvs/nat
Command: source ~/venvs/nat/bin/activate
Command: pip install --upgrade pip setuptools wheel
Then install the toolkit. The meta package nvidia-nat brings the core; framework integrations come as extras. For the ReAct agent we need the LangChain integration:
Command: pip install "nvidia-nat[langchain]"
Then check that the CLI is there. The following command prints the help and the version:
Command: nat --version
Placeholder: The exact version number (currently 1.7.x) and whether an additional extra besides [langchain] is needed, we fill in after installation.
Step 2: Register the local LLM backend
NAT workflows are YAML files. NAT doesn’t prescribe a fixed storage location, since the commands nat run, serve and validate accept any path via --config_file. It’s therefore worth creating your own project folder in which you collect all workflow YAMLs. For pure configuration workflows (only YAML + built-in tools) a simple folder is enough; a configs/ substructure is tidy and matches the convention NAT also uses in its examples:
Command: mkdir -p ~/nat-voice-agent/configs
The llms: block in the workflow file tells NAT which model it uses for its work, i.e. for inference. For an OpenAI-compatible backend like Ollama the type is openai; you simply point base_url at the Ollama server. Now create the file voice_agent.yml with the following command:
Command: nano ~/nat-voice-agent/configs/voice_agent.yml
And insert the following content:
llms:
  local_llm:
    _type: openai
    api_key: "ollama"        # ignored by Ollama, but a required field
    base_url: "http://<OLLAMA-SERVER-IP>:11434/v1"
    model_name: "<your-ollama-model>"   # e.g. qwen3:8b or llama3.1:8b

functions:
  current_datetime:
    _type: current_datetime

workflow:
  _type: react_agent
  tool_names: [current_datetime]
  llm_name: local_llm
  verbose: true
Placeholders – fill in as you go:
base_url– the IP/port of your Ollama server (for local Ollamahttp://localhost:11434/v1).model_name– the exact name of the model you have loaded in Ollama (check withollama list).
With Ctrl + x you save the file.
Validate the fresh configuration before you start it, as this catches YAML and schema errors early:
Command: nat validate --config_file ~/nat-voice-agent/configs/voice_agent.yml
After running the command, this is what I got shown in the terminal:
Validating configuration file: /home/ingmar/nat-voice-agent/configs/voice_agent.yml
✓ Configuration file is valid!
(nat) ingmar@A6000Ada:~$
Note: As long as we only use built-in tools, this folder is enough. As soon as you write your own Python tools in Step 4, a full NAT project is worth it. You create it with nat workflow create --workflow-dir ~/nat-voice-agent <name>. This generates the complete structure including configs/config.yml and pyproject.toml, and your tool is installed as a Python package right away.
Step 3: The first run – text in, text out
Now we send a single input through the workflow. nat run is the simplest way and ideal for debugging:
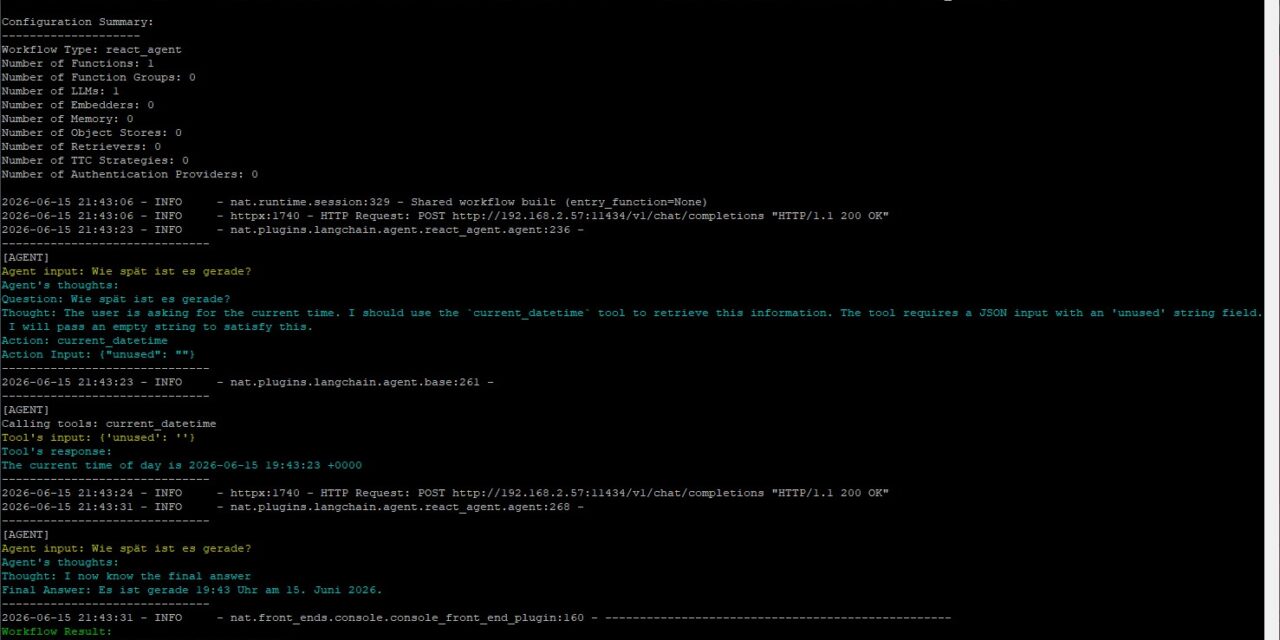
Command: nat run --config_file /home/ingmar/nat-voice-agent/configs/voice_agent.yml --input "What time is it right now?"
The agent runs through its ReAct loop, recognizes that it needs the current_datetime tool, calls it and formulates an answer in natural language. This very “text in -> text out” is the interface that later connects ASR and TTS.
The following image shows the text output produced via the [current_datetime] tool.
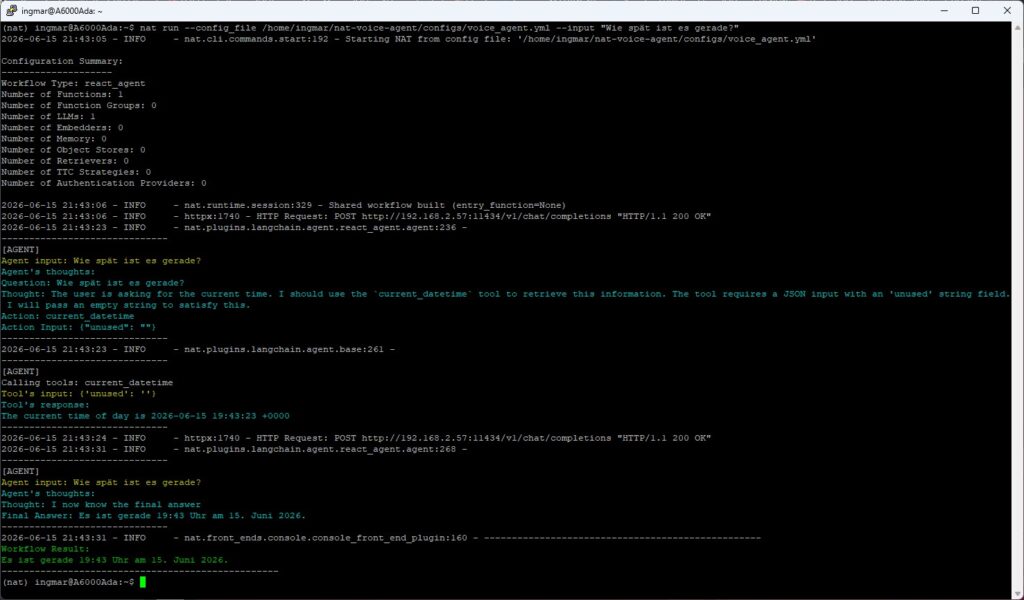
NVIDIA nim date time output
Step 4: Dock your own tools
An agent only gets interesting once it can trigger its own actions that actually help you with something. The time announcement is nice, but it’s mostly a demonstration of how NAT and ReAct templates work. How to write your own Python tool, register it as a package and reference it in the workflow, I showed step by step in the orchestration post (there using a GPU-status tool as the example).
For the voice agent the principle is enough for now: every registered tool appears under functions: and is enabled in workflow.tool_names. That’s how the agent grows from “just talking” to “doing something”.
Step 5: Expose the agent as a service
This is the crucial bridging step to Part 6. Instead of sending each input individually via nat run, we start the workflow as a web server. Pipecat then later sends the ASR text in via HTTP POST and gets the agent’s answer back, which goes straight to the TTS.
Command: nat serve --config_file ~/nat-voice-agent/configs/voice_agent.yml
NAT starts a local HTTP server with a Swagger/OpenAPI interface, through which you can inspect the exact routes and the request/response schema and test the endpoint directly in the browser.
Placeholder – verify after start: the exact host/port from the startup output, the POST route and the URL of the Swagger docs. We need these values in Part 6 for the Pipecat integration.
Step 6: Routing across multiple tools (a short outlook)
As soon as several tools are registered, the orchestrator decides based on the intent which tool it calls. That’s the classic router/supervisor pattern. How that looks with several agents acting as “tools” of a higher-level supervisor, I showed in the supervisor-pattern post. For the voice loop the simple ReAct agent from Steps 2–3 is enough for now. The routing can be expanded as much as you like later.
Tips: guardrails and deny-by-default
- Validated tool calls: Prefer clearly bounded, schema-checked tools over one tool that can do “everything”.
- Deny-by-default: Only explicitly enabled tools in the
tool_namesblock. When in doubt, have it ask rather than guess. For an agent that triggers actions, that’s mandatory. - Observability: With
verbose: trueor NAT’s tracing/observability part you can trace which decision the agent made and why. That’s important for debugging the later pipeline and also for documenting the steps that were run.
Conclusion
With that, the brain is in place: a local NAT workflow that takes in text, thinks with my Ollama LLM, calls tools when needed and is available as an API service. Together with ASR (Parakeet, Canary) and TTS (Magpie), all the building blocks are now available locally.
In the next and final part I connect them with NVIDIA Pipecat into a continuous, interruptible voice loop:
speak -> understand -> decide -> answer -> read aloud.
After that I’ll optionally put a wake word in front as a “doorman”, the way we know it from the AI services around us when we use them.
If you already use NAT: drop me a comment about which local model gives you the most reliable tool calls.


The tutorial offers a clear and practical guide for setting up and running the Tensorflow Object Detection Training Suite. Could…
This works using an very old laptop with old GPU >>> print(torch.cuda.is_available()) True >>> print(torch.version.cuda) 12.6 >>> print(torch.cuda.device_count()) 1 >>>…
Hello Valentin, I will not share anything related to my work on detecting mines or UXO's. Best regards, Maker
Hello, We are a group of students at ESILV working on a project that aim to prove the availability of…