

After I introduced the vision in Part 1 of my ESP-Claw series – bringing a local AI agent to life on an HMI board – this post is all about setting up the development environment. So I’ll now show you step by step how I set up the ESP-IDF v5.5.4 development environment and compiled ESP-Claw for the first time. I’ll describe the path on Windows 11 – on Linux and macOS the procedure is similar, only the installers and paths differ slightly.
This guide includes an important lesson that cost me half an evening, which is why I want to share it with you right at the beginning.
Installing the right ESP-IDF version
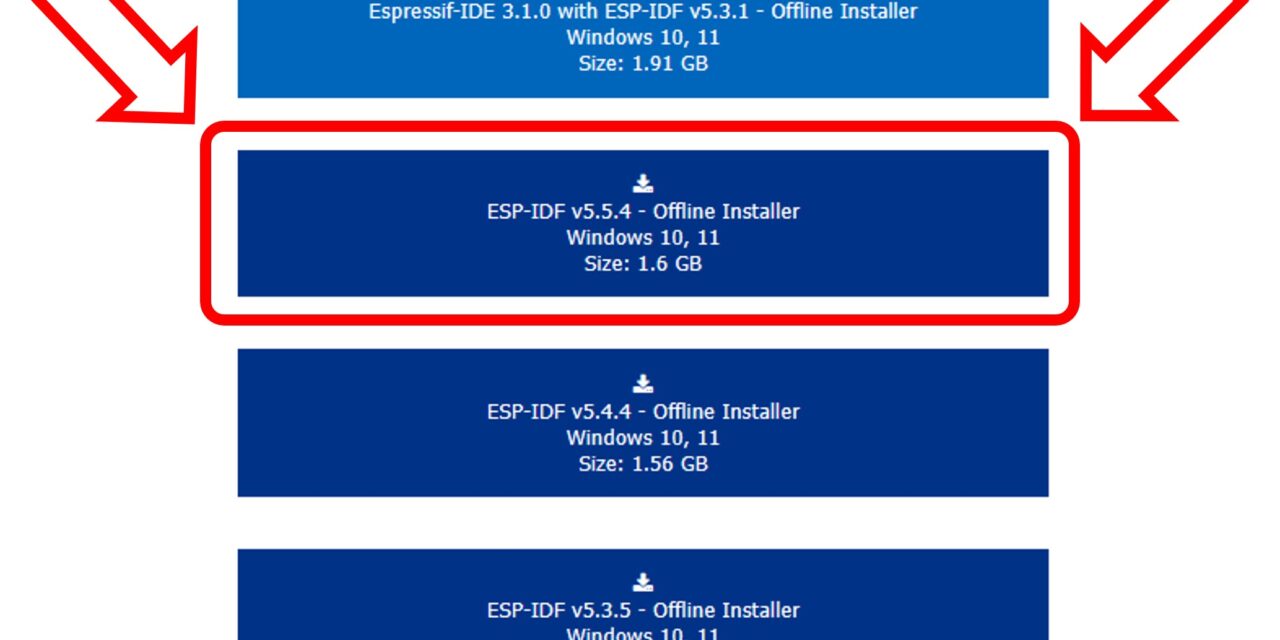
My first attempt went sideways. Out of habit, I had downloaded the “Espressif-IDE 3.1.0 with ESP-IDF v5.3.1”. It’s an all-in-one package that bundles the Espressif Eclipse-based IDE with an older ESP-IDF version. Looks like the most convenient entry point, and it was right at the top of Espressif’s download page. But this is exactly where you need to be careful.
The reason: ESP-Claw requires at least ESP-IDF v5.5.x. And for a smooth installation of the Python helper tool esp-bmgr-assist, which ESP-Claw absolutely needs, it should be ESP-IDF v5.5.4. With v5.3.1 I ran into the following problem:
- The Python package mirror stored in v5.3.1 was frozen at the state from March 6, 2023.
- However,
esp-bmgr-assistwas only published after that date. - Result:
pip install esp-bmgr-assistcan’t find the package and the ESP-Claw build fails.
I then installed ESP-IDF v5.5.4 as a separate offline installer. pip install esp-bmgr-assist ran through immediately, and the build started without errors.
Here is the link to the Espressif download page: https://dl.espressif.com/dl/esp-idf/
ESP-IDF v5.5.4
My recommendation to you
| Avoid | Use instead | Why |
| Espressif-IDE 3.1.0 with ESP-IDF v5.3.1 | ESP-IDF v5.5.4 Offline Installer | Up-to-date Python mirror, latest features, ESP-Claw compatible |
| Online installer | Offline installer (around 1.6 GB) | More robust during long downloads, no hanging on individual packages |
| Paths with spaces | A short path like D:\Programme\Espressif554\ |
ESP-IDF is sensitive to spaces in paths |
Good news: You can install both ESP-IDF versions side by side on the same machine without any conflicts. They won’t get in each other’s way as long as you always use the corresponding PowerShell shortcut.
Phase 1: Download ESP-IDF v5.5.4
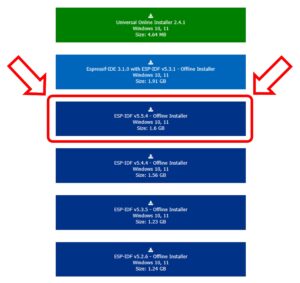
Head over to the official Espressif download page and make sure, as shown above, that you really download the current version.
Link: https://dl.espressif.com/dl/esp-idf/
There you’ll find a selection of different installers. For Windows, pick the following:
- Version: ESP-IDF v5.5.4 or newer
- Variant: Offline Installer (around 1.6 GB)
The offline installer ships with all Python packages and toolchains included. This makes you independent of mirror bottlenecks and long online downloads during installation.
Phase 2: Install ESP-IDF
Run the downloaded installer and follow the wizard. Pay special attention to the installation path:
- Pick a short path without spaces and without special characters.
- In my case:
D:\Programme\Espressif554\ - Avoid
C:\Program Files (x86)\...– the space and parentheses can lead to build errors later on.
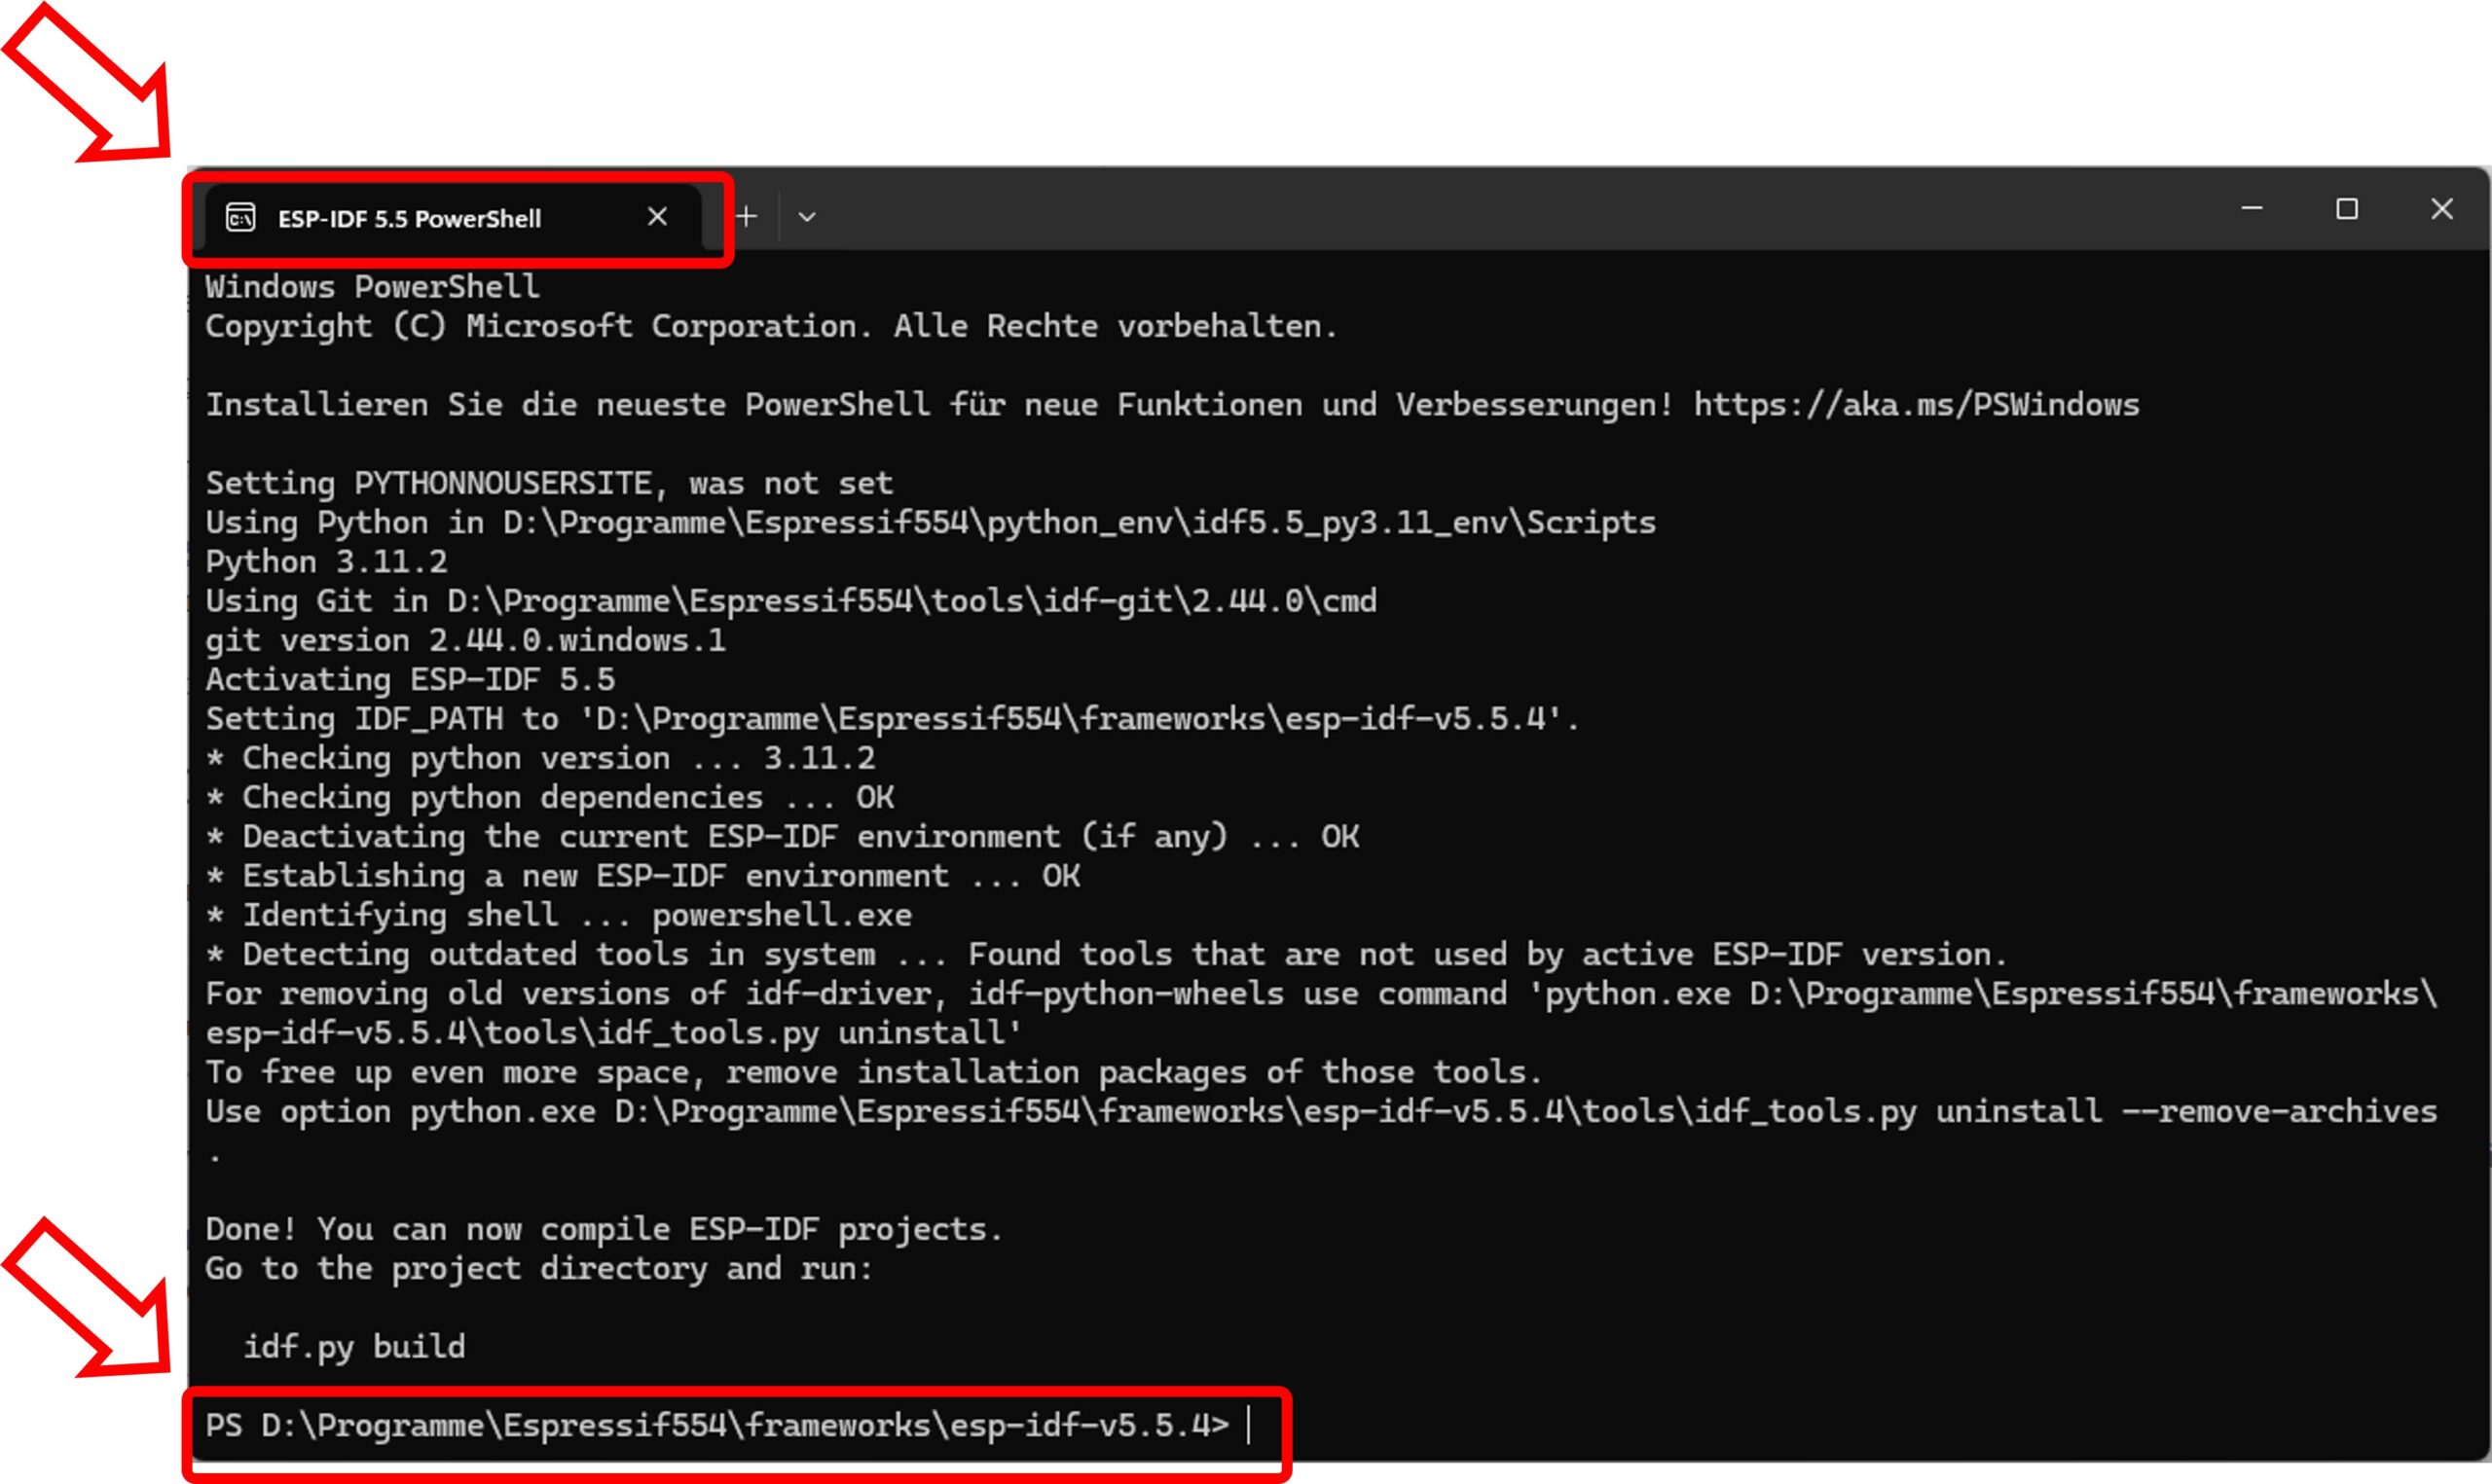
When you’re asked which components to install, leave the default selection. The installer automatically creates a shortcut called “ESP-IDF 5.5 PowerShell” in the Start menu. That’s exactly the shortcut you’ll need later.
After a successful installation, restart the PowerShell that opened at the end of the installation. Only then were the environment variables properly picked up on my system. Until I figured that out, I had already spent another little while troubleshooting – because the ESP PowerShell had supposedly just been freshly started.
Phase 3: Open the right PowerShell
This is one of the points where many beginners stumble: ESP-IDF commands only work in the specially prepared ESP-IDF PowerShell, not in a regular Windows PowerShell.
After the installation, you’ll find the following entry in the Start menu:
- ESP-IDF 5.5 PowerShell
This shortcut loads the ESP-IDF environment in the background, sets the paths correctly, and activates the right Python environment. You can recognize it by a line like this appearing at startup:
Using Python in D:\Programme\Espressif554\python_env\idf5.5_py3.11_env\Scripts
If you accidentally use the v5.3.1 PowerShell: Close the window and open the correct one. The two environments cannot be switched within the same session.
ESP-IDF v5.5.4 PowerShell
Phase 4: Clone ESP-Claw from GitHub
Now we fetch the ESP-Claw source code. I deliberately cloned ESP-Claw outside the ESP-IDF directory so that the two stay cleanly separated.
In my ESP-IDF PowerShell, I switch into a dedicated working directory and clone the repository:
Command: cd D:\
Command: mkdir esp32-claw
Command: cd esp32-claw
Command: git clone --recursive https://github.com/espressif/esp-claw.git
The --recursive switch is important – ESP-Claw brings along a whole bunch of Git submodules that would otherwise be missing.
After cloning, my directory structure looks like this:
D:\esp32-claw\esp-claw\application\edge_agent\– the main application we’ll be buildingD:\esp32-claw\esp-claw\components\– the reusable ESP-Claw components
Phase 5: Install esp-bmgr-assist
For ESP-Claw to process its board configuration, I still need a Python helper tool from Espressif. It’s installed straight into the ESP-IDF Python environment via pip:
Command: pip install esp-bmgr-assist
You should see output similar to this:
Successfully installed esp_bmgr_assist-0.8.1
If you get an error message here saying the package cannot be found: then you accidentally ended up in the wrong PowerShell (probably v5.3.1), or you didn’t restart the correct one once after installation as described at the beginning. Close the window and open the ESP-IDF 5.5 PowerShell from the Start menu.
Phase 6: Set the ESP32-P4 as the target chip
Now I switch into the edge_agent directory of the ESP-Claw application and tell ESP-IDF that I want to build for the ESP32-P4:
Command: cd D:\esp32-claw\esp-claw\application\edge_agent
Command: idf.py set-target esp32p4
This step generates the initial sdkconfig file and downloads all required dependencies. In my case, that was 76 components, including ESP-Hosted, LVGL, esp_codec_dev, and many more. The first time around, this takes several minutes. Be patient and grab yourself a coffee.
Phase 7: The stumbling block with the chip revision
Now comes a point the official ESP-Claw documentation keeps silent about, and which cost me another hour of troubleshooting:
The default configuration of ESP-IDF expects an ESP32-P4 with silicon revision v3.0 or newer. My Guition JC1060P470, however, uses an early ESP32-P4 chip with revision v1.3. This is a typical phenomenon with boards from 2024 / early 2025, and it wasn’t visible on the AliExpress seller’s page. Okay, the board also only cost me €25 including shipping. With the default setting, the bootloader refuses to start the firmware.
The solution is a small adjustment in menuconfig:
Command: idf.py menuconfig
In the configuration menu that now appears, I navigate to:
- Component config -> Hardware Settings -> Chip revision
There I enable the following option:
- Select ESP32-P4 revisions <3.0 (No >=3.x Support)
- Minimum supported chip revision: Rev v0.0
- Maximum supported chip revision: Rev v1.99
It took me a while to find this. I hope the menu stays stable and doesn’t change too much, because it really has a lot of items and sub-items.
I save the configuration with S and leave the menu with Q. From now on, the bootloader also accepts older P4 silicon revisions like my v1.3.
Important: If you have a board with a newer P4 chip (v3.0+), such as the ESP32-P4 Function EV Board or the M5Stack Tab5, simply skip this step. The default setting will work for you.
Phase 8: The first build
Now comes the exciting moment. With a single command, I kick off the complete build:
Command: idf.py build
The first time, this takes between 5 and 15 minutes depending on your machine. ESP-IDF compiles not just the ESP-Claw code, but also all 76 dependencies – from the WiFi stack via LVGL all the way to the Lua runtime.
If everything goes smoothly, you’ll see output similar to this at the end:
edge_agent.bin binary size 0x2392d0 bytes. Smallest app partition is 0x400000 bytes. 0x1c6d30 bytes (44%) free.
In other words: the firmware is about 2.3 MB in size, and on the OTA partition with 4 MB there’s still plenty of room for extensions. That’s exactly what I’ll need later for my own skills.
Phase 9: What have I achieved so far?
After these steps I have:
- A cleanly installed ESP-IDF v5.5.4 development environment
- A local copy of ESP-Claw including all submodules
- A successfully compiled firmware file
edge_agent.binfor my ESP32-P4 - The first proof that my build toolchain is working
What I do not yet have: a proper board adaptation for my Guition JC1060P470. The firmware is currently configured for the ESP32-P4 Function EV Board – Espressif’s own reference board. If I were to flash this firmware as-is onto my Guition, the display, touch, audio, and ESP-Hosted/WiFi wouldn’t work, because the pin assignment is different.
Honestly, this is where the real search for a suitable example I could learn from for the JC1060P470 began.
Exactly this board adaptation is the topic of Part 3 of my series – and it’s honestly the most exciting and at the same time the trickiest part of the whole project.
My personal conclusion on Part 2
Setting up the ESP-IDF development environment is not rocket science, but there are three stumbling blocks that can cost you several hours if you don’t know about them:
- The right ESP-IDF version – v5.5.4 for ESP-Claw, not v5.3.1.
- The right PowerShell – the “ESP-IDF 5.5 PowerShell” from the Start menu, and don’t shy away from restarting it once.
- The chip revision – on older ESP32-P4 chips,
menuconfigneeds to be adjusted.
If you keep these three points in mind, ESP-Claw will hopefully compile on the first attempt without errors. With that, you’ve laid the foundation for going deeper in the upcoming posts. Next up are the board adaptation, the Ollama connection, and your own skills.
In the next part, I’ll show you how I wrote my own board adaptation for my Guition JC1060P470 from scratch. That only worked because I had found an example with YAML configuration files for peripherals and devices, a custom setup_device.c, and the use of the ESP Board Manager. A topic where I learned a lot about the inner architecture of ESP-Claw.
See you in the next part!
What’s coming in the next posts?
- Part 1: Kickoff and introduction of the vision
- Part 2 (this post): Setting up ESP-IDF v5.5.4 and building ESP-Claw – step by step
- Part 3: Adding a new board to ESP-Claw – my board adaptation for the Guition JC1060P470
- Part 4: Connecting ESP-Claw to your own Ollama server – configuration and first chats
- Part 5: Understanding capabilities and skills – the architecture of an ESP-Claw agent
- Part 6: Writing your own skill – remote-controlling the robot car or explaining the dishwasher
- Part 7: Voice in, voice out – the HMI board as a real voice assistant to help out at the washing machine
- Part 8: Lua scripts for behavioral patterns – when the agent acts on its own


The tutorial offers a clear and practical guide for setting up and running the Tensorflow Object Detection Training Suite. Could…
This works using an very old laptop with old GPU >>> print(torch.cuda.is_available()) True >>> print(torch.version.cuda) 12.6 >>> print(torch.cuda.device_count()) 1 >>>…
Hello Valentin, I will not share anything related to my work on detecting mines or UXO's. Best regards, Maker
Hello, We are a group of students at ESILV working on a project that aim to prove the availability of…