

Every building block is now available locally: ASR (Parakeet, Canary), TTS (Magpie), an LLM via my Ollama server and the orchestrator (NAT, Part 5). Now I’m connecting them into a continuous, interruptible speech loop. This will be my first small local voice agent. What I’m aiming for is a kind of general-purpose agent: I speak, it understands, it gets things done and answers me in natural language. The things it does will be small at first, but the point here is the principle – how it works at all.
In this part I’m building along Path A: the LLM sits directly in the loop (my Ollama server), so we first get a cleanly running voice-to-voice loop. The “real brain” – the NAT agent with tool calling (telling the time and so on) that we already met in Part 5 – I’ll wire in for Part 7. The wake word follows in Part 8.

NVIDIA NIM Voice Assistant Web Frontend
What is NVIDIA Pipecat?
To understand the loop, it’s worth looking at the two layers that come together here.
Pipecat is an open-source framework for real-time voice and multimodal agents. At its core is a pipeline architecture: audio and text flow as small “frames” through a chain of stages (input → ASR → LLM → TTS → output). Pipecat takes care of exactly the tricky real-time problems you’d otherwise have to build laboriously yourself: the continuous streaming of audio chunks, turn detection (when have I finished speaking?) and interruptibility (cutting in on the agent). The framework is deliberately vendor-neutral; you can plug in open, commercial or your own models.
NVIDIA Pipecat is the NVIDIA-native extension of it and part of the ACE Controller project. It ships ready-made building blocks for exactly the models I run locally in this series:
- Riva ASR service: talks to my speech recognition (Parakeet or Canary).
- Riva TTS service: talks to my speech output (Magpie).
- LLM service: plugs in an LLM as the “thinking” stage; in my case my Ollama server via the OpenAI-compatible interface.
On top of that come NVIDIA-specific helpers such as the FastAPI WebSocket transport (a WebSocket-based audio transport including a small browser test UI), synchronizing the transcripts with audio playback, and latency optimizations like Speculative Speech Processing, which starts processing while I’m still speaking.
The decisive point for my sovereign approach: by default the Riva services point to the NVIDIA cloud, but they can just as easily be aimed at local endpoints. That makes Pipecat the connective tissue that turns my individual, locally running NIMs into a real, coherent dialogue. With this local configuration it’s once again guaranteed that not a single audio packet leaves my machine – that is, my network.
The architecture at a glance
[Diagram: microphone (browser) → ASR (Parakeet NIM) → LLM (Ollama) → TTS (Magpie NIM) → speaker, with feedback and interruptibility. Insert the architecture graphic here.]
The loop itself is a pipeline in this order:
transport.input() → STT → context.user() → LLM → TTS → transport.output() → context.assistant()Prerequisites
- The Parakeet ASR NIM (Part 2) and the Magpie TTS NIM (Part 4) now have to run at the same time.
- My Ollama server (on the second machine) as the LLM backend.
- A Python 3.12 venv – nvidia-pipecat requires Python 3.12 (so a dedicated environment, separate from the venvs of the other parts).
- A browser for testing (microphone access), just like the Gradio demo in Part 1.
Step 1: Install nvidia-pipecat
nvidia-pipecat explicitly requires Python 3.12 – and unfortunately nothing newer, which is a small problem on my Ubuntu server. On current distributions this is a stumbling block: Ubuntu 25.10, for instance, ships only Python 3.13 (and 3.14), and a python3.12 -m venv promptly answers with Command 'python3.12' not found. I wouldn’t force the newer versions here, because some dependencies (Pipecat itself, the ONNX/Silero components for the VAD, and so on) often don’t have ready-made wheels for 3.13/3.14 yet, so we hopefully sidestep potential problems. If we take a current Python version, the build will probably end in errors. So we specifically need a Python 3.12 – at least at the time I wrote this article, that was my path.
First check whether you even have it:
Command: python3.12 --version
Case A – Python 3.12 is available. Then the classic venv is enough:
Command: python3.12 -m venv ~/venvs/pipecat
Command: source ~/venvs/pipecat/bin/activate
Command: pip install --upgrade pip setuptools wheel
Case B – Python 3.12 is missing (e.g. on Ubuntu 25.10). Here uv is the cleanest route: the tool fetches an isolated Python 3.12 itself – entirely without sudo and without touching your system Python.
First install uv (if not already present) and put it on the PATH:
Command: curl -LsSf https://astral.sh/uv/install.sh | sh
Command: source $HOME/.local/bin/env
Then create the venv with Python 3.12 (uv downloads 3.12 automatically if needed) and activate it:
Command: uv venv --python 3.12 ~/venvs/pipecat
Command: source ~/venvs/pipecat/bin/activate
Note: In a uv venv you install packages with uv pip install … instead of pip install ….
Now install the package: depending on which route you took, you again have to choose A or B. For me it’s still the B variant:
Command (Case A): pip install nvidia-pipecat
Command (Case B): uv pip install nvidia-pipecat
Good to know – the important extras already come along:
A glance at the install output shows that nvidia-pipecat (for me it was version 0.4.0 based on pipecat-ai 0.0.98) already pulls in the building blocks we’re about to need as dependencies: onnxruntime (runtime for the Silero VAD), aiortc together with pipecat-ai-small-webrtc-prebuilt (WebRTC transport including a ready-made browser client), nvidia-riva-client (ASR/TTS) and openai (for the OpenAI-compatible LLM connection to Ollama). So you most likely won’t need to install anything extra. If a ModuleNotFoundError does show up on the first run, install the matching extra specifically, e.g. uv pip install "pipecat-ai[silero]".
Step 2: Start both NIMs at the same time and mind the ports
Up to now we always ran the NIMs individually. For the loop it’s different: ASR and TTS now have to run at the same time and stay started for the whole session. Each NIM is its own foreground container, so we start them in two separate terminals (we’ll use a third terminal later for the Pipecat bot).
And yes, here we have to watch the ports.
By default both NIMs want ports 9000 (HTTP) and 50051 (gRPC). If we started both like that, there’d be a port conflict and the second container wouldn’t even come up. The solution: Parakeet stays on the default ports, and we remap Magpie to 9001/50052. Worth remembering: the gRPC ports (50051 for ASR, 50052 for TTS) are exactly the addresses we’ll point the Pipecat services at in Step 3.
Now open two terminal windows to your application server.
Note: In a freshly opened terminal the API key is usually no longer set. So in each one we should first run the familiar command below (as in Part 2).
Command: export NGC_API_KEY="nvapi-xxxxxxxxxxxxxxxxxxxxx"
Terminal 1 – Parakeet (ASR) on the default ports 9000/50051:
Command: docker run -it --rm --name=parakeet-1-1b-rnnt-multilingual --runtime=nvidia --gpus '"device=0"' --shm-size=8GB -e NGC_API_KEY -e NIM_HTTP_API_PORT=9000 -e NIM_GRPC_API_PORT=50051 -p 9000:9000 -p 50051:50051 -e NIM_TAGS_SELECTOR="mode=str" -v ~/.cache/nim:/opt/nim/.cache nvcr.io/nim/nvidia/parakeet-1-1b-rnnt-multilingual:latest
Terminal 2 – Magpie (TTS), remapped to 9001/50052. Important: here I deliberately force batch_size=8 – why is explained in the VRAM box just below.
Command: docker run -it --rm --name=magpie-tts-multilingual --runtime=nvidia --gpus '"device=0"' --shm-size=8GB -e NGC_API_KEY -e NIM_HTTP_API_PORT=9001 -e NIM_GRPC_API_PORT=50052 -p 9001:9001 -p 50052:50052 -e NIM_TAGS_SELECTOR="name=magpie-tts-multilingual,batch_size=8" -v ~/.cache/nim:/opt/nim/.cache nvcr.io/nim/nvidia/magpie-tts-multilingual:latest
Both containers keep running – meaning you must not close the two terminal windows. That’s not ideal, but later, once everything works, we can also start the containers automatically in the background if we want. In a third terminal, briefly check that both services are active and working – let’s say healthy. Here we again have to mind the different ports.
Command: curl http://localhost:9000/v1/health/ready (ASR, Parakeet)
As a result I got the following back, confirming that the container and service are running.
{"object":"health.response","message":"ready","status":"ready"}
Command: curl http://localhost:9001/v1/health/ready (TTS, Magpie)
Here too I got a positive result, confirming the container and service are running.
{"object":"health.response","message":"ready","status":"ready"}
Note: VRAM and why batch_size=8: Unlike Part 4, where Magpie ran alone, ASR and TTS now share the same GPU (and even more so if other services are running on the card). The profile selector initially reached for the large batch_size=32 profile. That occupied around 31 GB of VRAM for me, whereas batch_size=8 gets by with ~11 GB. Together with Parakeet (and everything else), the 48 GB card filled up and the container aborted while loading. In the log it looked like this:
[TRT] [E] Error Code 2: OutOfMemory (Requested size was 10786262016 bytes.)
... Failed to create an execution context!
> Triton server died before reaching ready state.
That’s why I deliberately append batch_size=8 in the NIM_TAGS_SELECTOR above. Check beforehand with nvidia-smi how much VRAM is still free. If other GPU services are running there, stop them for the loop session or give them a different card.
Note: Persist the model build (no more 28-minute rebuild):
You’ve surely noticed that on startup Magpie builds the TensorRT codec decoder for several minutes. That’s because Magpie ships as an RMIR model and there’s no ready-made engine to download for the Ada GPU (the log says model_type: rmir). The mounted ~/.cache/nim only saves the download, not the build. The finished engine lands in the container-internal /data/models and is discarded every time with --rm. NVIDIA solves this with a one-time export: build the engine once, write it to a mounted folder, and load it from there on later starts.
Step A
Export the finished engine once (the container builds the engine, writes it to the export folder and exits):
Command: export NIM_EXPORT_PATH=~/nim_export
Command: mkdir -p $NIM_EXPORT_PATH && chmod 777 $NIM_EXPORT_PATH
We don’t need to specify a port for this command, because the container is built, exported immediately after the build, and then shut down right away once the export is complete.
Command: docker run -it --rm --name=magpie-tts-multilingual --runtime=nvidia --gpus '"device=0"' --shm-size=8GB -e NGC_API_KEY -e NIM_TAGS_SELECTOR="name=magpie-tts-multilingual,batch_size=8" -v ~/.cache/nim:/opt/nim/.cache -v $NIM_EXPORT_PATH:/opt/nim/export -e NIM_EXPORT_PATH=/opt/nim/export nvcr.io/nim/nvidia/magpie-tts-multilingual:latest
Now there should be a file named tts-MagpieTTS_21hz_codec_trtllm_Multilingual.tar.gz in the path ~/nim_export. To check, run the following command:
Command: ls ~/nim_export
This file then contains the built model. Now load this model as described in Step B.
Step B
Load the finished engine from persistent storage: on subsequent starts you mount the same export folder and additionally set NIM_DISABLE_MODEL_DOWNLOAD=true. The container then skips both the download and the rebuild and is ready in seconds instead of minutes.
For the exact flags and paths for your NIM version, it’s best to use NVIDIA’s docs “Model Caching for Speech NIM Containers”. The export workflow for RMIR models is described there step by step.
For me the command looked like this.
Command: docker run -it --rm --name=magpie-tts-multilingual --runtime=nvidia --gpus '"device=0"' --shm-size=8GB -e NGC_API_KEY -e NIM_TAGS_SELECTOR="name=magpie-tts-multilingual,batch_size=8" -e NIM_DISABLE_MODEL_DOWNLOAD=true -e NIM_HTTP_API_PORT=9001 -e NIM_GRPC_API_PORT=50052 -p 9001:9001 -p 50052:50052 -v ~/.cache/nim:/opt/nim/.cache -v $NIM_EXPORT_PATH:/opt/nim/export -e NIM_EXPORT_PATH=/opt/nim/export nvcr.io/nim/nvidia/magpie-tts-multilingual:latest
Note: Please remember, if you get an error like docker: invalid spec: :/opt/nim/export: empty section between colons, that both variables are set after a server restart:
Command: export NGC_API_KEY="nvapi-xxxxxxxxxxxxxxxxxxxxx"
Command: export NIM_EXPORT_PATH=~/nim_export
Command: curl http://localhost:9001/v1/health/ready (TTS, Magpie)
Here too I got a positive result, confirming the container and service are running.
{"object":"health.response","message":"ready","status":"ready"}
With the following command you can list all voices available in the model and their languages.
Command: curl http://localhost:9001/v1/audio/list_voices
For German, the following voices are available, and they become relevant for section 4, where we configure them.
# Mia (female)
Magpie-Multilingual.DE-DE.Mia
Magpie-Multilingual.DE-DE.Mia.Neutral
Magpie-Multilingual.DE-DE.Mia.Calm
Magpie-Multilingual.DE-DE.Mia.Angry
Magpie-Multilingual.DE-DE.Mia.Happy
Magpie-Multilingual.DE-DE.Mia.Sad# Sofia (female)
Magpie-Multilingual.DE-DE.Sofia
Magpie-Multilingual.DE-DE.Sofia.Neutral
Magpie-Multilingual.DE-DE.Sofia.Calm
Magpie-Multilingual.DE-DE.Sofia.Angry
Magpie-Multilingual.DE-DE.Sofia.Happy
Magpie-Multilingual.DE-DE.Sofia.Fearful# Pascal (male)
Magpie-Multilingual.DE-DE.Pascal
Magpie-Multilingual.DE-DE.Pascal.Neutral
Magpie-Multilingual.DE-DE.Pascal.Calm
Magpie-Multilingual.DE-DE.Pascal.Angry
Magpie-Multilingual.DE-DE.Pascal.Happy
Magpie-Multilingual.DE-DE.Pascal.Disgust
Magpie-Multilingual.DE-DE.Pascal.Sad# Diego (male)
Magpie-Multilingual.DE-DE.Diego
Magpie-Multilingual.DE-DE.Diego.Neutral
Magpie-Multilingual.DE-DE.Diego.Calm
Magpie-Multilingual.DE-DE.Diego.Angry
Magpie-Multilingual.DE-DE.Diego.Happy
Magpie-Multilingual.DE-DE.Diego.PleasantSurprised
Magpie-Multilingual.DE-DE.Diego.Disgust
Step 3: Get the official nvidia-pipecat example as a scaffold
Instead of building the FastAPI and runner mechanics by hand, we take NVIDIA’s official “speech-to-speech” example as the basis. It already ships the ACETransport, the pipeline runner and a small web test UI. The best part of this solution: ASR, LLM and TTS can be switched entirely via environment variables, without touching the Python code.
Command: git clone https://github.com/NVIDIA/voice-agent-examples.git
Command: cd ~/voice-agent-examples/examples/voice_agent_websocket
The example brings its own uv-managed environment. We create it and install the dependencies – from here on we work in this project venv (the venv from Step 1 mainly served to verify Python 3.12 and the installation):
Command: uv venv
Command: source .venv/bin/activate
Command: uv sync
Important: the example can also spin up its own ASR/TTS/LLM containers via docker compose. But we don’t want that here. Our NIMs (Step 2) and the Ollama server are already running. So we take the pure Python route and simply point the example at our already-running services via the .env.
Step 4: Configure for local, Ollama and German (.env)
Now the clever bit: we copy the example environment file and point it at our local services and at German.
Command: cp env.example .env
Command: nano .env
The bundled env.example points to the NVIDIA cloud by default and is set to English. We remap it to our local NIM gRPC ports (remember the Magpie remap to 50052 from Step 2) and to the Ollama server. Here’s what my .env looks like:
NVIDIA_API_KEY=dummy

ENABLE_SPECULATIVE_SPEECH=true
CHAT_HISTORY_LIMIT=20

# ASR – local Parakeet NIM (default gRPC port from Step 2)
ASR_SERVER_URL=localhost:50051
ASR_LANGUAGE=de-DE
# Leave ASR_MODEL_NAME empty = default model of the local NIM (details in the note below)
ASR_MODEL_NAME=

# TTS – local Magpie NIM (remapped to 50052 in Step 2)
TTS_SERVER_URL=localhost:50052
TTS_LANGUAGE=de-DE
TTS_VOICE_ID=Magpie-Multilingual.DE-DE.Mia.Calm
TTS_MODEL_NAME=magpie_tts_ensemble-Magpie-Multilingual

# LLM – my Ollama server (OpenAI-compatible)
NVIDIA_LLM_URL=http://<OLLAMA-IP>:11434/v1
NVIDIA_LLM_MODEL=<your-ollama-model>   # e.g. qwen3:8b
A few words on why exactly these values:
- NVIDIA_API_KEY=dummy: The key isn’t needed for the local services. But the OpenAI-compatible client for Ollama insists on a non-empty value, hence the placeholder.
- ASR_SERVER_URL / TTS_SERVER_URL: point to the gRPC ports of our two NIMs (50051 for Parakeet, 50052 for Magpie). In
env.examplethese lines are commented out – we enable them and enter our local addresses. - ASR_LANGUAGE / TTS_LANGUAGE / TTS_VOICE_ID: these three are not in
env.example, butbot.pydoes evaluate them (otherwise the default en-US, or the voice “Aria”, kicks in). So we add them by hand to switch to German and the Magpie voice from Part 4. - TTS_MODEL_NAME: is already the default and matches our Magpie export exactly (
magpie_tts_ensemble-Magpie-Multilingual) – nothing to do here.
Note on ASR_MODEL_NAME: The default in the example (parakeet-1.1b-en-US-asr-streaming-silero-vad-sortformer) is an English model with a different name than the one our local parakeet-1-1b-rnnt-multilingual provides. The Parakeet container reveals the exact name on startup: look in its log for the line Successfully registered: <name> for ASR and enter that <name>. If you want it quick, leave ASR_MODEL_NAME= empty – then the local endpoint uses its default model.
Important: don’t comment out the line, because a commented-out ASR_MODEL_NAME makes bot.py fall back to the English default.
You set the system prompt – the role of the general assistant – directly in bot.py, where the messages with the system role are defined. I replace the English default with:
    messages = [
        {
            "role": "system",
            "content": "Du bist ein hilfsbereiter Sprachassistent der in allen Lebenslagen des Benutzers von Dir bereitwillig hilft."
            "Antworte freundlich, höflich und in höchstens einem kurzen Satz auf Deutsch."
            "Keine Aufzählungen oder Listen.",
        },
    ]
A few lines further down, the on_client_connected handler holds the greeting with which the bot opens the conversation. I switch that to German as well, otherwise it might introduce itself in English:
messages.append({"role": "system", "content": "Bitte stell dich dem Nutzer kurz auf Deutsch vor."})Step 5: Start the voice loop and test it in the browser
Now everything comes together. Before you start the bot, make sure the two NIMs from Step 2 are still running – because of the one-time export or closed terminals, they may have been stopped in the meantime. Restart them if necessary:
- Parakeet (ASR) as in Step 2 (ports 9000/50051).
- Magpie (TTS) via the fast Step-B command (loads the exported engine, ports 9001/50052) – no more rebuild.
Quickly verify both are healthy:
Command: curl http://localhost:9000/v1/health/ready
Command: curl http://localhost:9001/v1/health/ready
If both report ready, start the bot in a third terminal – in the project folder and with the project venv active:
Command: cd ~/voice-agent-examples/examples/voice_agent_websocket
Command: source .venv/bin/activate
Command: python bot.py
This hosts the small test UI together with the voice agent server. At the end, Uvicorn should be listening on 0.0.0.0:8100. Then open in the browser:
URL: http://<SERVER-IP>:8100/static/index.html
Microphone access without HTTPS: Since my A6000 Ada server is headless and has no HTTPS encryption, the browser initially won’t allow the microphone. For me the SSH tunnel worked reliably:
Command: ssh -L 8100:localhost:8100 ingmar@192.168.2.119
Then open http://localhost:8100/static/index.html – over localhost the browser allows the microphone. (Alternatively, in Chrome under chrome://flags/, add the address http://<SERVER-IP>:8100 under “Insecure origins treated as secure”.)
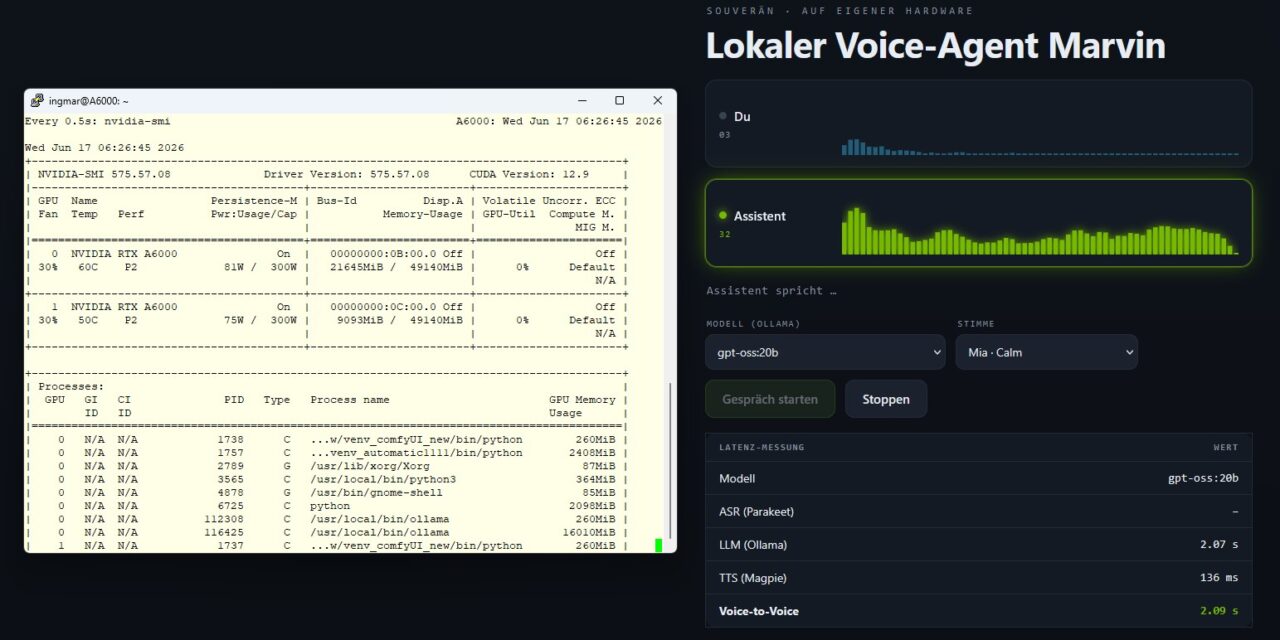
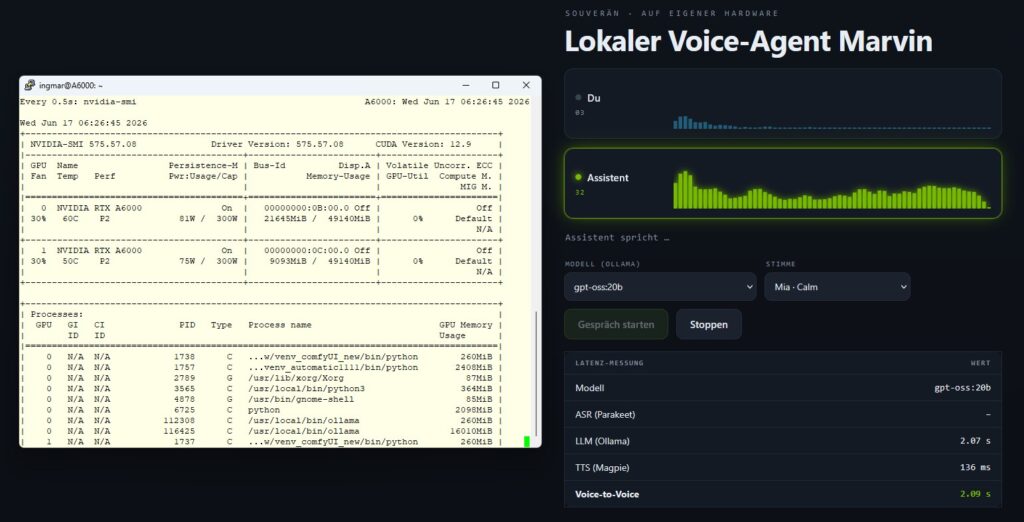
In the UI you click Start Audio – and the loop is live: I speak a German sentence, Parakeet transcribes, the Ollama LLM answers, and Magpie reads the answer aloud in the voice Mia. Entirely in German and on my own hardware.
[Placeholder: describe one or two of my own example sentences and the spoken answer; insert a screenshot of the UI.]
Port note: If you want to change the port, adjust it in the uvicorn.run line in bot.py and in the wsUrl in static/index.html.
Step 6: Turn detection, interruptibility and speculative speech
What makes the whole thing feel like a conversation rather than a walkie-talkie lies in three mechanisms – and the nice part is: all three are already built into the example and controlled via the .env or bot.py, without having to rebuild the pipeline itself.
1. Interruptibility. In bot.py the pipeline is configured with allow_interruptions=True. This lets me cut in on the agent – it stops the output and listens again. Especially in the in-car scenario this matters: you want to be able to correct without waiting for the end of the answer.
2. Turn detection via the VAD profile. When have I finished speaking? That’s controlled by the VAD_PROFILE environment variable in bot.py:
- ASR (default): the Nemotron ASR delivers the end-of-speech and interruption signals itself – no separate VAD needed.
- Silero: with
VAD_PROFILE=Silerothe WebSocket transport instead gets aSileroVADAnalyzerplaced in front.
3. Speculative Speech Processing. Already enabled in Step 4 via ENABLE_SPECULATIVE_SPEECH=true. Instead of waiting for the final transcript, the agent already works on the early, preliminary ASR transcripts – which noticeably reduces response latency. This only works with the Nemotron ASR and is switched on automatically in the example; no code edit needed.
Step 7: Measure the latency chain
For the conversation to feel natural, what counts is the total latency from the end of my utterance to the first sound of the answer. The good news: Pipecat already measures these values for every stage, so we don’t have to design or program anything ourselves. Pipecat just doesn’t write them out by default, which is why we see no measurements in the terminal. The values flow through the pipeline as small MetricsFrames and are simply discarded at the end as long as nobody listens for them or picks them up. So we have to do two things: turn the metrics on and attach an observer that writes them to the log.
Enable and log the metrics. Pipecat ships a ready-made MetricsLogObserver for this. So, as said at the start, you don’t have to build anything yourself. In bot.py, find the place where the PipelineTask is created and add the two metrics switches and the observer.
Insert the following import line at the very top among the imports of the Python program:
from pipecat.observers.loggers.metrics_log_observer import MetricsLogObserverMake the following change in "task = PipelineTask(...":
task = PipelineTask(
pipeline,
params=PipelineParams(
allow_interruptions=True,
enable_metrics=True,
enable_usage_metrics=True,
send_initial_empty_metrics=True,
report_only_initial_ttfb=True,
start_metadata={"stream_id": stream_id},
),
observers=[MetricsLogObserver()],
)
Now save the changes to the Python program.
What you see in the log afterwards. As soon as you restart the bot and speak a sentence, lines like these appear per conversation turn (with the service names from our local setup):
NvidiaLLMService#0 TTFB: 0.837
NemotronTTSService#0 TTFB: 0.171
NemotronTTSService#0 processing time: 0.0005
The values are given in seconds. Here’s how to map them to my three stages:
- ASR (Parakeet): the
processing timeof theNemotronASRService– roughly the time to the final transcript. - LLM (Ollama) – TTFT: the
TTFBvalue of theNvidiaLLMService– from the finished transcript to the first token of my Ollama model. - TTS (Magpie) – TTFA: the
TTFBvalue of theNemotronTTSService– from the first LLM text to the first audio sample.
The approximate voice-to-voice latency is then the sum of ASR + LLM TTFB + TTS TTFB – plus the network hops that, in my case, come from the separate Ollama server on the second machine.
The bonus round: measuring the real end-to-end time. If you want “from the end of my utterance to the first sound” as a single number, hook onto the frames that mark the turn boundaries: VADUserStoppedSpeakingFrame (I’m done – start the clock) and BotStartedSpeakingFrame (the bot starts speaking – stop the clock). A compact custom observer is enough:
import time
from loguru import logger
from pipecat.observers.base_observer import BaseObserver, FramePushed
from pipecat.frames.frames import VADUserStoppedSpeakingFrame, BotStartedSpeakingFrame

class VoiceLatencyObserver(BaseObserver):
    def __init__(self):
        super().__init__()
        self._t_user_stopped = None

    async def on_push_frame(self, data: FramePushed) -> None:
        frame = data.frame
        if isinstance(frame, VADUserStoppedSpeakingFrame):
            self._t_user_stopped = time.time()
        elif isinstance(frame, BotStartedSpeakingFrame) and self._t_user_stopped:
            ms = (time.time() - self._t_user_stopped) * 1000
            logger.info(f"Voice-to-Voice latency: {ms:.0f} ms")
            self._t_user_stopped = None
You simply add it to the observers=[...] list as well:
observers=[MetricsLogObserver(), VoiceLatencyObserver()],Note: With VAD_PROFILE=ASR (our default) the Nemotron ASR delivers the end-of-speech signals itself – depending on the Pipecat version the start frame may then be named slightly differently. The MetricsLogObserver works in any case, so it’s the reliable starting point; take the custom observer as the icing on the cake.
My measurements. This is what the latency chain looked like on my first run. I asked my assistant “Kannst du mir sagen, wie du dich heute fühlst?” (Can you tell me how you’re feeling today?); the LLM was the large gemma4:26b running on the separate dual-RTX-A6000 inference Ollama server, with ASR (Parakeet) and TTS (Magpie) on the RTX A6000 Ada:
| Stage | What’s measured | My value (gemma4:26b) |
|---|---|---|
| ASR (Parakeet) | Compute latency to the final transcript | ≈ 32 ms |
| LLM (Ollama) | to the first complete sentence (this releases TTS) | ≈ 7.05 s |
| TTS (Magpie) | Time-to-First-Audio (TTFB) | ≈ 73 ms |
| Voice-to-voice (total) | End of utterance → first sound | ≈ 7.1 s |
The numbers speak a clear language: ASR and TTS together, at around 100 ms, are practically free. But the entire latency sits in the LLM. In my case the large gemma4:26b was running, and for my short question it produced a hefty 423 completion tokens, even though the system prompt asks for only a short sentence. On top of that comes a subtlety of the pipeline: the TTS stage doesn’t wait for the first token, but for the first complete sentence. A fast first token (my greeting arrived in 0.49 s) therefore helps little if the model rambles on before the first sentence ends.
A word on the often-suspected “model loading”: yes, on the very first call Ollama pulls the model into VRAM, which can cost time once. In my measurement, though, the model was already warm – the greeting did arrive in 0.49 s. So the seven seconds here come almost entirely from the sheer generation of such a large model, not from loading.
The conclusion is clear: for a fluid conversation, a 26B model is simply too heavy at this spot. If you want to hit the target of roughly under ~700–800 ms, use a smaller, faster model for the reasoning in the loop. That’s exactly what the model dropdown in my upgraded UI is handy for: switch to a 7–8B instruct model once, speak the same sentence, and the latency drops noticeably. The two-machine split is interesting here too: the LLM on the separate Ollama server takes load off the A6000 Ada GPU (which runs ASR and TTS) but costs a network hop. Only measuring shows in black and white that this hop is utterly negligible here – the bottleneck is the model size alone.
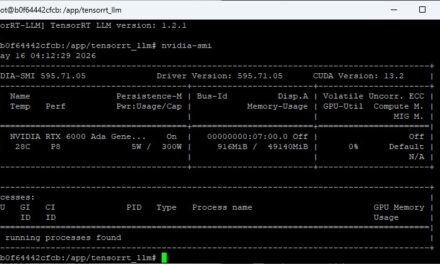
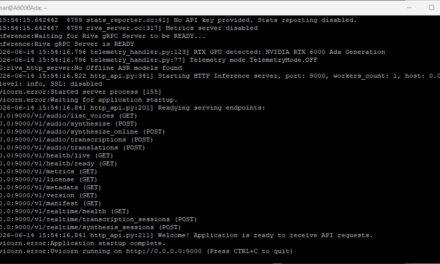
NVIDIA NIM Voice Assistant web frontend inference server
Tips and troubleshooting
- Port conflict: the most common stumbling block – ASR and TTS both want 9000/50051. That’s exactly why we remapped Magpie to 9001/50052 (Step 2).
- Sample rates between stages: keep a consistent 16 kHz mono; mismatches between ASR output and TTS input are a typical source of errors.
- Two machines: the LLM runs separately – check network latency and the reachability of the
base_url. - Python 3.12: nvidia-pipecat doesn’t run in the venvs of the other parts – use a dedicated environment.
- Service rename as of nvidia-pipecat 0.4.0: if you write your own pipeline code, import
NemotronASRServiceorNemotronTTSService(fromnvidia_pipecat.services.riva_speech). The old namesRivaASRService/RivaTTSServiceonly work as deprecated aliases with a warning now. - Exact voice name: take the German Magpie
voice_idexactly as from--list-voices.
Conclusion
With that, the first complete local voice loop is in place: I speak, Parakeet transcribes, my Ollama LLM answers, Magpie speaks. I’ve built the whole setup end to end on my own hardware, interruptible, in German. The skeleton of my agent is alive.
For now, though, the agent just “thinks” freely off the cuff. In the next part I replace the bare LLM with the NAT agent from Part 5 (Path B). That’s another big step for the setup, because then the agent can trigger real actions – telling the time, for instance – and turns from a conversation partner into an assistant. In Part 8, finally, the wake word comes in as the doorman in front of it.
If you build the loop yourself: feel free to write in the comments what total latency you achieve on your hardware.


The tutorial offers a clear and practical guide for setting up and running the Tensorflow Object Detection Training Suite. Could…
This works using an very old laptop with old GPU >>> print(torch.cuda.is_available()) True >>> print(torch.version.cuda) 12.6 >>> print(torch.cuda.device_count()) 1 >>>…
Hello Valentin, I will not share anything related to my work on detecting mines or UXO's. Best regards, Maker
Hello, We are a group of students at ESILV working on a project that aim to prove the availability of…