

The speech recognition is in place: with Parakeet (Part 2) and Canary (Part 3) I covered the input direction, speech to text, natively on NVIDIA. Now comes the opposite direction, the voice output. In this post I run NVIDIA Magpie TTS as a local NIM and have German text read aloud naturally. This is the NVIDIA-native counterpart to my earlier post on German TTS with Piper and XTTS, but this time entirely within the NVIDIA ecosystem and, as always, local, on my own hardware.
What is Magpie TTS?
Magpie TTS is an end-to-end multilingual neural text-to-speech model. It generates speech by predicting discrete audio codec tokens via a transformer encoder-decoder architecture; a downstream audio codec model then turns those tokens into the audible waveform.
Three properties matter for us:
- Multilingual incl. German: Magpie Multilingual covers nine languages, German (
de-DE) among them. - Streaming and offline: it can deliver the finished audio in one piece or stream the first fragments as soon as they are ready. The latter matters a lot to me for the later voice-agent feel.
- Multiple voices: at least one male and one female voice per language, partly with emotional styles.
In short: the TTS counterpart to the ASR NIMs from Parts 2 and 3.
The goal of this post
We run the Magpie TTS NIM locally: German text in, natural German speech as a WAV out. Optionally also in streaming mode, which delivers the first audio fragments as soon as they are ready. Everything local, so your text and the generated audio stay on the machine.
Requirements
If you have been through Parts 2 and 3, the groundwork is already in place and we only reference it briefly:
- NGC account and API key,
docker logintonvcr.io(see Part 2) - the
riva-clientvenv withnvidia-riva-clientinstalled – the clonedpython-clientsrepo also includes the TTS scripts underscripts/tts/ - GPU ≥ compute capability 8.0 – Magpie Multilingual uses about 11 GB VRAM at
batch_size=8
So you don’t need to install anything new. One important point: Magpie uses the same ports (9000/50051) as the ASR NIMs. Before this step, stop any Parakeet or Canary container that may still be running (Ctrl + C), otherwise you get a port conflict.
Step 1: Start the Magpie TTS NIM
If your API key is no longer set in the current terminal session, set it again:
Command: export NGC_API_KEY="nvapi-xxxxxxxxxxxxxxxxxxxxx"
Then pick the container and profile. For the TTS NIM the profile is selected via name= (not via mode= like for ASR):
Command: export CONTAINER_ID=magpie-tts-multilingual
Command: export NIM_TAGS_SELECTOR=name=magpie-tts-multilingual
Command: docker run -it --rm --name=$CONTAINER_ID --runtime=nvidia --gpus '"device=0"' --shm-size=8GB -e NGC_API_KEY -e NIM_HTTP_API_PORT=9000 -e NIM_GRPC_API_PORT=50051 -p 9000:9000 -p 50051:50051 -e NIM_TAGS_SELECTOR -v ~/.cache/nim:/opt/nim/.cache nvcr.io/nim/nvidia/$CONTAINER_ID:latest
You can reuse the cache directory ~/.cache/nim from Parts 2/3. The first start again downloads the model and builds the inference engine; the service is ready once “Application is ready to receive API requests” appears in the logs.
Note on batch size:
The default is batch_size=8 (~11 GB VRAM). If you need more parallelism, append the batch size: export NIM_TAGS_SELECTOR="name=magpie-tts-multilingual,batch_size=32". That configuration uses about 31 GB, though. On the A6000 Ada (48 GB) both are feasible; keep an eye on usage with nvidia-smi.
After the start, the terminal again looked rather unspectacular. But everything should be fine and properly up.
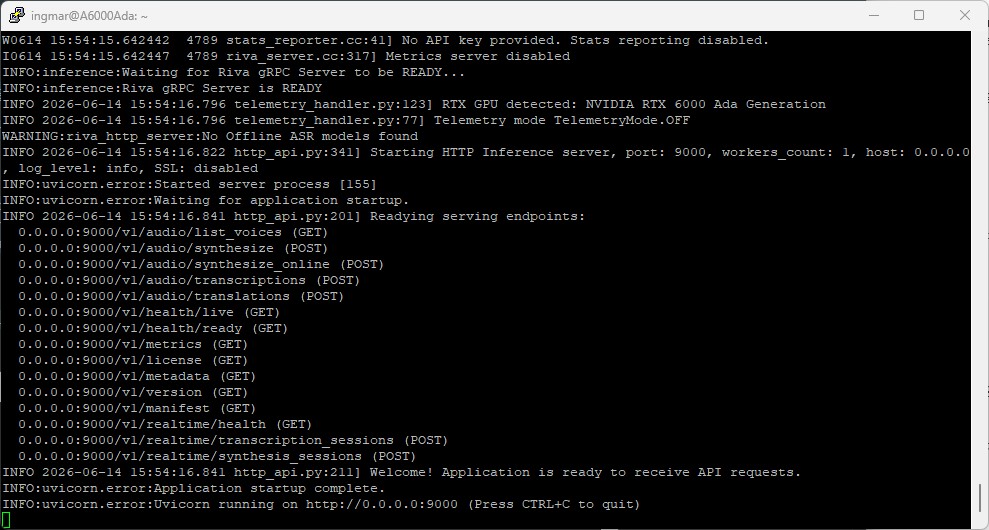
NVIDIA NIM container Magpie setup
Step 2: Check the container status
In a second terminal you check as usual whether the service is running.
Command: docker ps
Command: curl http://localhost:9000/v1/health/ready
If the health check answers with {"object":"health.response","message":"ready","status":"ready"}, your TTS microservice is up.
Step 3: List the available voices
Before we have anything read aloud, we look at which voices the model offers. First activate the venv:
Command: source ~/venvs/riva-client/bin/activate
Then query the voices:
Command: python python-clients/scripts/tts/talk.py --server 0.0.0.0:50051 --list-voices
You get back a JSON list of languages and voices. For German, look for entries that start with Magpie-Multilingual.DE-DE.. There are several voices (for example a female and a male one), partly with emotional styles (e.g. .Neutral, .Calm). We enter the exact name of the German voice you want into the synthesis command in a moment.
Here is an excerpt of the voices for the German language:
“Magpie-Multilingual.IT-IT.Pascal.Happy”,
“Magpie-Multilingual.IT-IT.Pascal.Disgust”,
“Magpie-Multilingual.IT-IT.Pascal.Sad”,
“Magpie-Multilingual.DE-DE.Pascal”,
“Magpie-Multilingual.DE-DE.Pascal.Neutral”,
“Magpie-Multilingual.DE-DE.Pascal.Calm”,
“Magpie-Multilingual.DE-DE.Pascal.Angry”,
“Magpie-Multilingual.DE-DE.Pascal.Happy”,
“Magpie-Multilingual.DE-DE.Pascal.Disgust”,
“Magpie-Multilingual.DE-DE.Pascal.Sad”,
“Magpie-Multilingual.DE-DE.Mia”,
“Magpie-Multilingual.DE-DE.Mia.Neutral”,
“Magpie-Multilingual.DE-DE.Mia.Calm”,
“Magpie-Multilingual.DE-DE.Mia.Angry”,
“Magpie-Multilingual.DE-DE.Mia.Happy”,
“Magpie-Multilingual.DE-DE.Mia.Sad”,
“Magpie-Multilingual.DE-DE.Diego”,
“Magpie-Multilingual.DE-DE.Diego.Neutral”,
“Magpie-Multilingual.DE-DE.Diego.Calm”,
“Magpie-Multilingual.DE-DE.Diego.Angry”,
“Magpie-Multilingual.DE-DE.Diego.Happy”,
“Magpie-Multilingual.DE-DE.Diego.PleasantSurprised”,
“Magpie-Multilingual.DE-DE.Diego.Disgust”,
“Magpie-Multilingual.DE-DE.Sofia”,
“Magpie-Multilingual.DE-DE.Sofia.Neutral”,
“Magpie-Multilingual.DE-DE.Sofia.Calm”,
“Magpie-Multilingual.DE-DE.Sofia.Angry”,
“Magpie-Multilingual.DE-DE.Sofia.Happy”,
“Magpie-Multilingual.DE-DE.Sofia.Fearful”,
“Magpie-Multilingual.EN-US.Pascal”,
“Magpie-Multilingual.EN-US.Pascal.Neutral”,
“Magpie-Multilingual.EN-US.Pascal.Calm”,
“Magpie-Multilingual.EN-US.Pascal.Angry”,
Step 4: First German speech output
Now we have German text read aloud and save the result as a WAV. Important on a headless server (like my A6000 Ada over SSH): there is no sound card for direct playback, and I’m not sitting at the machine anyway. So we write to a file (--output) and listen to it afterwards (e.g. after downloading via scp).
Note: Please make sure you adjust the --output parameter so the file is written to a path that actually exists on your system.
Command: python python-clients/scripts/tts/talk.py --server 0.0.0.0:50051 --language-code de-DE --voice Magpie-Multilingual.DE-DE.Sofia.Neutral --text "Hallo, das ist eine lokale Sprachausgabe mit NVIDIA Magpie." --output /home/ingmar/asr/de_Sofia.Neutral.wav
You replace the voice name with the appropriate value from Step 3.
Alternatively, this also works directly via the NIM’s HTTP interface:
Command: curl -sS http://localhost:9000/v1/audio/synthesize --fail-with-body -F language=de-DE -F text="Hallo, das ist eine lokale Sprachausgabe mit NVIDIA Magpie." --output ausgabe.wav
Audio sample:
Step 5: Streaming TTS for low latency
A note up front, because “streaming” is slightly confusing here: no URL is opened in the browser and nothing is played “live”. It is exactly the same command-line call as in Step 4, just with the additional --stream switch. The difference lies solely in how the NIM returns the audio:
- Without
--stream(offline): you send the text, the NIM synthesizes the complete speech and only then returns it in one piece. You wait until everything is done. - With
--stream: the NIM delivers the audio in small fragments as soon as they are ready. The client already gets the first fractions of a second while the rest is still being generated. That is the low “time-to-first-audio” that makes a voice agent feel natural.
So for now it is only about testing whether the --stream parameter works at all.
Command: python python-clients/scripts/tts/talk.py --server 0.0.0.0:50051 --language-code de-DE --voice Magpie-Multilingual.DE-DE.Mia.Calm --text "Hallo, das ist eine lokale Sprachausgabe mit NVIDIA Magpie." --stream --output /home/ingmar/asr/ausgabe_stream.wav
What does that mean on a headless server in practice?
In both cases the same file ausgabe*.wav is produced at the end, which you download and listen to. You only hear the streaming advantage (start talking immediately instead of waiting) when the audio goes to a speaker live. Here on the server we mainly test that the streaming mode runs cleanly and produces a valid WAV. Streaming shows its real benefit later in Part 6, when Pipecat passes the audio fragments straight to playback.
Two practical points:
- Listening: download the WAV via
scpto your workstation and play it there. - Long texts: for long inputs,
--streamis the better choice anyway, because otherwise the offline response can exceed the gRPC limit of 4 MB per message.
Step 6: Voices and styles
Magpie Multilingual brings at least one male and one female voice per language, plus emotional styles. Via the --voice name you select exactly which voice and which style is spoken. We have already seen that.
Note on voice cloning: True zero-shot voice cloning (reproducing a voice from a short audio prompt) is not part of this multilingual NIM, but a separate, access-restricted model (magpie-tts-zeroshot). Here we use the predefined voices. They are perfectly sufficient for testing and experimenting with a clean German voice agent. Whether you really want to use them in production is up to you.
Tips and troubleshooting
- Port conflict: Magpie occupies 9000/50051 like the ASR NIMs. Stop the other container first, or assign different ports in the
docker runcommand. - Headless server: No direct playback without a sound card – write the audio output to a WAV with
--outputand listen to it after downloading (instead of--play-audio). - Long texts / gRPC 4 MB limit: For long inputs use the streaming mode (
--stream), otherwise the offline response can blow past the gRPC message size. - Copy the voice name exactly: Copy the
--voicevalue exactly from--list-voices; a typo leads to an error. - VRAM: ~11 GB at
batch_size=8, ~31 GB atbatch_size=32. Check withnvidia-smi. - Sample rate/encoding: The default is
LINEAR_PCM; via the parameters you can control, for example, the output sample rate (around 44100 Hz).
Conclusion
With Magpie, the voice output is now available as an NVIDIA microservice too. That gives me ASR (Parakeet, Canary) and TTS (Magpie) together, fully NVIDIA-native and local. These are the two halves of a voice agent: listening and answering.
In the next part comes the brain: the orchestrator via the NVIDIA NeMo Agent Toolkit (NAT), which recognizes what the user wants and triggers the matching action. After that, in Part 6, we connect all the building blocks with Pipecat into a continuous, interruptible voice loop – the complete local voice agent.
If you rebuild the setup: drop me a comment about which German Magpie voice sounds most natural to you.


The tutorial offers a clear and practical guide for setting up and running the Tensorflow Object Detection Training Suite. Could…
This works using an very old laptop with old GPU >>> print(torch.cuda.is_available()) True >>> print(torch.version.cuda) 12.6 >>> print(torch.cuda.device_count()) 1 >>>…
Hello Valentin, I will not share anything related to my work on detecting mines or UXO's. Best regards, Maker
Hello, We are a group of students at ESILV working on a project that aim to prove the availability of…