

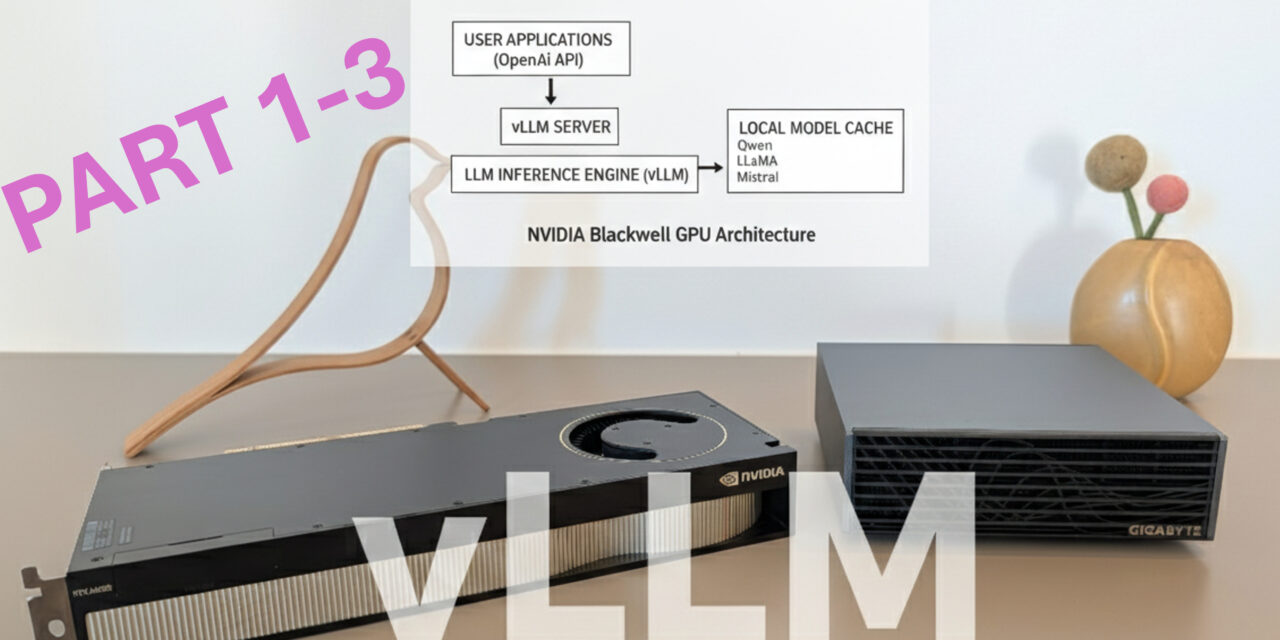
After showing you how to install Ollama, Open WebUI, ComfyUI, and LLaMA Factory on the Gigabyte AI TOP ATOM in my previous posts, now comes something for everyone who needs maximum performance when running Large Language Models: vLLM – a high-performance inference engine specifically designed to run LLMs with maximum throughput and minimal memory consumption.
In this post, I will show you how I installed and configured vLLM on my Gigabyte AI TOP ATOM to run language models like Qwen, LLaMA, or Mistral with optimal performance. vLLM also utilizes the full GPU performance of the Blackwell architecture and offers an OpenAI-compatible API, allowing existing applications to be seamlessly integrated. Since the AI TOP ATOM system I use is based on the same platform as the NVIDIA DGX Spark, the official NVIDIA playbooks work just as reliably here. For my experience reports here on my blog, I was loaned the Gigabyte AI TOP ATOM by MIFCOM, a specialist for high-performance and gaming computers from Munich.
The Basic Idea: Maximum Performance for LLM Inference
Before I dive into the technical details, an important point: vLLM is an inference engine designed to operate Large Language Models with maximum throughput and minimal memory usage. Unlike standard inference solutions, vLLM uses innovative techniques like PagedAttention for memory-efficient attention calculations and Continuous Batching to add new requests to ongoing batches and maximize GPU utilization. My experience here shows that vLLM is significantly faster than Ollama when it comes to processing hundreds of similar requests in succession. This is exactly the kind of requirement we often find in industrial applications.
The special thing about it: vLLM offers an OpenAI-compatible API, so applications developed for the OpenAI API can be seamlessly switched to a vLLM backend – without code changes. This means that we can also pull in external power depending on the system load if it is needed. Installation is done via Docker with a pre-built NVIDIA container that already contains all the necessary libraries and optimizations for the Blackwell architecture. We have already become familiar with this procedure in other reports like LLaMA Factory.
What you need for this:
-
A Gigabyte AI TOP ATOM, ASUS Ascent, MSI EdgeXpert (or NVIDIA DGX Spark) connected to the network
-
A connected monitor or terminal access to the AI TOP ATOM
-
Docker installed and configured for GPU access
-
NVIDIA Container Toolkit installed
-
Basic knowledge of terminal commands, Docker, and REST APIs
-
At least 20 GB of free space for container images and models
-
An internet connection to download models from the Hugging Face Hub
-
Optional: A Hugging Face account for gated models (models with access restrictions)
Checking System Requirements
For the rest of my instructions, I am assuming that you are sitting directly in front of the AI TOP ATOM or the NVIDIA DGX Spark and have a monitor, keyboard, and mouse connected. First, I check whether all necessary system requirements are met. To do this, I open a terminal on my AI TOP ATOM and execute the following commands.
The following command shows you if the CUDA Toolkit is installed:
Command: nvcc --version
You should see CUDA 13.0. Next, I check if Docker is installed:
Command: docker --version
Now I check if Docker has GPU access:
Command: docker run --gpus all nvcr.io/nvidia/cuda:13.0.1-devel-ubuntu24.04 nvidia-smi
This command starts a test container and displays GPU information. If Docker is not yet configured for GPU access, you must set that up first. Also check Python and Git:
Command: python3 --version
Command: git --version
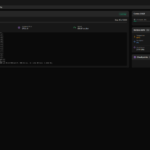
And finally, I check if the GPU is recognized:
Command: nvidia-smi
You should now see the GPU information. If any of these commands fail, you must install the corresponding components first.
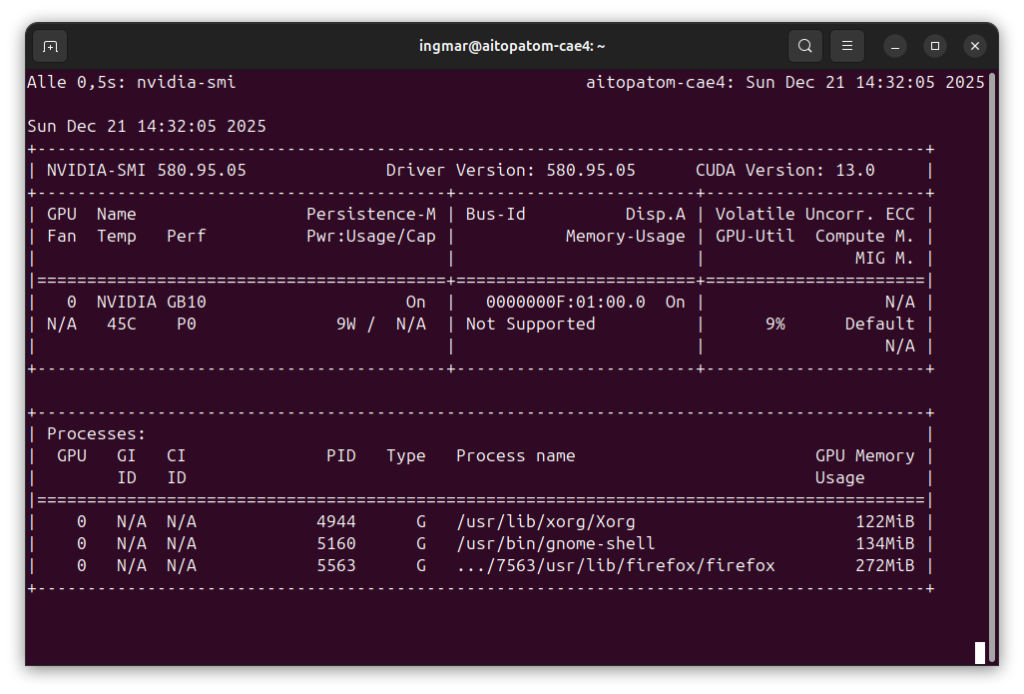
GIGABYTE AI TOP ATOM – NVIDIA-SMI
Downloading the vLLM Container Image
vLLM runs in a Docker container that already contains all the necessary libraries and optimizations for the Blackwell architecture. This makes installation significantly easier since we don’t have to worry about Python dependencies or build processes. You don’t need to create a folder for this – Docker manages the container image automatically. I simply download the vLLM container image from NVIDIA as follows:
Command: docker pull nvcr.io/nvidia/vllm:25.11-py3
This command downloads the latest vLLM container image. Depending on the internet speed, the download may take a few minutes. The image being downloaded is about 10-15 GB in size. Docker automatically stores the image in its own directory (usually under /var/lib/docker). The image already contains all necessary CUDA libraries and optimizations for the Blackwell GPU. This means for us that we do not need to install anything else manually.
Note: If you have problems with the download or need authentication, you can also download the image directly from the NVIDIA NGC Registry.
Important: We will only create a folder for the models in Phase 4 when we configure vLLM for production. For the first test in Phase 3, this is not necessary. The folder will be called ~/models.
Starting and Testing the vLLM Server (Simple)
Now I start the vLLM server with a test model to check the basic functionality. I am using the small openai/gpt-oss-20b model for the first test. In the Phase 4 section, I will go into much more depth regarding Docker parameters and configurations.
Note: There is no single list of supported LLMs maintained by the vLLM project, as vLLM supports almost every model published in “Safetensors” or “PyTorch” format on Hugging Face. Since vLLM is being developed extremely rapidly, new architectures are constantly being added. You can find information about the current architectures at vLLM here: vLLM custom models
Command: docker run -it --gpus all -p 8000:8000 nvcr.io/nvidia/vllm:25.11-py3 vllm serve "openai/gpt-oss-20b"
Note: In my case, errors occurred during execution suggesting that vLLM could not reserve 90% of the available VRAM because only 82 GB RAM were still available on the AI TOP ATOM.
The error message here is clear:
ValueError: Free memory on device (82.11/119.7 GiB) on startup is less than desired GPU memory utilization (0.9, 107.73 GiB).
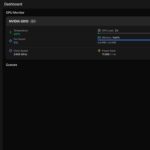
Now we can provide vLLM with a value upon startup for how much VRAM may be reserved using the following attribute: --gpu-memory-utilization 0.6.
Command: docker run -it --gpus all -p 8000:8000 --ipc=host --ulimit memlock=-1 --ulimit stack=67108864 nvcr.io/nvidia/vllm:25.11-py3 vllm serve "openai/gpt-oss-20b" --gpu-memory-utilization 0.6
Afterwards, I was able to successfully start the download as you can see in the following image.
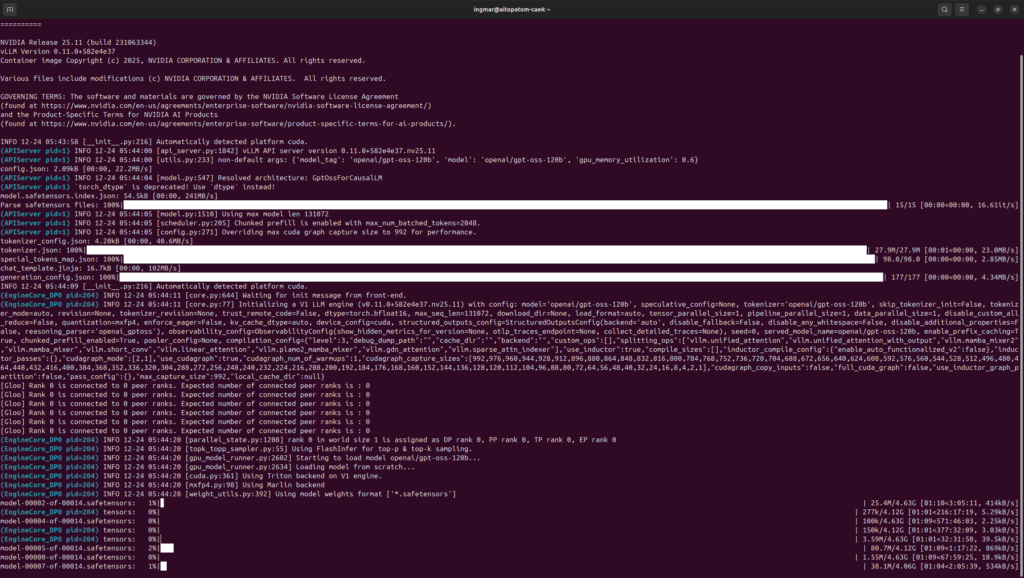
GIGABYTE AI TOP ATOM – vLLM gpt-oss-120b startup
The command docker run... starts the vLLM server in interactive mode and makes port 8000 available. The server automatically downloads the model from the Hugging Face Hub. You should see an output containing the following information:
-
Model loading confirmation
-
Server start on port 8000
-
GPU memory allocation details
INFO:      Started server process [1]
INFO:      Waiting for application startup.
INFO:      Application startup complete.
INFO:      Uvicorn running on http://0.0.0.0:8000 (Press CTRL+C to quit)
Important Note: The server runs on 0.0.0.0 by default, which means it is already reachable on the network. The parameter --host 0.0.0.0 is therefore not strictly necessary but is sometimes used for explicit configuration.
In a second terminal window, I now test the server with a simple CURL request to see if the LLM model responds:
Command: curl http://localhost:8000/v1/chat/completions -H "Content-Type: application/json" -d '{"model": "openai/gpt-oss-20b", "messages": [{"role": "user", "content": "12*17"}], "max_tokens": 500}'
The answer should contain a calculation, such as "content": "204" or a similar mathematical solution. If the answer is correct, vLLM is working perfectly!
Note: vLLM also offers a /v1/completions endpoint for simple prompt-based requests. However, the /v1/chat/completions endpoint is recommended for chat-based models.
Click here for Part 2 of the installation and configuration guide.

The tutorial offers a clear and practical guide for setting up and running the Tensorflow Object Detection Training Suite. Could…
This works using an very old laptop with old GPU >>> print(torch.cuda.is_available()) True >>> print(torch.version.cuda) 12.6 >>> print(torch.cuda.device_count()) 1 >>>…
Hello Valentin, I will not share anything related to my work on detecting mines or UXO's. Best regards, Maker
Hello, We are a group of students at ESILV working on a project that aim to prove the availability of…