

After showing in my previous posts how to install Ollama, Open WebUI, LLaMA Factory, vLLM, and ComfyUI on the Gigabyte AI TOP ATOM, here is something for everyone who wants to train their own Stable Diffusion AI models: AI Toolkit by Ostris – a comprehensive solution for training Stable Diffusion models with a user-friendly web interface.
In this post, I will show you how I installed and configured the AI Toolkit on my Gigabyte AI TOP ATOM to train and customize my own models. The AI Toolkit utilizes the full GPU performance of the Blackwell architecture and offers an intuitive web UI for configuring and monitoring training jobs. Since the system is based on the same platform as the NVIDIA DGX Spark, the official NVIDIA Playbooks work just as reliably here. For my experience reports here on my blog, I was lent the Gigabyte AI TOP ATOM by the company MIFCOM, a specialist for high-performance and gaming computers from Munich.
The Basic Idea: Training Your Own AI Models with a User-Friendly Interface
Before I dive into the technical details, an important point: AI Toolkit is a comprehensive solution for training Large Language Models and other AI models. Unlike complex manual setups, the AI Toolkit provides an intuitive web interface through which you can configure, start, and monitor training jobs – without having to manually edit complex command-line commands or YAML files.
What makes it special: The AI Toolkit runs directly on your AI TOP ATOM and utilizes the 128 GB of memory and the full GPU performance of the Blackwell architecture. Installation is done via a virtual Conda environment with Python 3.11, which allows for clean isolation from the system Python installation. The web UI runs on port 8675 and is accessible from any computer on the network, so you can start and monitor training jobs from other machines as well.
What you need for this:
-
A Gigabyte AI TOP ATOM, ASUS Ascent, MSI EdgeXpert (or NVIDIA DGX Spark) connected to the network
-
A connected monitor or terminal access to the AI TOP ATOM
-
Basic knowledge of terminal commands, Python, and Conda
-
At least 20 GB of free disk space for Conda, PyTorch, and dependencies, and especially the base models you wish to extend
-
An internet connection to download Miniconda, PyTorch, and Node.js
-
The dgx_requirements.txt file of the AI Toolkit (should be included in the AI Toolkit repository)
-
A computer on the same network with a modern browser for the web UI
Phase 1: Checking System Requirements
For the rest of my instructions, I am assuming that you are sitting directly in front of the AI TOP ATOM or the NVIDIA DGX Spark and have a monitor, keyboard, and mouse connected. First, I check whether all necessary system requirements are met. To do this, I open a terminal on my AI TOP ATOM and execute the following commands.
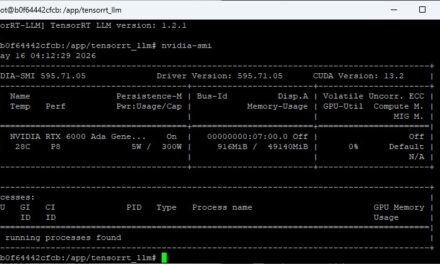
The following command shows you if the CUDA Toolkit is installed:
Command: nvidia-smi
You should now see the GPU information. If not, you must first install the NVIDIA drivers. Also check if Python is already installed:
Command: python3 --version
The AI Toolkit requires Python 3.11, but we will install this via Miniconda, so the system Python version is not critical. Also check if wget is available:
Command: wget --version
If any of these commands fail, you must install the corresponding components first.
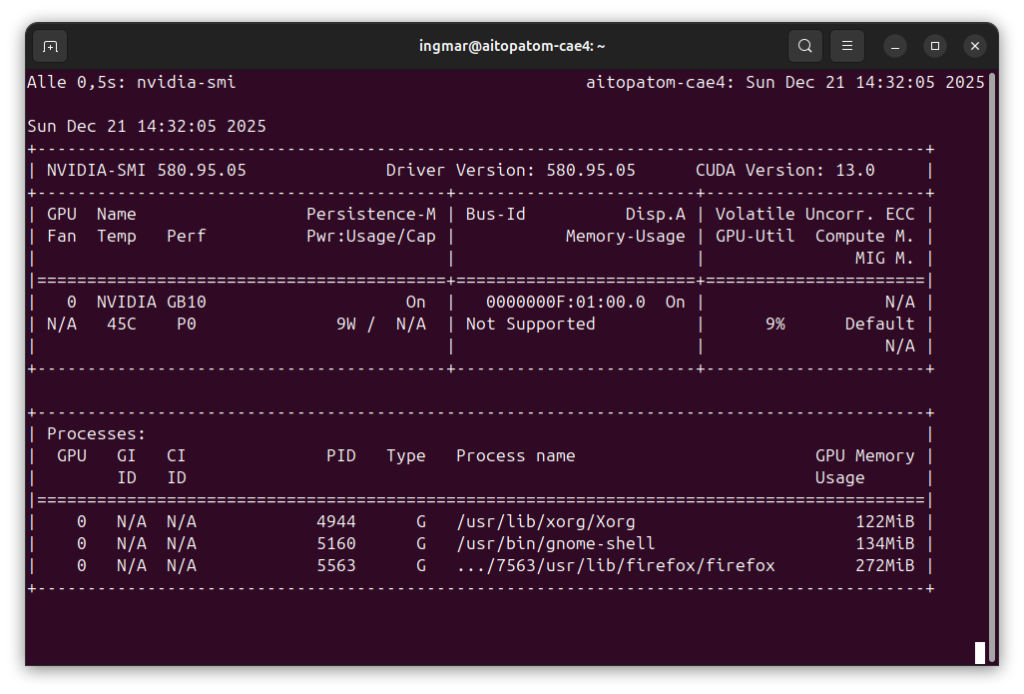
GIGABYTE AI TOP ATOM – NVIDIA-SMI
Next, I downloaded the AI Toolkit from GitHub and followed these step-by-step instructions: DGX OS installation instructions. To do this, I executed the following command in my user’s home directory.
Command: git clone https://github.com/ostris/ai-toolkit.git
Command: cd ai-toolkit
Phase 2: Installing Miniconda
The AI Toolkit requires Python 3.11, and the easiest way to do this without affecting the system Python installation is to use Miniconda. Miniconda allows you to create isolated Python environments with specific Python versions. First, I download the latest version of Miniconda for Linux ARM64:
Command: wget https://repo.anaconda.com/miniconda/Miniconda3-latest-Linux-aarch64.sh
After the download, I make the installation script executable:
Command: chmod u+x Miniconda3-latest-Linux-aarch64.sh
Now I start the installation:
Command: ./Miniconda3-latest-Linux-aarch64.sh
During the installation, you will be asked for the installation path. The default path is ~/miniconda3, which is sufficient for most cases. I accept the default settings and also let Miniconda set the PATH variable in the ~/.bashrc file. To do this, I simply confirmed the prompts several times with ja or yes.
Important Note: After installation, you must restart your bash session or reload the ~/.bashrc file so that Conda is available:
Command: source ~/.bashrc
Or simply open a new terminal window. If Miniconda was successfully installed, you will see (base) at the beginning of your terminal prompt, which means the base Conda environment is activated.

GIGABYTE AI TOP ATOM – Conda CLI
If you do not want the base environment to be activated automatically, you can deactivate it with the following command:
Command: conda config --set auto_activate_base false
Personally, I do not keep automatic activation enabled, as I rarely use Conda virtual environments, preferring Python virtual environments instead.
Phase 3: Creating a Conda Environment for AI Toolkit
Now I create a new Conda environment specifically for the AI Toolkit with Python 3.11:
Command: conda create --name ai-toolkit python=3.11
Conda will ask you for a variety of confirmations that you must answer with ja / yes. Afterwards, the Conda environment will be created. This may take a few minutes. After creation, I activate the environment:
Command: conda activate ai-toolkit
You should now see that your prompt in the terminal window changes from (base) to (ai-toolkit), so (ai-toolkit) now appears at the beginning. This means that the virtual (ai-toolkit) Conda environment is activated and all subsequent commands will be executed in this environment to install the AI Toolkit.
Important Note: The Conda environment (ai-toolkit) must be activated in every new terminal window. If you forget to activate the environment, the following installations will not work, nor will starting the AI Toolkit later.
Phase 4: Installing PyTorch
The AI Toolkit requires PyTorch with CUDA support. I am installing the specific version optimized for the Blackwell architecture into the virtual (ai-toolkit) environment:
Command: pip3 install torch==2.9.1 torchvision==0.24.1 torchaudio==2.9.1 --index-url https://download.pytorch.org/whl/cu130
This installation may take a few minutes as PyTorch and its associated packages are relatively large. The --index-url parameter ensures that we download the CUDA 13.0-compatible versions optimized for the Blackwell GPU.
After installation, I check if PyTorch was installed correctly and if CUDA support is available:
Command: python -c "import torch; print(f'PyTorch: {torch.__version__}, CUDA available: {torch.cuda.is_available()}')"
You should see an output that looks something like this:
PyTorch: 2.9.1+cu130, CUDA available: TrueIf CUDA available: False is displayed, there is a problem with the CUDA installation or the drivers. Then check with nvidia-smi to see if the GPU is recognized.
Phase 5: Installing Further Requirements
Now I install the remaining dependencies of the AI Toolkit. At the time of my installation, these were contained in a file named dgx_requirements.txt, which can be found in the AI Toolkit repository.
Note: If you haven’t cloned the repository yet, you must do so first as described at the end of Phase 1 section above:
Command: pip3 install -r dgx_requirements.txt
This installation can also take a few minutes, depending on how many packages are listed in the requirements file. Pip automatically installs all dependencies and their own dependencies.
Important Note: Ensure that the Conda environment (ai-toolkit) is activated before running this command. If not, the packages will be installed in the wrong environment.
Phase 6: Installing Node.js for ARM64
The web UI of the AI Toolkit requires Node.js. Since the AI TOP ATOM uses an ARM64 architecture (NVIDIA Grace CPU), we need an ARM64 version of Node.js. The standard Node.js installation via apt does not work reliably here, so we install Node.js manually.
First, I download a Linux ARM64 build of Node.js from the official Node.js website. I am using version 24.11.1 here as an example, but you can also use a newer version:
Command: wget https://nodejs.org/dist/v24.11.1/node-v24.11.1-linux-arm64.tar.xz
After the download, I extract the archive:
Command: tar -xf node-v24.11.1-linux-arm64.tar.xz
Now I move the extracted directory to /opt so that it is available system-wide:
Command: sudo mv node-v24.11.1-linux-arm64 /opt/
Now I add the Node.js bin directory to the PATH. To do this, I edit the ~/.bashrc file:
Command: nano ~/.bashrc
At the end of the file, I add the following line:
export PATH="/opt/node-v24.11.1-linux-arm64/bin:$PATH"Save the file (in nano: Ctrl+O, then Enter, then Ctrl+X) and reload the ~/.bashrc:
Command: source ~/.bashrc
Now I check if Node.js was installed correctly:
Command: node --version
You should see a version number, e.g., v18.19.1. If the command is not found, check if the PATH is set correctly.
Phase 7: Installing npm
The Node.js installation usually already includes npm, but for the DGX Spark platform and the AI TOP ATOM, it may be necessary to install npm additionally. npm is needed to install the Node.js dependencies of the web UI and to compile the UI.
First, I check if npm is already available:
Command: npm --version
If npm is not found or an error message appears, I install npm via apt. This was necessary in my case:
Command: sudo apt install npm
This installation may take a few minutes. After installation, I check again:
Command: npm --version
You should now see a version number, e.g., 9.2.0 or similar.
Important Note: This step was not listed in the original AI Toolkit instructions, but it is necessary for the web UI to be compiled. Without npm, the build process that follows will fail.
Click here for Part 2/2: Install AI Toolkit on Gigabyte AI TOP ATOM – Step-by-Step Guide – Part 2-2


The tutorial offers a clear and practical guide for setting up and running the Tensorflow Object Detection Training Suite. Could…
This works using an very old laptop with old GPU >>> print(torch.cuda.is_available()) True >>> print(torch.version.cuda) 12.6 >>> print(torch.cuda.device_count()) 1 >>>…
Hello Valentin, I will not share anything related to my work on detecting mines or UXO's. Best regards, Maker
Hello, We are a group of students at ESILV working on a project that aim to prove the availability of…