


Phase 7: Start ComfyUI Server
Now comes the crucial step: I start the ComfyUI server so that it is accessible across the entire network. To do this, I use the parameter --listen 0.0.0.0 so that ComfyUI listens on all network interfaces:
Command: python main.py --listen 0.0.0.0
The server starts now and binds to port 8188. You should see output that looks something like this:
Starting server
To see the GUI go to: http://0.0.0.0:8188
The server is now running in the foreground. Let it run and open a new terminal window if you want to execute further commands.
Here is an image of the ComfyUI web interface as it should look now after the fresh installation. I have already generated the image on the right at the end of the workflow.
Please open the following URL directly in a browser on the AI TOP ATOM.
URL: http://localhost:8188
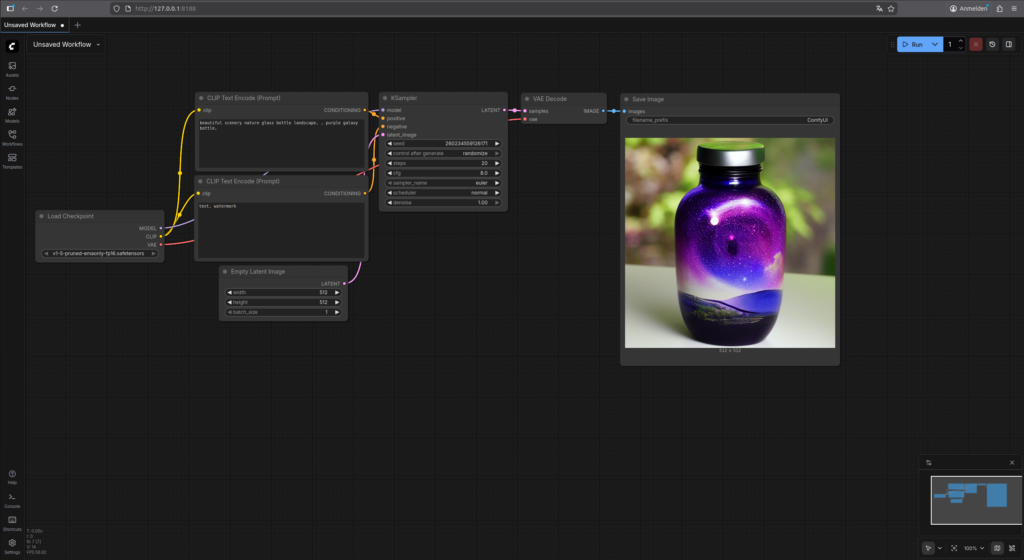
GIGABYTE AI TOP ATOM – ComfyUI Web-Interface
To stop the server, press:
Command: Ctrl+C
Phase 8: Test Installation and Configure Network Access
First, I check if the server is running locally and for this, open the following URL in your browser:
URL: http://localhost:8188
You should see an HTTP 200 response, which shows that the web server is running.
Now I check the IP address of my AI TOP ATOM in the network:
Command: hostname -I
I make a note of the IP address (e.g., 192.168.2.100). If a firewall is active, I must open port 8188:
Command: sudo ufw allow 8188
Now I open a browser on another computer in the network and navigate to http://<IP-Address-AI-TOP-ATOM>:8188 (replace <IP-Address-AI-TOP-ATOM> with the IP address of your AI TOP ATOM). The ComfyUI interface should open.
Important Note: On the first start, it may take a few seconds for the page to load. ComfyUI is initializing and loading the necessary components.
Phase 9: Test Your First Image Generation
When the ComfyUI interface is loaded, you will see a node-based interface. By default, a simple workflow should already be loaded. To generate your first image:
-
Click the “Queue Prompt” button (or press
Ctrl+Enter) -
The model will be loaded and image generation will start
-
You will see the progress in real-time
-
After 30-60 seconds, the first image should be ready
In a separate terminal, you can monitor GPU usage with nvidia-smi to see how the Blackwell GPU performs the image generation.
Try Out Other Models
The beauty of ComfyUI is the wide range of available models. You can download more models from Hugging Face or other sources. Popular models include:
-
Stable Diffusion XL (SDXL) – Higher resolution and better quality
-
Flux – Very high-quality results, optimized for modern GPUs
-
Stable Diffusion 2.1 – Improved version of Stable Diffusion
-
Custom Models – Many community models with special styles
To add more models, simply download them into the models/checkpoints/ directory. ComfyUI will automatically recognize them on the next start.
Troubleshooting: Common Problems and Solutions
In my time with ComfyUI on the AI TOP ATOM, I have encountered some typical problems. Here are the most common ones and how I solved them:
-
PyTorch CUDA not available: Check if PyTorch was installed correctly with CUDA support. Run
python -c "import torch; print(torch.cuda.is_available())"– it should returnTrue. -
Model download fails: Check your internet connection and available storage space. You can check storage space with
df -h. -
Web interface not reachable: Check if the firewall is blocking port 8188. You can open the port with
sudo ufw allow 8188. Also check if both computers are on the same network. -
Out of GPU Memory error: The model might be too large for the available GPU memory. Try a smaller model or check GPU usage with
nvidia-smi. On the DGX Spark platform with Unified Memory Architecture, you can manually clear the buffer cache if memory problems occur:- Command:
sudo sh -c 'sync; echo 3 > /proc/sys/vm/drop_caches'
- Command:
-
Virtual Environment not active: Make sure the virtual environment is activated. The prompt should show
(comfyui-env). If not, runsource comfyui-env/bin/activate. -
Model not found: Check if the model is in the correct directory (
models/checkpoints/). The file should have the extension.safetensorsor.ckpt.
Run ComfyUI in the Background (for testing only)
If you want to keep ComfyUI running permanently, you can set it up as a systemd service or run it in a session with screen or tmux. A simple solution is to use screen:
Command: screen -S comfyui
Then start ComfyUI as usual. To leave the session (without stopping ComfyUI), press Ctrl+A followed by D. To return to the session:
Command: screen -r comfyui
Set Up ComfyUI as a Systemd Service (recommended)
For a professional setup that starts ComfyUI automatically after every reboot, set up a systemd service. First, determine the full path to your ComfyUI directory and your username:
Command: pwd
Note the path (e.g., /home/<username>/ComfyUI). Now create the systemd service file:
Command: sudo nano /etc/systemd/system/comfyui.service
Insert the following content (replacing /home/username with your actual username and /home/username/ComfyUI with your actual ComfyUI path):
[Unit]
Description=ComfyUI Service
After=network.target

[Service]
Type=simple
User=username
WorkingDirectory=/home/username/ComfyUI
Environment="PATH=/home/username/ComfyUI/comfyui-env/bin:/usr/local/sbin:/usr/local/bin:/usr/sbin:/usr/bin:/sbin:/bin"
ExecStart=/home/username/ComfyUI/comfyui-env/bin/python /home/username/ComfyUI/main.py --listen 0.0.0.0 --enable-manager
Restart=always
RestartSec=10

[Install]
WantedBy=multi-user.target
Save the file with Ctrl+O, confirm with Enter, and exit the editor with Ctrl+X.
Now reload the systemd configuration and activate the service:
Command: sudo systemctl daemon-reload
Command: sudo systemctl enable comfyui
Start the service:
Command: sudo systemctl start comfyui
Check the status of the service:
Command: sudo systemctl status comfyui
You should see that the service is active and running. If there are errors, check the logs with:
Command: sudo journalctl -u comfyui -f
The service will now start automatically after every reboot. To stop the service manually:
Command: sudo systemctl stop comfyui
To deactivate the service (will no longer start automatically after reboot):
Command: sudo systemctl disable comfyui
To completely remove the service:
Command: sudo systemctl stop comfyui
Command: sudo systemctl disable comfyui
Command: sudo rm /etc/systemd/system/comfyui.service
Command: sudo systemctl daemon-reload
Rollback: Remove ComfyUI Again
If you want to completely remove ComfyUI from the AI TOP ATOM, execute the following commands on the system:
First, stop the server with Ctrl+C (if it is still running) and deactivate the virtual environment:
Command: deactivate
Then remove the virtual environment and the ComfyUI directory:
Command: rm -rf comfyui-env/
Command: rm -rf ComfyUI/
Important Note: These commands remove all ComfyUI files and also all downloaded models. Make sure you really want to remove everything before you run these commands.
But also remember to delete the ComfyUI service if it was set up.
Summary & Conclusion
The installation of ComfyUI on the Gigabyte AI TOP ATOM is surprisingly straightforward thanks to compatibility with NVIDIA DGX Spark playbooks. In about 30-45 minutes, I have a fully functional image generation solution running that is accessible across the entire network.
What particularly excites me: The performance of the Blackwell GPU is fully utilized, and the node-based interface allows for creating complex workflows for image generation. This makes ComfyUI especially interesting for anyone who wants to work seriously with AI image generation – whether for creative projects, prototyping, or even commercial applications.
I also find it particularly practical that the workflows are saved as JSON files. This allows workflows to be versioned, shared, and reproduced – just like code. This makes ComfyUI a powerful tool for everyone who wants to work professionally with AI image generation.
For teams or creative projects, this is a perfect solution: a central server with full GPU power that everyone can access via a browser. No local installations needed, no complex configurations – just open the IP address in the browser and get started.
If you have questions or encounter problems, feel free to check the official NVIDIA DGX Spark documentation, the ComfyUI documentation, or the ComfyUI Wiki. The community is very helpful, and most problems can be solved quickly.
Next Step: Expand and Optimize Workflows
You have now successfully installed ComfyUI and exposed it to the network. The basic installation works, but that is just the beginning. ComfyUI offers a huge selection of custom nodes and extensions that make your workflows even more powerful.
In the next step, you can look into custom nodes that offer additional functions like Face Restoration, Upscaling, ControlNet, or LoRA support. The ComfyUI community is constantly developing new nodes and workflows that you can use directly.
Good luck experimenting with ComfyUI on your Gigabyte AI TOP ATOM. I am excited to see what creative projects and workflows you develop with it! Let me and my readers know here in the comments.


The tutorial offers a clear and practical guide for setting up and running the Tensorflow Object Detection Training Suite. Could…
This works using an very old laptop with old GPU >>> print(torch.cuda.is_available()) True >>> print(torch.version.cuda) 12.6 >>> print(torch.cuda.device_count()) 1 >>>…
Hello Valentin, I will not share anything related to my work on detecting mines or UXO's. Best regards, Maker
Hello, We are a group of students at ESILV working on a project that aim to prove the availability of…