

Download and Run Additional Models Locally
Since you already downloaded models locally in Phase 4, you can now switch between different models without having to redownload them. To use another already downloaded model, simply stop the current container and restart it with the desired model.
First, I stop the current container (if it is still running):
Command: docker stop vllm-server
Command: docker rm vllm-server
Now I start the server with another already downloaded model. Here, I am using the Qwen2.5-Math-1.5B-Instruct model that we already downloaded in Phase 4:
Model: Qwen2.5-Math-1.5B-Instruct (already stored locally under ~/models/Qwen2.5-Math-1.5B-Instruct)
Command: docker run -d --gpus all --name vllm-server -p 8000:8000 --restart unless-stopped -v ~/models:/data --ipc=host --ulimit memlock=-1 --ulimit stack=67108864 nvcr.io/nvidia/vllm:25.11-py3 vllm serve /data/Qwen2.5-Math-1.5B-Instruct --gpu-memory-utilization 0.6
Important: I am using the local path /data/Qwen2.5-Math-1.5B-Instruct instead of the Hugging Face name Qwen/Qwen2.5-Math-1.5B-Instruct. This way, vLLM loads the model directly from the local directory and does not need to redownload it.
If you want to download a new model, you can use the download command from Phase 4.
With the following command, you can now test whether the model has loaded and is responding to you.
Command: curl http://localhost:8000/v1/chat/completions -H "Content-Type: application/json" -d '{"model": "/data/Qwen2.5-Math-1.5B-Instruct", "messages": [{"role": "user", "content": "Why is the sky red during sunset?"}], "max_tokens": 500}'
Here is an example for a larger model:
Model: openai/gpt-oss-120b
Download Command: docker run -it --rm --name vllm-gpt-oss-120b -v ~/models:/data --dns 8.8.8.8 --dns 8.8.4.4 --ipc=host nvcr.io/nvidia/vllm:25.11-py3 /bin/bash -c "pip install hf_transfer && export HF_HUB_ENABLE_HF_TRANSFER=1 && python3 -c \"from huggingface_hub import snapshot_download; snapshot_download(repo_id='openai/gpt-oss-120b', local_dir='/data/gpt-oss-120b', max_workers=1, resume_download=True)\""
After the download, you can start this model with the following command:
Server Start Command: docker run -d --gpus all --name vllm-server -p 8000:8000 --restart unless-stopped -v ~/models:/data --ipc=host --ulimit memlock=-1 --ulimit stack=67108864 nvcr.io/nvidia/vllm:25.11-py3 vllm serve /data/gpt-oss-120b --gpu-memory-utilization 0.6
The parameter -v ~/models:/data mounts the local directory ~/models into the container under /data, so all downloaded models are stored on the host system. The next time the container starts, the models will not be redownloaded but used directly from the local directory.
Command: curl http://localhost:8000/v1/chat/completions -H "Content-Type: application/json" -d '{"model": "/data/gpt-oss-120b", "messages": [{"role": "user", "content": "Why is the sky red during sunset?"}], "max_tokens": 500}'
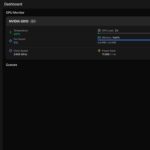
Note: Larger models require more GPU memory. Check with nvidia-smi beforehand to see if enough VRAM is available. For models with more than 32B parameters, you can also use quantization to reduce memory requirements.
For gated models (models with access restrictions), you must first log in to the Hugging Face Hub and request access to the model:
Command: docker exec -it vllm-server huggingface-cli login
You will be asked for your Hugging Face Token. You can find this in your Hugging Face account settings under https://huggingface.co/settings/tokens.
Can I use Ollama models?
Unfortunately, no – Ollama and vLLM use different model formats. Ollama stores models in its own format (usually under ~/.ollama/models), while vLLM requires Hugging Face models stored in the Hugging Face format. The models are not directly compatible. However, if you use both systems, you can optimize storage space by managing the Hugging Face cache for vLLM in a separate directory and keeping Ollama models in another directory.
Troubleshooting: Common Problems and Solutions
During my time with vLLM on the AI TOP ATOM, I encountered some typical problems. Here are the most common ones and how I solved them:
-
CUDA Version Error: The CUDA version does not match. Check with
nvcc --versionif CUDA 13.0 is installed. If not, install the correct version. Some systems may also have issues with CUDA 12.9 – in this case, CUDA 13.0 should be used. -
Container Registry Authentication Fails: If you have problems downloading the container image, it might be that authentication at the NVIDIA NGC Registry is required. Check your network connection or use the NVIDIA NGC Registry directly.
-
SM_121a Architecture Not Recognized: If you build vLLM from source, LLVM patches may need to be applied. For the Docker variant, this problem should not occur.
-
CUDA Out of Memory: The model is too large for the available GPU memory. Use a smaller model or activate quantization with
--quantization awqor--quantization gptq. -
Model Download Fails: Check the internet connection. If you already have cached models, you can mount the cache path with
-v ~/.cache/huggingface:/root/.cache/huggingface. -
Access to Gated Repository Not Possible: Certain Hugging Face models have access restrictions. Regenerate your Hugging Face Token and request access to the gated model in the browser.
-
Memory Issues Despite Sufficient RAM: On the DGX Spark platform with Unified Memory Architecture, you can manually clear the buffer cache if you encounter memory problems:
sudo sh -c 'sync; echo 3 > /proc/sys/vm/drop_caches'
Managing Containers
To check the status of the container:
Command: docker ps -a | grep vllm-server
To stop the container (without deleting it):
Command: docker stop vllm-server
To start the container:
Command: docker start vllm-server
To completely remove the container:
Command: docker rm vllm-server
To view the container logs:
Command: docker logs -f vllm-server
Rollback: Removing vLLM Again
If you want to completely remove vLLM from the AI TOP ATOM, execute the following commands on the system:
First, remove all vLLM containers (including stopped ones):
Command: docker rm $(docker ps -aq --filter ancestor=nvcr.io/nvidia/vllm:25.11-py3)
If you have a named container, you can also directly:
Command: docker stop vllm-server
Command: docker rm vllm-server
Remove the container image:
Command: docker rmi nvcr.io/nvidia/vllm:25.11-py3
To also remove unused Docker containers and images:
Command: docker system prune -f
Important Note: These commands remove the vLLM container and the image. Downloaded models remain in the Hugging Face cache if you mounted the cache path.
Summary & Conclusion
Installing vLLM on the Gigabyte AI TOP ATOM is surprisingly straightforward thanks to compatibility with the NVIDIA DGX Spark playbooks. In about 30 minutes, I set up vLLM and can now run Large Language Models with maximum performance.
What particularly excites me: The performance of the Blackwell GPU is fully utilized, and the Docker-based installation makes the setup significantly easier than a manual installation. vLLM offers an OpenAI-compatible API, allowing existing applications to be integrated seamlessly.
I also find it especially practical that vLLM works with PagedAttention and Continuous Batching, which maximizes throughput and minimizes memory consumption. This makes it ideal for production use cases where multiple requests must be processed simultaneously.
For teams or developers needing a high-performance LLM inference solution, this is a perfect solution: a central server with full GPU power on which models can be executed with optimal performance. The OpenAI-compatible API allows existing applications to be integrated without code changes.
If you have questions or encounter problems, feel free to check the official NVIDIA DGX Spark documentation or the vLLM documentation. The community is very helpful, and most problems can be solved quickly.
Next Step: Production Deployment and Performance Tuning
You have now successfully installed vLLM and performed an initial test. The basic installation works, but that is just the beginning. The next step is configuration for your specific requirements.
vLLM offers many configuration options for production use: adjusting batch sizes, optimizing memory settings, enabling quantization for larger models, or running multiple models simultaneously. The documentation shows you how to optimize these settings for your workloads.
Good luck experimenting with vLLM on your Gigabyte AI TOP ATOM. I am excited to see which applications you develop with it! Let me and my readers know here in the comments.
Click here for Part 1 of the installation and configuration guide.


The tutorial offers a clear and practical guide for setting up and running the Tensorflow Object Detection Training Suite. Could…
This works using an very old laptop with old GPU >>> print(torch.cuda.is_available()) True >>> print(torch.version.cuda) 12.6 >>> print(torch.cuda.device_count()) 1 >>>…
Hello Valentin, I will not share anything related to my work on detecting mines or UXO's. Best regards, Maker
Hello, We are a group of students at ESILV working on a project that aim to prove the availability of…